You can apply text wrapping to shapes in CorelDRAW so that any paragraph text placed close to the shape will flow around the object instead of over or under it, as shown in the examples in Figure 1.
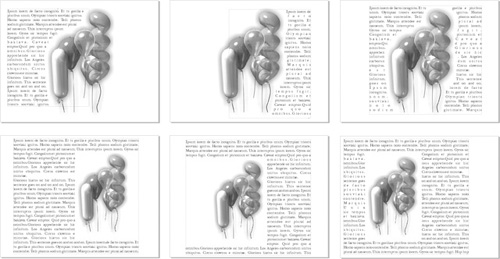
Several types of wrapping are available.
Contour wrapping The text is wrapped a line at a time around the outline of the object.
Square wrapping The text is wrapped around an imaginary rectangle that bounds the object with the wrap (its bounding box).
In
either case, the text can be made to flow down the left or right of the
object, or straddle it (flow down both sides). Square wrapping also
supports Above/Below, where no text flows to the sides of the object.
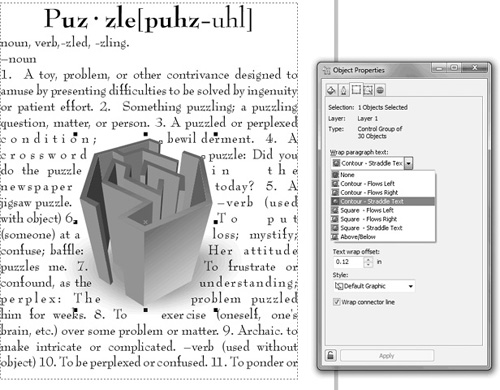
To apply Contour Straddle,
right-click the shape and select Wrap Paragraph Text from the pop-up
menu. To set a different wrapping type, select it from the General tab
of the Object properties docker (press ALT+ENTER).
Then set the margin distance, which is the gap between the outline or
bounding box of the shape and the paragraph text wrapped around it.
Note
Grouped
objects will accept Contour Straddle, but not all complex objects will.
For example, if you want to straddle text around a blend group, group
the blend objects first, or the Wrap Paragraph Text option will be
dimmed.
It’s
important to understand that text legibility can be at peril when you
wrap text around a highly freeform shape; it’s just not good layout, for
example, to create a zigzag-shaped wrap, causing the reader’s head to
whiplash every other line. Use wrapping text as a creative element, but
use your artistic eye to avoid unnecessarily hard-to-read paragraph
text.
Tip
Wrapping
affects only paragraph text. Text wrapping is not applied to the
wrapped text itself, only to the shapes that are wrapped by the text.
Fitting Text to Curve
Wrapping text around an
object has its alter ego: putting text inside a shape, so it looks as
though the text itself forms a shape. And there’s a third variation
called Fit Text To Curve—you
can have artistic text follow an arc, a freeform line, an open or
closed shape, and you have options for the style in which the text
follows your line.
Pouring Text into a Shape
The simplest way to form text
so it appears to have a geometry other than rectangular, is to first
create a shape, copy some text to the Clipboard if you don’t have a
message in mind, and then carefully position your Text tool just inside
the line of the shape (perhaps 1/8 of a screen inch inside) until the
cursor turns into an I-beam with a tiny text box at its lower right, and
then click to start typing, or click and then press CTRL+V
to paste your Clipboard text. Text inside a shape is paragraph text. Here’s an example of a creative use for shaped paragraph
text: the following mock article is about buttons, so the shape of the
paragraph text might look appropriate if it was shaped like... a button.
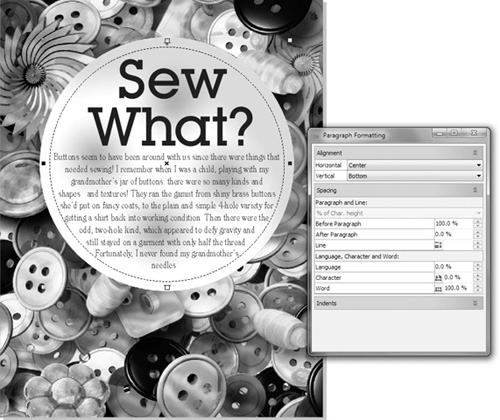
Creating a Round Text Frame
Open Sew what.cdr in CorelDRAW. The text has been provided for you in the margin.
With the Ellipse tool (F7) hold CTRL
to constrain the ellipse to a circle, and then drag a shape in the
document about 6” in width. Check the property bar if necessary to get
an approximation of the 6” circle.
Copy
the text at left to the Clipboard. It’s easiest to do this with the
Pick tool; the Text tool can also be used. Highlight the text and then
press CTRL+C to copy or CTRL+X to cut.
With
the Text tool, hover the cursor just inside the circle until it turns
into an I-beam cursor with a tiny “AB” to the bottom right, and then
click. Do not click if the cursor features an “A” with a wavy line—this
is the indication that you can put text along a curve, the wrong feature
for this example. With the insertion point for text inside the circle,
you could start typing, but for these steps, press CTRL+V to paste text from the Clipboard.
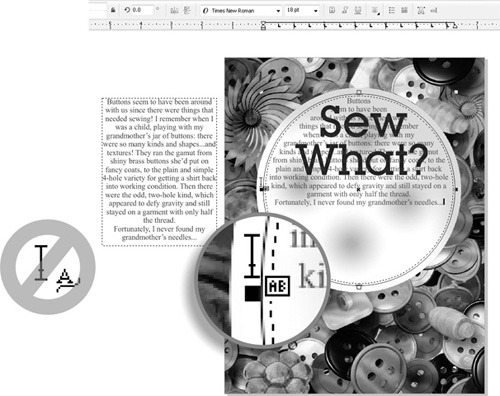
Choose
Text | Paragraph Formatting. If you’d created a half-circle into which
you poured the text, it would not obscure the headline in this example.
However, the text doesn’t fill the circle container, so you can align
the text to the bottom of the circle: choose Bottom from the Alignment | Vertical drop-down list on the Paragraph formatting docker.
With
the text selected, choose an appropriate typeface from your list of
installed fonts, accessed from the property bar. Then choose a font size
of your liking. Times New Roman—a Windows system font—works quite well
for this short text passage at 18 points.
If the text proves to be too large in point height, resize the container using the Pick tool—hold SHIFT
to contain the scaling, and magically the text reflows dynamically
until you release the object. You don’t always need to scale text;
sometimes scaling the text’s container is a more inspired way to finish a
design.
Make
the circle containing the text invisible: select the circle with the
Pick tool (check the status line to make sure the circle and not the
text is selected), and then right-click the no outline well on the color
palette, the top one with the “X” in it. Figure 2 shows the assignment nearing completion.
One very popular treatment for
text “bound” to an object is the arc of text. This is accomplished by
first creating the arc shape (a circle usually works well) and then
instead of clicking inside the shape, hovering your cursor above the
shape until your Text tool cursor becomes an I-beam with a tiny swooping
curve beneath it.
Follow these steps to flow text in a semicircle.
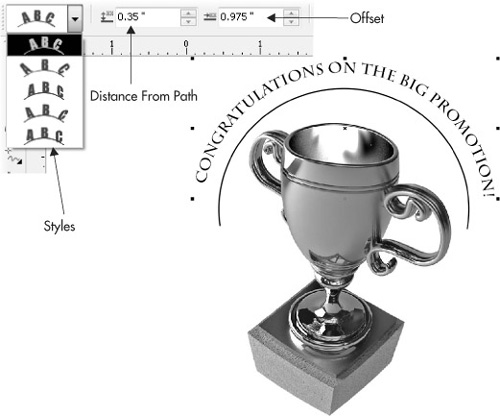
Text Along a Curve
Open Loving Cup.cdr. The graphic of the trophy could use some text surrounding the top.
Create a circle using the Ellipse tool.
With
the Shape tool, drag the Ellipse node away from the center of the
circle to create an open arc. Adjust each node until you have an arc
centered above the loving cup.
With
the Text tool, position the cursor just along the outline of the
circle, and then click an insertion point and begin to type. You’ll see
that the text follows the curve. What you type is up to you, but
“Congratulations” is a solid starter for graphics that involve a trophy!
If the text isn’t aligned to your liking, use the Offset spin box on the property bar to correct it.
If you’d like the text to be a little off the curve, use the Distance From Path spin box.
If
you’d like a truly wild and interesting style, a treatment of the text
such as a 3D ribbon look, check out the drop-down list at left on the
property bar. Click any of the styles to apply them. Figure 3 shows an example of an award; the circle still has an outline, but it takes one right-click to correct that.