Creating an XPS Document
The
XPS file format is a new universal format that produces a document that
looks exactly the same as it looked originally, regardless of which
computer you use to open or print the document. To create an XPS
document, you print it to the Microsoft XPS Document Writer from
whichever program you used to create the content.
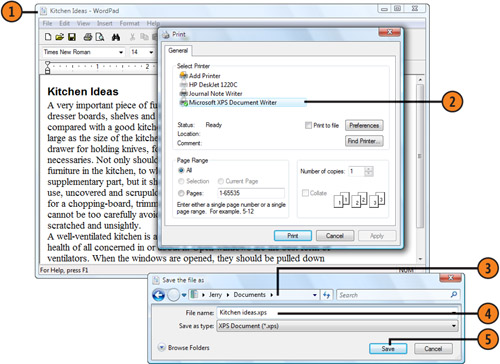
Create the Document
- 1. Create or open the document or other item—a photo, for example—in the
program you normally use, and choose to print the document. If the
program doesn’t let you choose a printer before printing, set the
Microsoft XPS Document Writer as your default printer.
- 2. In the dialog box that appears, select Microsoft XPS Document Writer if
it isn’t already selected, make any other settings you want, and then
click Print.
- 3. In the Save The File As dialog box that appears, specify where you want the file to be stored.
- 4. Enter a name for the file.
- 5. Click Save to create the file.
Tip
XPS stands for XML Paper Specification, and XPS documents are usually viewed using Internet Explorer. |
Caution
You’ll
need an XPS Viewer to view XPS documents. An XPS Viewer add-on to
Internet Explorer is already installed on computers running Windows
Vista, but the Viewer might not be installed on computers using earlier
versions of Windows or on other operating systems. If the Viewer isn’t
installed, you can download and install it from Windows Update. |
Scanning a Picture
A
scanner is an excellent tool for digitizing images and making them
available on your computer. Windows Vista provides access to your
scanner directly from the Windows Photo Gallery, provided the scanner
uses a Windows Acquisition driver (WIA) rather than a TWAIN driver. The
New Scan dialog box adapts to the specific features of your scanner, so
the options you see in the dialog box might be a bit different from
those described here.
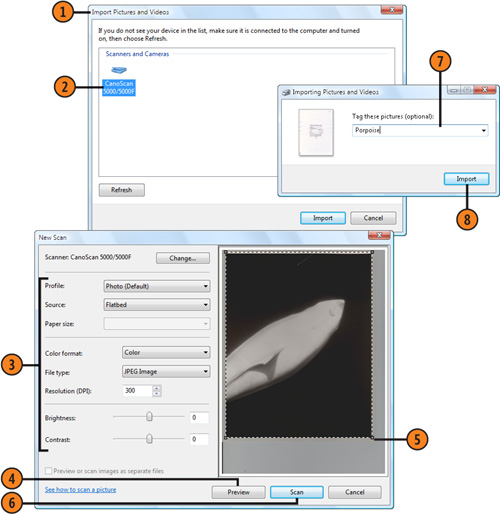
Scan a Picture
- 1. In Windows Photo Gallery, click the down arrow next to the File button,
and choose Import From Camera Or Scanner from the drop-down menu to
display the Import Pictures And Videos dialog box.
- 2. Double-click your scanner to display the New Scan dialog box.
- 3. Make any changes you want to the scanner settings.
- 4. Click Preview to do a quick scan of the picture and to preview it. Make
any setting changes, such as brightness, that you want, and click
Preview again.
- 5. Drag the selection rectangle, if necessary, to limit the scan to your picture.
- 6. Click Scan, and wait for the picture to be scanned.
- 7. In the Importing Pictures And Videos dialog box that appears, type a
tag for the picture, or select a tag from the drop-down list to
classify the picture and provide a name for the file.
- 8. Click Import to import the picture onto your computer and into Photo Gallery.
Scanning Anything
You
can scan any item—a drawing, a newspaper article, a piece of patterned
fabric—directly into Windows Paint, provided the scanner uses a Windows
Acquisition driver (WIA) rather than a TWAIN driver, using the settings
you want. Then you can save the scan of the item in the format and
location you want.
Scan
- 1. In Windows Paint, choose From Scanner Or Camera from the File menu to display the Scan dialog box.
- 2. Select the type of scan result you want.
- 3. If you want to make custom settings, click Adjust The Quality Of The
Scanned Picture to display the Advanced Properties dialog box.
- 4. Make any changes you want, and click OK.
- 5. Click Preview to do a quick scan of the picture and to preview it.
- 6. If the selected area doesn’t match your item or the part of it you
want, drag the handles in the preview to change the selected area.
- 7. Click Scan.
- 8. Preview the scan in Paint, and make any modifications you want.
- 9. Choose Save from the File menu, and save the scan in the file format and location you want.
