A custom image can be deployed as easily as taking an
answer file and copying it to a USB flash drive (UFD) device. Place a
Windows Vista DVD into a computer; then plug in the UFD device and
ensure that the DVD drive is the first bootable device. When Setup.exe runs from the Windows Vista DVD, it first looks for an answer file on removable media.
Several configuration
passes occur during the different phases of Windows Vista Setup. When
performing unattended installations, you must heed the issues of each of
these phases as well as what settings can or should be made during a
specific configuration pass. You need to be familiar with the important
aspects of the configuration passes as they apply to the previous
discussion of the objectives related to the 70-622 exam.
Following are the configuration phases involved in Windows Vista Setup:
WindowsPE
offlineServicing
specialize
generalize
auditSystem
auditUser
oobeSystem
The first two
configuration phases, windowsPE and offlineServicing, run prior to the
first reboot. The windowsPE configuration pass is used to configure the
Windows PE environment as well as the ensuing Windows Vista Setup
options. In this pass of the answer file, you include settings for the
disk partitions as well as the product key. The offlineServicing
configuration pass updates the Windows image prior to the system
restarting when the Windows image has been copied to the local drive.
After the first
reboot, Windows Vista Setup runs the specialize phase. Within this phase
is the configuration of the network settings, any international
settings, and possible domain information.
When Windows
Vista Setup has completed, the oobeSystem configuration pass runs. In
this phase you are presented with Windows Welcome. Then you are prompted
for user creation, a license key if not already entered, and a computer
name if not already set.
The rest of the phases apply depending on your use of the Sysprep options.
The generalize configuration phase runs immediately after being invoked when you use the Sysprep.exe /generalize
command during the image creation process. This phase removes all
unique identification from the computer, such as domain affiliation,
computer name, SID, and some hardware-specific settings. It also ensures
certain settings persist in the image from the master computer.
The auditSystem and auditUser configuration passes run if you used the Sysprep.exe /audit
options when resealing the image to deployed. When the computer image
is deployed and the computer is booting up, the auditSystem phase runs
prior to your logon or in system context. Settings from an unattended
setup are applied if set to be configured in the auditSystem phase. When
you log on to the computer, the auditUser configuration phase is
processed. Neither phase runs unless the computer boots into audit mode.
If you are to deploy a captured image, you must take a few additional steps. If you recall, a captured image was stored as a .WIM
file. You can now deploy this image onto your desktop. Essentially, all
you need is the image file; a share point from which to pull the source
image; and a Windows PE 2.0 RAM CD to boot the target system, prepare
the target system, and acquire the image from the share.
Exam Alert
The three essential steps involved in deploying an image to a system are
1. | Boot the system using a Win PE 2.0 CD/DVD.
|
2. | Use DiskPart to partition the disk and set the active partition.
|
3. | Use ImageX to pull down a prepared image file (.WIM) from a network server.
|
Although an answer file is involved within the final step, understanding the order of the these steps is crucial.
To apply the custom answer file
to the deployed image to automate the rebooting of the systems, you can
choose from one of several methods:
You can have it sealed into your image by using the Sysprep.exe /unattended:answerfile option.
You can seal it into the image as a file in one of several different directories.
You can place it into various directories such as %Systemdrive%, %Windir%\panther\unattend, %Windir%\system32\sysprep, or others.
You can place it on removable media so that it can be found during the ensuing bootup process of the new image.
Note
Using the XML Answer File There is an order of precedence as to which Unattend.xml or AutoUnattend.xml
is chosen during this process. It is incumbent upon you, as the IT
administrator, to research this issue. The preceding is not meant to be
an exhaustive list of where and how a specific answer file is chosen. In
addition, the name of the answer file must be AutoUnattend.xml in the windowsPE and offlineServicing passes.
Deploy the Custom .WIM file
Deploying
the image requires once again pulling out the trusty Windows PE CD and
booting the target system from it. After you have booted up, you use
another tool found in the Windows PE image: DiskPart.
DiskPart allows you to wipe the disk clean, partition it, format the partition(s), and set an active partition. Figure 1 shows a Windows PE CD booted up and performing the necessary steps to partition the disk using DiskPart.

After the disk has been prepared, you again use ImageX. This time, you use ImageX to acquire the .WIM file from the share and target a partition of a drive on the local computer. You need to map a drive to the share using the net use command from the command line. With the drive mapped, you just need to use ImageX /apply/apply option is used with the image filename (source), image number (number of the image within the .WIM file), and image pathname (target). For example: to acquire the image from the share. The
imagex /apply y:\fourthcoffee.wim 1 c:\
This command applies an image located on the mapped drive Y: using the first image in the .WIM file and applies it to the local C: drive.
After acquiring the image, you may need to use the command-line tool BCDedit
to manage the Boot Configuration Data (BCD) files. The BCD files are
the new store for the boot application settings and replace the legacy boot.ini file found in previous Window versions. Bootmgr, a new boot loader, initiates the boot process by reading the BCD file.
Figure 2 shows the final steps in deploying a .WIM file onto the target system.
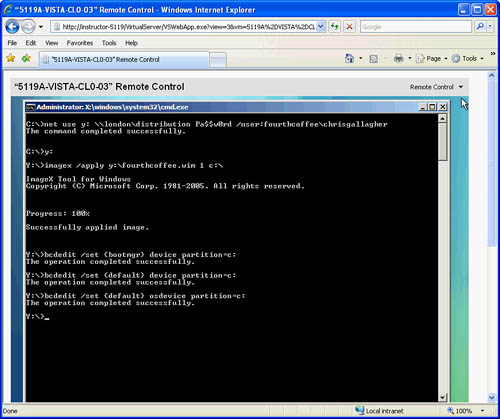
In Figure 2, ImageX acquired the image file fourthcoffee.wim, and BCDedit configured the BCD data store. Several options were used with several different issuances of the BCDedit command:
/set {bootmgr}— Updates the BCD Boot Manager settings to point to the correct device partition.
/set {default}— Updates the BCD default Windows Loader objects to point to the correct device partition.
/set {default} osdevice—
Also updates the BCD default Windows Loader objects to point to the
correct partition of the primary operating system partition.
Image Management
The
image files Windows Vista uses for deployment allow for multiple images
to be stored within one file. This feature allows an enterprise that
has images required for multiple PC platforms, such as different brands
of laptops and desktops, to store its entire set of images in a minimum
of two files. An individual .WIM file is required to store images for the 32-bit platforms, and another .WIM
file is required to store images for the 64-bit platforms. Even images
involving different languages may be stored together within a single .WIM file.
The use of a single .WIM file allows only a single administrator to open that file for deployment. When you are deploying or modifying a .WIM file, the file is locked for single use.
Caution
Watch Out for Locked .WIM Files The use of a single .WIM
image file allows only a single administrator to open that file,
whether for deployment or for modifications to the images stored, or for
adding images to the .WIM file.
