Performing Windows Memory Diagnostics
Modern operating systems
such as Windows Vista rely heavily on the use of system memory to speed
up common operations. Random access memory (RAM) chips are a very
reliable component of the computer’s architecture. Because they have no
moving parts, they’re not as likely to fail as other components such as
fans or hard disks. However, memory-related issues can cause a variety
of problems on the computer. Symptoms can range from application crashes
to a complete shutdown or restart of the operating system. The results
could include data loss and reduced system reliability.
During normal
operations, Windows Vista attempts to detect memory-related errors. For
example, if an application has crashed or an operating system feature
stops working correctly, the detection process might determine that
physical memory is a potential cause of the problem. In this case,
Windows Vista displays a notification icon in the system tray,
recommending that the user run a diagnostic test.
Starting the Memory Diagnostics Tool
The Memory Diagnostics
Tool is designed to test the physical memory installed in the computer.
Because the analysis process requires direct access to memory hardware,
you must run this utility before you start the operating system. There
are two main ways to instruct the system to perform a memory diagnostic
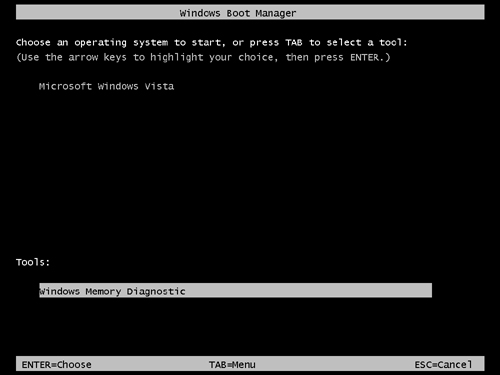
test. The first is to choose this option during the boot process (see Figure 7).
To access boot options, press F8 prior to the system startup process.
When the boot menu appears, the user can select the appropriate startup
menu option to launch the utility. To access that option, press the Tab
key, select Windows Memory Diagnostic, and press Enter. This method is
most appropriate when the operating system is not running (or will not
boot), and you suspect that the root cause of the issue is the physical
memory in the system.
In other cases, you
might currently be running Windows Vista and either receive a
memory-related alert or want to perform a memory diagnostic. In this
case, you can launch the Memory Diagnostics Tool by using a shortcut in
the Administrative Tools program group or by searching for it using the
Start menu. Figure 8 shows the available options.
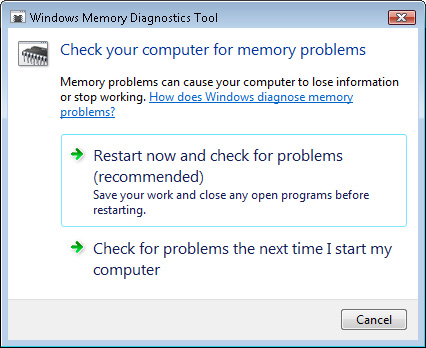
Both
options have the same effect: they instruct Windows Vista to boot into
the Memory Diagnostics Tool automatically when the system restarts. The
first option automatically performs a restart immediately, whereas the
second option specifies that the diagnostics should run whenever the
computer is restarted.
Performing Memory Diagnostic Tests
Regardless of the
method used to launch the Memory Diagnostics Tool, the system boots to a
text-based user interface. A standard memory test begins to run
automatically, as shown in Figure 9.
Two test passes are executed, each of which runs many different
operations to verify that the system’s physical memory is working
properly. For the majority of cases, the default test options are
appropriate.
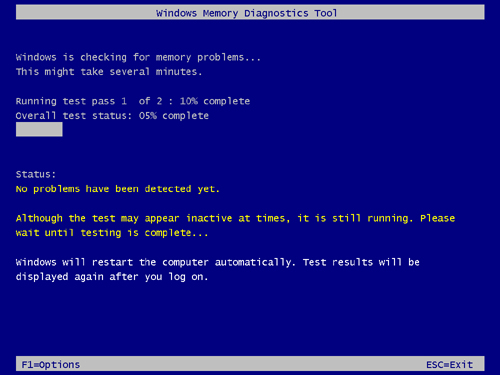
If you want to run specific tests or change diagnostic settings, you can press F1 to access memory diagnostics options (see Figure 10). Use the arrow keys to make settings changes within a section and the Tab key to move between the sections.
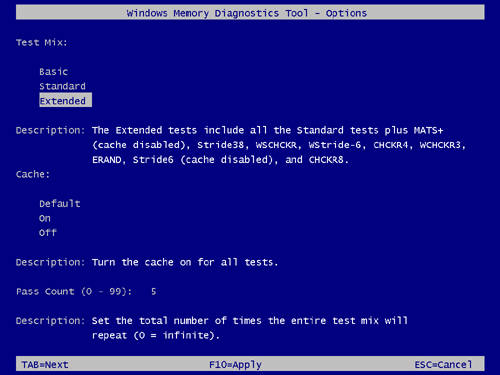
The available options include the following:
Test Mix (Basic, Standard, or Extended)
These settings control which tests the tool runs to analyze physical
memory. The Basic test runs more quickly than the default (Standard)
option, and the Extended test takes more time but performs a more
rigorous diagnostic.
Cache
The Windows Memory Diagnostics Tool can use memory caching options to
improve performance. Various operations in the selected test mix might
automatically enable or disable cache settings. Therefore, the Default
setting enables each test to use its recommended settings. You can also
choose to enable or disable the cache for all tests, regardless of the
default settings.
Pass Count
The final option specifies how many test passes the Windows Memory
Diagnostic process executes. Because memory-related problems can be
intermittent (that is, they might occur relatively rarely), you might
want to configure the tests to run many times to be reasonably sure that
the system memory is performing adequately. The available values are 0
to 99. The value of 0 specifies that the memory test runs continuously
until you manually interrupt the process.
When you have chosen the options that you wish to use, press F10 to apply the settings and start running the tests.
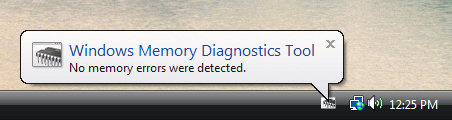
Viewing Memory Diagnostics Results
You can view the
progress of the memory test as it is running by using the text-based
user interface. The Status section reports any errors the tool finds.
The Memory Diagnostics Tool automatically restarts the system as soon as
it completes testing. The next time a user logs on to Windows Vista, a
notification is displayed providing the results of the last memory
diagnostic test (see Figure 11).
If the system
did detect a problem, the Memory Diagnostics Tool might provide
additional details. In general, any errors that are indicated will be
based on a physical hardware problem. To resolve the issues, users
should contact their computer manufacturers or technical support
personnel for information on how to resolve the issue.
