Most Windows PE tasks have
just a few basic steps. Applications and customizations might vary the
process somewhat, but the basic process is the same. This section gives
you an overview of the Windows PE build process.
Applying Windows PE
After you create the Windows PE build
environment, the first step in creating a new Windows PE build is to
apply the Windows PE base image to the build. This process essentially
copies the Windows PE source files from the .wim image file to the build
folder. Use ImageX to apply the Windows PE base image. See the “What is
ImageX” in the Windows Automated Installation Kit User’s Guide
for more information about ImageX and .wim image files. An example of
the command to apply the base image is shown here (where 1 is the image
number within Winpe.wim to be applied and c:\winpe_x86\base is the path in which to copy the image contents):
imagex /apply .\x86\winpe.wim 1 c:\winpe_x86\base
Note
.\x86\winpe.wim specifies
the location of the .wim file for the x86 platform within the PETools
folder. You must create the base subfolder in the C:\winpe_x86 folder
before running this command. |
Adding Optional Components
This Windows PE base image includes a number of
pre-staged application support components; you can add more if they are
available. To import an additional component or language pack to the
base Windows PE build image, use the Peimg.exe command.
Before you can install a component or language
pack, you must first import it. This process makes the component or
language pack part of the base build image’s component store.
If you don’t install the component, it will be removed from the final
image when it is captured. Once you have imported all required
components, you must install them to make them part of the final Windows
PE build.
To import a component into the component store
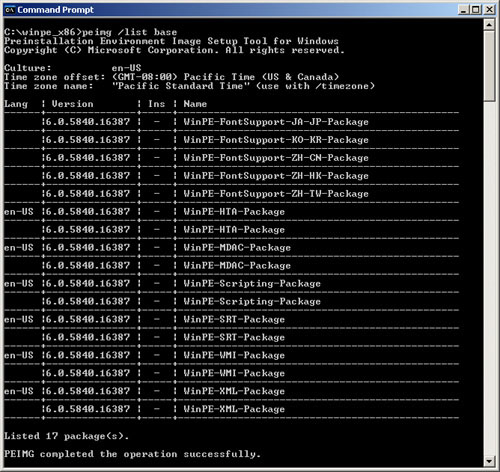
1. | List
the components, or packages, in the component store to see if the
component is already present by running the following command (see the
sidebar “Pre-Staged Components” for descriptions of these components):
peimg /list c:\winpe_x86\base
This command displays a list of packages in the current image. A
plus sign (+) in the INS column indicates installed packages and a
minus sign (-) indicates not installed packages. For more information
about Peimg.exe, see the “PEImg Command-Line Options” in the Windows
Automated Installation Kit User’s Guide.
|
2. | Use
the Peimg.exe command to import the component. The following command
imports the French Base Language Pack for Windows PE from the Windows
AIK DVD (D: in this instance):
peimg /import=D:\winpe_langpacks\x86\fr-fr\lp.cab c:\winpe_x86\base
|
Note
Many components you can
import also include their own language packs. For instance, the base
components included with Windows PE have language packs on the Windows
AIK DVD. Be sure to import the applicable accompanying language packs so
that you can use the components in the language you require. |
To install a component that is already in the component store
1. | List
the components in the component store to get the full name of the
component to be installed. You can also use the component names
described in the sidebar “Pre-Staged Components.”
|
2. | Use the Peimg command to install the component that you imported. The following example installs language packs into the build:
peimg /install=Microsoft-Windows-WinPE-LanguagePack-Package c:\winpe_x86\base
|
Note
You can use wildcards in the install command. Using the string /install=*LanguagePack* in the preceding example would install all imported language packs. |
|
The base Windows PE image in the Windows AIK
build includes a number of pre-staged components. These components have
been imported into the base component store, but are not actually
installed into the image. When you prepare and capture the image, these
components will be removed if not installed using the peimage /install command. Components included with (but not installed into) the base image include:
WinPE-HTA-Package HTML Application support) WinPE-MDAC-Package Microsoft Data Access Component support WinPE-Scripting-Package Windows Script Host support WinPE-SRT-Package Windows Recovery Environment component WinPE-XML-Package Microsoft XML (MSMXL) Parser support
You can apply additional components, language packs, and device drivers to the image as well.
|
Copying Applications
You
can also copy applications into the Windows PE image build so that you
can use them during the Windows Vista implementation process.
To copy an application into a base build
1. | Use operating system copy commands to copy the application to the appropriate location:
xcopy /chery myapp.exe “c:\winpe_x86\base\program files\myapp\myapp.exe”
|
Adding Device Drivers
Windows PE can make use of Windows Vista device
drivers to provide hardware support for Windows Vista installation
processes. Use the Peimg command to add device drivers to the base
Windows PE build (offline), where path is the path containing the device driver .inf files:
peimg /inf=path c:\winpe_x86\base
Windows PE can also add device drivers
dynamically when running (online). Use the drvload.exe command to load
device drivers while operating:
drvload.exe path[,path]
Installing Updates
You install updates to Windows PE using the same
process by which you add components: You import them into the component
store, and then you install them.
To install a Windows PE update to the build
1. | Import the update using the Peimg tool, where update.cab is the name of the file containing the update:
peimg /import=update.cab c:\winpe_x86\base
|
2. | List components to get the full name of the update:
peimg /list c:\winpe_x86\base
|
3. | Install the update, where full_name_of_update is the name of the update you found in step 2:
peimg /install=full_name_of_update c:\winpe_x86\base
|
