For your convenience, the
Quick Access toolbar appears in the upper-left corner of the screen no
matter where you go in OneNote. This toolbar offers a handful of useful
buttons you can click: Back, Undo, Dock to Desktop, and Full Page View.
Because these commands are on the Quick Access toolbar, they are always
available.
OneNote offers the
opportunity to add more buttons to and remove buttons from the Quick
Access toolbar. You can also change the order of buttons and move the
Quick Access toolbar below the ribbon.
Use these techniques to customize the Quick Access toolbar:
Add buttons: OneNote offers these methods of adding buttons:
Right-click a button on any tab and choose Add to Quick Access toolbar.
Click the Customize Quick Access Toolbar button (it’s located to the right of the toolbar) and choose a button on the gallery.
Open
the Customize the Quick Access Toolbar window, choose a command, and
click the Add button. To open the Customize the Quick Access Toolbar
window, right-click the Quick Access toolbar and choose Customize Quick
Access Toolbar.
Remove buttons: OneNote offers these methods of removing buttons from the Quick Access toolbar:
Right-click a button and choose Remove from Quick Access toolbar.
Click the Customize Quick Access Toolbar button (located to the right of the toolbar) and clear a button on the gallery.
Open
the Customize the Quick Access Toolbar window, select a button, and
click the Remove button. Right-click the Quick Access toolbar and choose
Customize Quick Access Toolbar to open the window.
Change
the order of buttons: Open the Customize the Quick Access Toolbar
window, select a button, and click the Move Up or Move Down button. To
open this window, right-click the Quick Access toolbar and choose
Customize the Quick Access Toolbar.
Move
the toolbar below the ribbon: Right-click the Quick Access toolbar and
choose Show Quick Access Toolbar Below the Ribbon on the shortcut menu.
To return the Quick Access toolbar to the top of the screen, right-click
the toolbar and choose Show Quick Access Toolbar Above the Ribbon.
Reset
the Quick Access toolbar: Right-click the Quick Access toolbar and
choose Customize Quick Access Toolbar to open the Customize the Quick
Access Toolbar window. Then click the Reset button and choose Reset Only
Quick Access Toolbar on the gallery.
1. Add and Remove Quick Access Toolbar Buttons
Right-click the Text Highlight Color button and choose Add to Quick Access toolbar to add this button to the toolbar.
Click the Customize Quick Access Toolbar button.
Select Redo on the gallery to add the Undo button to the toolbar.
Right-click the Quick Access toolbar and choose Customize Quick Access Toolbar to open the OneNote Options dialog box to the Customize the Quick Access Toolbar window.
On the left side of the window, select the Cut button.
Click Add to add the Cut button to the Quick Access toolbar.
Click OK.
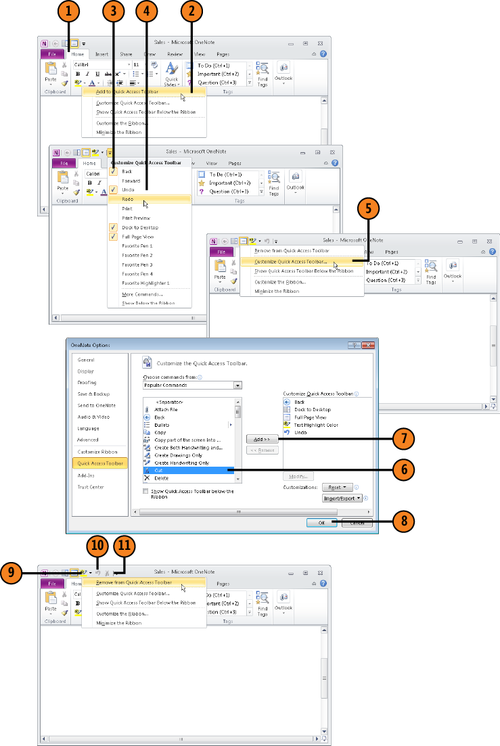
Right-click the Text Highlight Color button on the Quick Access toolbar and choose Remove from Quick Access Toolbar.
Right-click the Undo button and choose Remove from Quick Access Toolbar.
Right-click the Cut button and choose Remove from Quick Access toolbar.
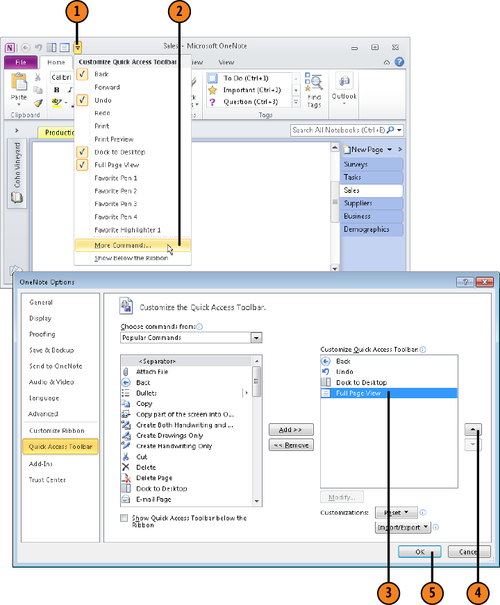
2. Change the Order of Buttons on the Quick Access Toolbar
Click the Customize Quick Access Toolbar button.
Choose More Commands on the gallery to open the Customize the Quick Access Toolbar window.
On the right side of the screen, select the Full Page View button.
Click the Move Up button.
3. Reposition the Quick Access Toolbar
Right-click the Quick Access Toolbar and choose Show Quick Access Toolbar Below the Ribbon.
Right-click the Quick Access toolbar and choose Show Quick Access Toolbar Above the Ribbon.
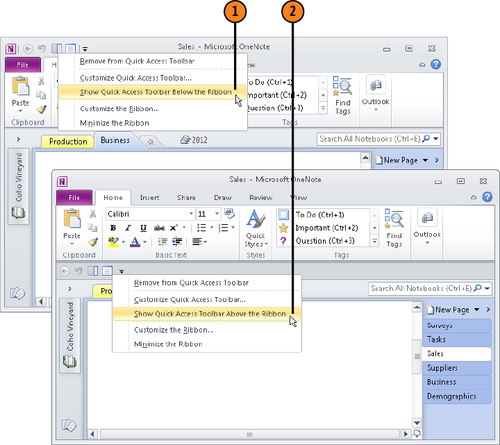
Tip:
You can also reposition
the Quick Access toolbar by clicking the Customize Quick Access Toolbar
button. On the shortcut menu, choose Show Below the Ribbon or Show Above
the Ribbon.
4. Reset Quick Access Toolbar Customizations
Right-click the Quick Access toolbar and chose Customize Quick Access Toolbar.
Click Reset and choose Reset Only Quick Access Toolbar on the gallery.
Click Yes in the Are You Sure? message box.

