1. Adding Text to Shapes
In some Visio diagrams, the shapes are self-explanatory. In many drawings, however, you need to label the shapes.
In this exercise, you will add text to existing shapes.
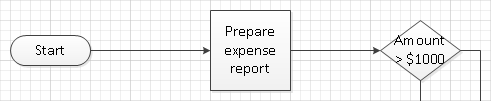
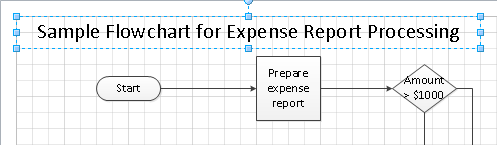
On the left side of the page, click once (don’t double-click) on the start/end shape, type Start, and then click anywhere on the page background to finish text editing.
Because the default font size is very small, in the next steps you will increase the size for all shapes on the page.
Press Ctrl+A to select all shapes.
Font Size

On the Home tab, in the Font group, in the Font Size list, click 14 pt. The text in your start/end shape is more legible.
Double-click the process shape to the right of the start shape, type Prepare expense report, and then click anywhere on the background of the page.
When
you click outside of the shape, notice that the dimensions of the shape
change—it grows taller. The process box is an example of a shape that
expands automatically when the amount of text exceeds its size.
Click once (don’t double-click) on the decision shape, press F2, type Amount > $1000, and then click outside of the shape.
Tip:
F2 is a Visio keyboard shortcut that enters and exits text edit mode.
Note:
Save your changes to the Text Exercises drawing but leave it open if you are continuing to the next exercise.
Tip:
You
added text to shapes in Steps 1, 4, and 5 in this exercise. You may
have noticed that you were instructed to use a different method each
time. For most Visio shapes, the three methods of entering text edit
mode—single-click and start typing; double-click; and select the shape
and press F2—are interchangeable. You will find exceptions to this rule,
but most shapes behave as you saw in this exercise.
2. Creating and Formatting Text Boxes
Although a picture can be worth a thousand words, sometimes you still need a few words.
In this exercise, you will create and format a text box to use as a page title.
Note:
You need the Text Exercises drawing that you created in the previous exercise.
Text

On the Home tab, in the Tools group, click the Text button. The cursor changes to a plus sign with a page icon below it.
Click
in the upper-left corner of the drawing page and drag to create a text
box that is approximately 6 inches (150 mm) long. Visio automatically
zooms in so you can type in the text box.
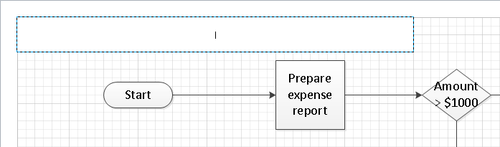
Type Sample Flowchart for Expense Report Processing.
Pointer Tool

On the Home tab, in the Tools group, click the Pointer Tool button. Visio closes the text box, returns to the previous zoom level, and leaves the text box selected.
Tip:
If you want to continue
working with the Text tool to create another text box, you can close the
current text box by pressing the Esc key.
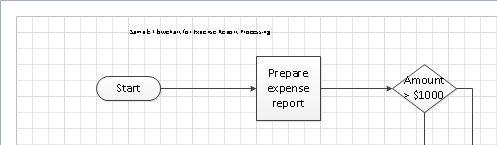
The text in the page title box is a bit small!
Font Size

On the Home tab, in the Font group, click the Font Size arrow. As you point to various font sizes, notice that Visio provides a live preview of the results on the drawing page.
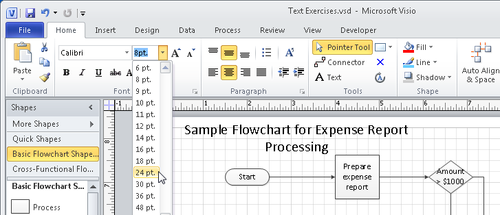
Select 24 pt. as the new font size.
Because
the text wraps inside the text box at this font size, drag the right
resize handle to the right until the text no longer wraps.
At this point, you can use all
of the usual text manipulation tools in the Font and Paragraph groups on
the Home tab to apply other fonts, colors, and text styles or to add
bullets or numbers and reposition the text within the text box.
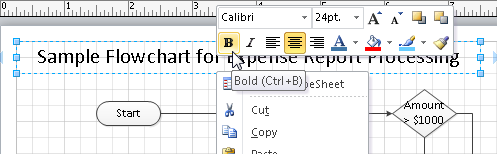
Right-click on the text box, and then click the Bold button on the Mini Toolbar to make the title text bold.
Tip:
The Mini Toolbar functions that include menus—text color, fill color, and line color—all include Live Preview.
Note:
Save your changes to the Text Exercises drawing, and then close it.
Tip:
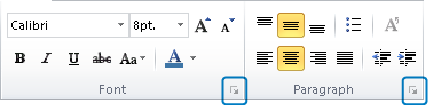
If you are a long-time Visio
user and prefer to use the legacy text formatting dialog boxes, they
are still available. Just click the dialog box launcher in the Font and
Paragraph groups on the Home tab (refer to the following graphic).
Tip:
To apply changes to all of the
text in a text box, select the box by using the Pointer Tool before
making changes. To change only part of the text, double-click the text
box to enter edit mode, and then select the specific text you want to
change. (As an alternative to double-clicking the text box, you can
select the text box by using the Text tool, which automatically enters
edit mode.)
