Visio 2010 provides an enhanced Dynamic Grid.
The purpose of the Dynamic Grid is to help you position a shape with
greater accuracy as you drop it on the page, eliminating much of the
need to drag and nudge the shape into alignment after you’ve placed it
on the page.
In this exercise, you will
create a drawing from a stencil containing basic Visio shapes. In the
process of doing so, you will use the Dynamic Grid. You will also create
several shapes using Visio’s drawing tools.
Note:
Start Visio, or if it’s already running, click the File tab, and then
click New. In the Template Categories section, click General, and then
double-click the Basic Diagram thumbnail. Save the drawing as Basic shapes.
Drag a Rectangle shape onto the drawing page and position it toward the upper-left corner of the page.
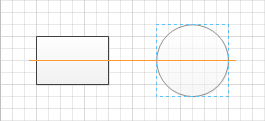
Drag a Circle
shape onto the drawing page and position it to the right of the
rectangle. Before you release the mouse button to drop the circle, move
it up and down on the page.
As
you move the circle, you see an orange, horizontal line appear when the
circle is in certain positions relative to the rectangle. This line is
part of the Visio 2010 Dynamic Grid feature that assists you in aligning
and spacing shapes.
From
left to right in the following graphics, you can see the Dynamic Grid
line when the circle is aligned with the top, center, and bottom of the
existing rectangle.


Note:
If the Dynamic Grid lines
don’t appear as you move shapes near others already on the page, it is
probably because the feature is turned off for this drawing. To activate
the Dynamic Grid, on the View tab, in the Visual Aids group, click the
Dynamic Grid button.
Use
the Dynamic Grid to align the circle with the center of the rectangle
and drop it approximately 1 inch (2.5 cm) to the right of the rectangle.
Tip:
Use of the Dynamic Grid lines is
not restricted to positioning new shapes as you drop them from the
stencil. The Dynamic Grid lines also appear when you reposition existing
shapes on the page.
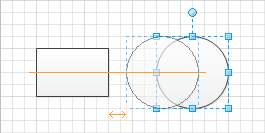
Click on the circle and drag it closer to the rectangle.
The
Dynamic Grid centerline appears, and if you’ve located the circle a
certain distance from the rectangle, a second Dynamic Grid element will
appear. When the distance between the two shapes matches the default
spacing interval for this page, a double-headed arrow appears.
Press Ctrl+Z to undo the shape movement and position the circle back where you originally dropped it.
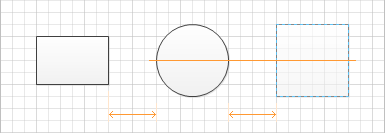
Drag a Square shape onto the page and position it on the right side of the circle but don’t release the mouse button yet.
Use
the Dynamic Grid to align the square with the center of the circle and
then move the square left and right until the orange double-headed arrow
appears.
Notice that
the double-headed arrow shown in the following graphic is longer than
the double-headed arrow shown in the graphic after Step 4 and that there
are two of them, not one. In Step 4, the double-headed arrow shows that
the interval between your shapes matched the drawing’s default spacing.
In this example, the pair of double-headed arrows indicates that your
new shape is the same distance from the circle that the circle is from
the rectangle.
Release the left mouse button to drop the square.
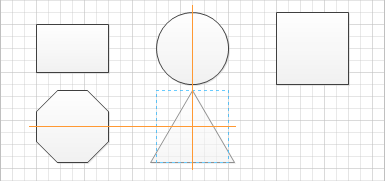
Continue to experiment with the Dynamic Grid by dragging an Octagon shape below the rectangle on the drawing page.
As
shown in the following graphic, the Dynamic Grid can provide guidance
in two directions at once: the vertical line shows alignment with the
rectangle; the pair of longer double-headed arrows shows horizontal
spacing; the short double-headed arrow highlights vertical spacing.

Release the left mouse button to drop the shape.
Drag a Triangle
shape to the right of the octagon and below the circle. Once again,
notice that the Dynamic Grid can work in two directions simultaneously.
Now that you’ve added five
shapes to the page by using a Visio stencil, it’s time to create some
shapes of your own using the Visio drawing tools.
Rectangle

On the Home tab, in the Tools group, click the Rectangle tool. Notice that the cursor changes to a plus sign with a rectangle to the lower right.
Warning:
Important
The Rectangle tool is one of six
tools on the same menu that is located immediately to the right of the
Pointer Tool. The button on this tool shows the Rectangle tool each time
you start Visio. However, Visio always displays the most recently used
tool on the button. Consequently, if you have previously used a
different tool, the button and the popup tooltip text may show any one
of the six tools. There are two tools that draw two-dimensional shapes:
Rectangle and Ellipse. There are four tools that draw lines: Line,
Freeform, Arc, and Pencil.
Click anywhere on the drawing page and drag down and to the right to draw a rectangle.
Tip:
You can constrain the Rectangle tool so it only draws squares by holding down the Shift key while dragging the mouse.
Ellipse

On the Home tab, in the Tools group, click the Ellipse tool, and then drag to create an ellipse to the right of your rectangle.
Tip:
You can constrain the Ellipse tool so it draws only circles by holding down the Shift key while dragging the mouse.
Note:
Save your changes to the Basic shapes drawing but leave it open if you are continuing with the next exercise.
Dynamic Grid

Although you have used the
Dynamic Grid in this exercise while working with simple, geometric
shapes, it is also useful with more complex shapes. However, if at any
time you prefer to work without the Dynamic Grid, you can turn it off:
on the View tab, in the Visual Aids group, click the Dynamic Grid
button.
