Windows 7 introduces a new organizational element called libraries, which make
it easier to view, sort, search, and filter similar items, even when
those items are stored in multiple physical locations. A library is, in
essence, a virtual folder that aggregates the contents of multiple
folders stored on your computer or on your network. You can sort,
filter, group, search, arrange, and share the data in a library as if it
were in a single location.
If you look only at the four
default libraries
included in a user profile, you might have trouble seeing the point of
libraries, especially if you have a single user account and your
computer isn't connected to a network. The true advantages of libraries don't become obvious
until you customize the default libraries or create new, custom
libraries. Consider the following scenarios:
Large digital
media collections You keep your favorite music and pictures in the My Music
folder on your notebook so that you have it available when you leave
home. The bulk of your collection, including large high-definition movie
files and albums you don't listen to regularly, are stored on an
external hard drive. By arranging content on the external drive into
Music, Pictures, and Videos folders and then adding those folders to the
corresponding libraries in Windows Explorer, you have full access to your entire
collection when you're home and connected to the external drive.
Workgroup projects You and some
coworkers are collaborating on a project. Your drafts are stored in a
subfolder of the Documents folder on your local hard disk. You also need
access to shared graphics on a network file server, and final drafts
from you and your coworkers will be saved in another shared network
folder. By adding the local Drafts folder and the two network folders to
a custom library,
you can search and browse through all those files from one virtual
location.
Homegroup projects At the end of every year, you create a holiday newsletter to
send to friends and family. You create a custom library that includes
one local folder where you copy photos that will go in the newsletter.
You also save the draft of the newsletter here. With two clicks, you can
share the custom library with your homegroup so that other family
members can add their own files and photos to the project.
School-related or
work-related projects You keep
documents, notes, spreadsheets, and other files organized in subfolders,
one for each client or project you're working on. Adding those
subfolders to a custom library allows you to quickly browse a single
subfolder or search through all folders at once. Searching for
proposals, contracts, or homework assignments can help you find a
document you did for a previous project, adapt it for a new project, and
save it quickly in the correct subfolder.
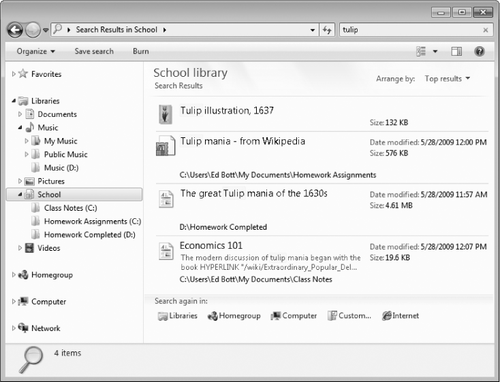
Figure 1 illustrates two of these scenarios
in use. The computer is a notebook with limited storage on the main
drive (C) and a large external USB drive (D) with a large collection of
MP3 and WMA tracks in a Music folder. We've added the Music folder from
the external drive to the Music library and created a custom School
library with three folders for class notes and homework. The search
results show files from multiple locations within the search folder, all
containing the search term tulip.
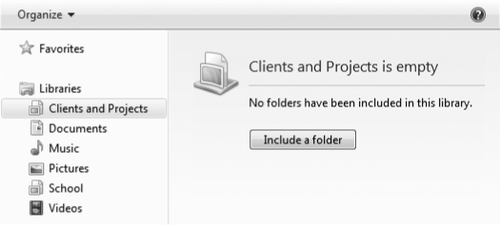
To create a new library,
click the Libraries heading in the navigation pane and then click the
New Library button on the toolbar (or right-click Libraries and click
New, Library). Give the new library a descriptive name and then press
Enter. Your newly created library appears in the navigation pane. Click
the Include A Folder button to populate the library.
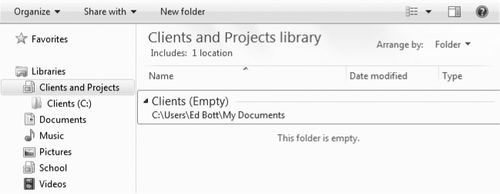
Using the Include Folder
dialog box, select the folder you want to use as the default location
for saving files in this library and then click Include Folder. That
opens the library and lists the contents of the folder you just
selected. At the top of the contents pane is the Library pane; the link
below the library name lists the number of locations it includes—in
this case, only one:
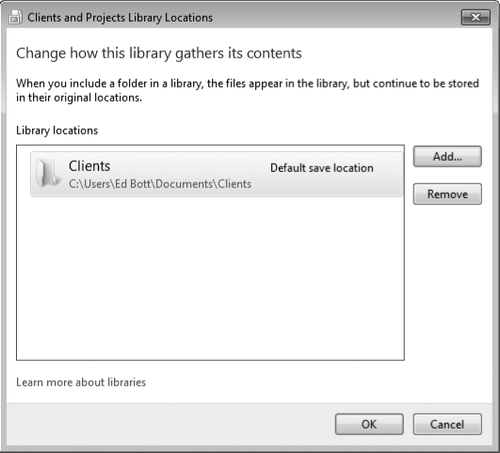
Clicking that link leads to
the dialog box shown here, with Add and Remove buttons that you can use
to change the lineup of locations that contribute to the library's
content:
What locations can you add
to a library? The most important consideration is that the folder must
be indexed so that it can be included in searches. Folders and network
shares in any of the following locations are eligible for inclusion:
The system drive.
An additional volume on an internal
local drive formatted using NTFS or FAT32.
An external USB or IEEE 1394
(FireWire) hard drive, formatted using NTFS or FAT32.
A USB flash drive, but only if the
device appears in the navigation pane, under the Computer heading, in
the Hard Disk Drives section. If it appears under Devices With Removable
Storage, it is not eligible.
A shared network folder that is indexed using Windows
Search; this includes any shared folder from another computer in your
homegroup.
A
shared network folder that has been made available offline and is
therefore available in your local index.
You can also add a folder to a
library by
opening the folder location in Windows
Explorer and choosing a library
from the Include In Library menu on the toolbar. When you add a folder
from a local drive to a library, Windows checks to see whether that
location is in the search index already and adds it to the index, if
necessary. For additional customization options, right-click the library
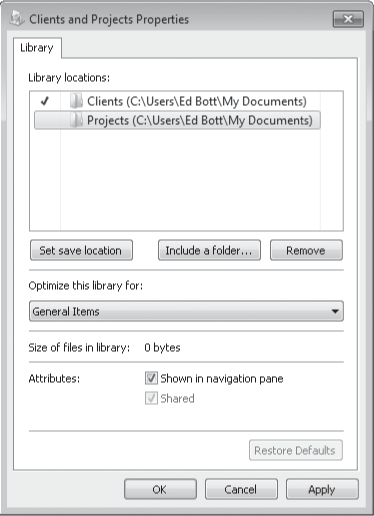
name in the navigation pane and then click Properties. Figure 2 shows a typical properties dialog box.
This dialog box offers
yet another way to include a folder in a library (or remove a folder).
It also allows you to change the save location, which is the specific
folder where files and folders
are copied or moved when you drop them on the library icon in the
navigation pane. The check mark indicates the current save location.
Choose a different folder from the Library Locations list and click Set
Save Location to make a change. The Shown In Navigation Pane check box
indicates whether a library is visible in the navigation pane. If you've
created a library specifically for sharing or for use with backups, you
might want to hide it from the navigation pane to reduce clutter.
|
Libraries are per-user
settings and are not shared among user accounts on a Windows 7 PC. Each
library in your collection is defined by an XML settings file (with the
file name extension library-ms) and is saved automatically in a hidden
subfolder within your user profile
(%AppData%\Microsoft\Windows\Libraries). You should never need to edit
the files stored here directly. Any changes you make to the contents or
arrangement of a folder are saved here automatically, and the
corresponding XML file is deleted when you delete a library from within
Windows Explorer.
|
The Arrange
By list at the right of the library pane allows you to change the way
the contents of the library are displayed. By default, each library
initially shows its contents arranged by folder, with each folder listed
in alphabetical order, with a subheading and a separate file list for
each one. From the Arrange By list, you can choose a different option,
which applies the selected sorting or grouping to the aggregated folder
contents. The exact choices available for each library are determined by
its properties; look at the selection in the Optimize This Library For
box in the properties dialog box. For the default Music library, for
example, you can choose Album or Artist to combine all tracks from all
locations into a single list grouped by the field you chose.
|
Because
libraries are virtual folders, it's sometimes difficult to perform
operations directly on their contents. If you want to see a file or
folder in its actual location in Windows Explorer,
right-click and choose Open File Location or Open Folder Location from
the shortcut menu.
|