The taskbar is that strip of
real estate along one screen edge (bottom by default) that contains the
Start menu button, program buttons, and status icons. The taskbar made
its first appearance in Windows 95. In the years since, it has slowly
evolved: installing Internet Explorer 4 in Windows 95 also added a Quick
Launch toolbar and other toolbars; Windows XP reduced clutter by
introducing taskbar grouping; and Windows Vista added taskbar previews, small window representations that increased your chances of clicking the correct taskbar button for the program you want to bring to the front.
The evolution continues in Windows 7, but at a generation-skipping pace. The Windows 7 taskbar (see Figure 1)
continues to serve the same basic functions as its progenitors—
launching programs, switching between programs, and providing
notifications—but in a way that makes these basic tasks easier and more
efficient.

1. Opening and Monitoring Programs from Taskbar Buttons
As in previous Windows
versions, the taskbar houses the Start menu button, a button for each
running program, and the notification area. You can use these task
buttons to switch from one running program to another. You can also
click a task button to minimize an open window or to restore a minimized
window. But in a departure from earlier Windows versions, which had
separate bands dedicated to a Quick Launch bar (from which you can open programs) and to taskbar buttons (which represent programs
that are currently running), the Windows 7 taskbar combines these
functions. That is, buttons between the Start button and the
notification area can be used both for opening programs and for
switching between programs.
1.1. Adding and Removing Pinned Programs, Documents, and Folders
Programs that you use often (the ones that you might've had on the Quick
Launch toolbar in the past) can be easily pinned to the taskbar so that
a single click launches them. To open a program that is pinned to the
taskbar, you don't need to open the Start menu or dig down to find a
desktop shortcut. To pin a program to the taskbar, simply drag its icon
or a shortcut (from the desktop, from the Start menu, or from any other
folder) to the taskbar. Alternatively, right-click a program icon
wherever you find it and choose Pin To Taskbar.
To remove a pinned program from the taskbar, right-click the pinned icon and choose Unpin This Program From Taskbar. This same command also appears on other shortcuts to the program, including those on the desktop and on the Start menu.
You can also pin frequently used documents and folders to the taskbar, using similar methods:
To pin a document
to the taskbar, drag its icon or a shortcut to the taskbar. If the
taskbar already has a button for the program associated with the
document, Windows adds the document to the Pinned section of the
program's Jump List. (For more information about Jump Lists, see Section 4.1.4 on Section 4.1.3.)
If the document's program is not on the taskbar, Windows pins the
program to the taskbar and adds the document to the program's Jump List.
To
pin a folder to the taskbar, drag its icon or a shortcut to the
taskbar. Windows adds the folder to the Pinned section of the Jump List
for Windows Explorer.
To open a pinned document or folder, right-click the taskbar button and then click the name of the document or folder.
To
remove a pinned document or folder from the Jump List, right-click the
taskbar button and point to the name of the document or folder to be
removed. Click the pushpin icon that appears.
|
Some habits die hard. If you just can't bear to give up the Quick
Launch toolbar, you can display it in Windows 7. To do so, add the
hidden Quick Launch folder as you would any other folder. In the New Toolbar dialog box, type %AppData%\Microsoft\lnternet Explorer\Quick Launch in the Folder box.
To mimic the
appearance of the Quick Launch toolbar in previous Windows versions,
unlock the taskbar. (Right-click the taskbar and, if there's a check
mark by Lock The Taskbar, choose that command.) Right-click the Quick
Launch toolbar and clear the Show Title and Show Text commands. Then
drag the handle (the dotted line) on the left side of the Quick Launch
toolbar so that it's next to the Start button, and drag the handle on
the right side of the toolbar to set the width you want. Then relock the
taskbar.
If you later decide
you don't need the Quick Launch toolbar after all, right-click the
taskbar and select Toolbars, Quick Launch to remove the check mark and
the toolbar.
|
1.2. Opening Programs
To open a program, click its taskbar button. A few simple (but not obvious) tricks let you do more:
To open a new
instance of a program, Shift+click its taskbar button. This is useful
for programs that are already running, in which an ordinary click
switches to the existing instance or, if you already have multiple open
instances, displays the window thumbnails. (If you have a wheel mouse or
other three-button mouse, middle-click serves the same purpose as
Shift+click.)
To open a new instance with administrative privileges, Ctrl+Shift+click a taskbar button.
1.3. Switching Tasks
When you open a pinned
program, the appearance of its taskbar button changes to indicate that
the program is running, as shown in Figure 2.
The icon for a running program has a button-like border, and when you
mouse over the button, the background color becomes similar to the
program's window colors. A program that has more than one window or tab
open appears as a stack of buttons. Opening other programs adds a button for each program to the taskbar.

As in previous
Windows versions, you can switch to a different program by clicking its
taskbar button. Much of the guesswork required to pick the correct
taskbar button in previous versions is gone in Windows 7, however. Now,
when you hover the mouse pointer over a taskbar button, a thumbnail
image of the window appears next to the taskbar button. If a taskbar
button represents more than one window (because the program has multiple
open windows), hovering the mouse pointer over the taskbar button
displays a preview of each window.
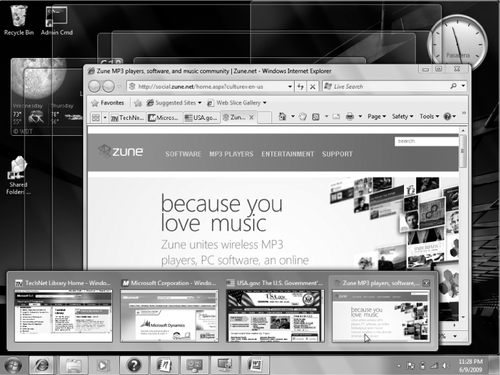
Still not sure which is the correct window? Use another new Windows 7 feature, Aero Peek.
Hover the mouse pointer over one of the preview images, and Windows
brings that window to the fore and indicates the location of all other
open windows with outlines, as shown in Figure 3.

When the preview (or
the title bar, if you're not using Aero) of the window you want is
displayed, simply click that preview to switch to that window. You also
have the option of closing a window by clicking the red X in the upper right corner of the preview or by middle-clicking anywhere in the preview image. Other basic window tasks are available on the context menu that appears when you right-click the preview image.
|
If you're not using Aero, you don't get thumbnail previews and you can't use Aero
Peek to view full-size windows or tabs before you switch to them.
However, if you hold down the Ctrl key while you click a taskbar button
that represents a group of windows, you'll see each window in turn.
Release the Ctrl key when you see the one you want.
|
|
The first 10 taskbar
buttons are accessible by keyboard as well as mouse. Press Windows logo
key+1 for the first, Windows logo key+2 for the second, and so on
(using 0 for the tenth). Using one of these shortcuts is equivalent to
clicking the corresponding taskbar button: if its program isn't running,
it starts; if it has a single open window, you switch to that window;
if it has multiple open windows, Windows displays previews of all
windows and a "peek" view of the first window.
Note that you can move
taskbar buttons, which therefore determines the key number that opens a
particular icon. To move a taskbar button, simply drag it to the desired
location.
Another useful
shortcut key is Windows logo key+T, which brings focus to the first item
on the taskbar, as indicated by a faint glow at the bottom of that
taskbar button. At that point, you can repeatedly press Windows logo
key+T, Shift+Windows logo key+T, or the arrow keys to select other
taskbar buttons. When a taskbar button is selected, you can press
Spacebar to "click" the button, press the Menu key to display its Jump
List, or press Shift+F10 to display its context menu.
|
As you use Windows 7, you'll notice other enhancements to the taskbar. Some taskbar previews do more than simply show a thumbnail image of the window; for example, the preview for Windows Media Player includes basic player controls
(previous, pause/play, and next). And with some taskbar buttons, you
don't even need to display a preview to know what's going on with the
program; windows or dialog boxes that show a progress bar, for example,
indicate their progress with a colored background in the taskbar button
itself.
2. Opening Programs from the Start Menu
Although improvements
to the taskbar in Windows 7 have reduced the number of necessary trips
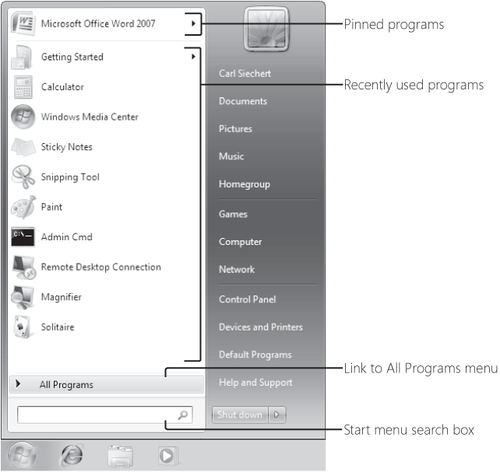
to the Start menu (shown below), the Start menu continues to provide
access to nearly everything you need to do in Windows.

Like the default Start menu
in Windows XP and Windows Vista, the Windows 7 Start menu is a
two-column affair, the left side of which is reserved for the programs
you use most often or that you have used most recently. Windows 7
devotes the right side of the menu to various important system folders,
such as your Documents and Pictures folders, Control Panel, and Devices
And Printers.
Four areas of the Start menu make it easy to run the programs and open the documents you need most. They are listed here in descending order of convenience and ease of use:
Pinned programs
The area in the upper left corner of the Start menu, above the
horizontal line, is reserved for the programs you want to be accessible
at all times. After you have pinned an item to this part of the Start
menu, it stays there (unless you subsequently remove it).
Recently used programs
Windows populates the area directly below the pinned programs with
programs that you have used recently. You can change the number and
types of programs that appear here;.
Start menu search box
The Start menu includes a search box (at the bottom on the left,
directly below All Programs). You can get to anything on the menu, no
matter how deeply nested it might be, by typing a few characters into
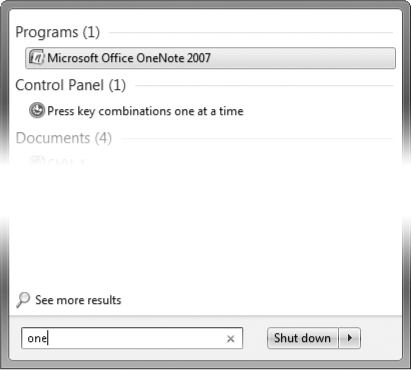
this box. In the preceding illustration, for example, Microsoft Office
OneNote 2007 does not appear on the left side of the menu because we
haven't pinned it to the top of the menu or used it recently. Navigating
to this program's menu entry would require a couple of clicks and a bit
of scrolling (one click to open All Programs, another to open Microsoft
Office). As Figure 4
shows, three characters in the search box are enough to bring Microsoft
Office OneNote 2007 to the Programs area of the search results, at the
top of the Start menu.

Provided
you're not completely averse to typing, the search box pretty much
eliminates the hassle of finding items that are buried several folders
deep within the menu structure. The Start menu search box doesn't limit its searches to programs, however; it's an entry point to the full-fledged search capabilities of Windows 7.
All Programs folder Clicking All Programs opens a hierarchically arranged list of
program icons similar to that found in earlier Windows versions. The
All Programs menu is generated by merging the contents of two folders:
A personal folder, located at %AppData%\Microsoft\Windows\Start Menu\ Programs
An "all users" folder, located at %ProgramData%\Microsoft\Windows\Start Menu\Programs
As
you might expect, items stored in the personal folder appear only on
your own Start menu. Items stored in the "all users" folder appear on
the Start menu of everyone who has an account on your computer.
3. Adding and Removing Pinned Programs
To add a program to the
pinned programs area of the Start menu, right-click it wherever you see
it (elsewhere on the Start menu, for example) and choose Pin To Start
Menu. The item will take up residence at the bottom of the pinned
programs area. If you'd like to give it a more prominent location, drag
it upward.
Note:
If no shortcut menu
appears when you right-click an item, and you can't drag the item to the
pinned programs area, open the Customize Start Menu dialog box. In the list of options, select Enable Context Menus And Dragging And Dropping.
To remove an item from the pinned programs area, right-click it and choose Unpin From Start Menu.
4. Using Jump Lists on the Taskbar and Start Menu
A powerful addition to the taskbar and Start menu is the Jump List,
a menu of options closely related to the program associated with a
taskbar button or an entry on the Start menu. Programs that are written
to take advantage of Jump
Lists in Windows 7 might include on the Jump List various common
commands and tasks that can be performed with that program.
Jump Lists can be big timesavers even with older programs. For those programs, Windows adds to the Jump List a list of recently used documents, making it easy to reopen a recent document quickly.
In addition, each
taskbar Jump List includes commands to open the program, to pin (or
unpin) the program to the taskbar, and to close all open windows
represented by the button.
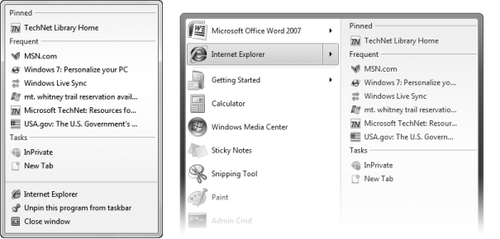
Figure 5 shows Jump Lists for Internet Explorer.

To open a taskbar Jump List, use either of these techniques:
Right-click the taskbar button.
Using
a stylus (or your finger, if you have a touch-capable computer), drag
the taskbar button away from the edge of the screen in a flicking
motion. When you release, the Jump List appears.
The
preceding technique was created for use with tablet and touch
computers, but it also works with a mouse: point to the taskbar button,
press the left mouse button, drag away from the taskbar, and release the
mouse button.
On the Start menu, a Jump List is available only for programs that have been pinned
and those in the recently used list. To display the Jump List
associated with a Start menu item, click the arrow next to the program
name or simply hover the mouse pointer over the menu item.
Most of the Jump List
content is created by the program's author or, in the case of recent
items, generated by Windows. To keep favorite documents always available
on the Jump List, you can pin an item in the recent documents list:
point to it and click the pushpin icon, or right-click it and choose Pin
To This List.
To protect your privacy
or simply to clean up a cluttered list, you can remove an item from the
recent list or the pinned list: right-click and choose Remove From This
List (or, for pinned items, Unpin From This List).
The recent items lists on Jump Lists, grouped by program, largely replace the need for a Recent Items menu on the Start menu, which is disabled by default in Windows 7. (If you want to restore the Recent
Items menu, open the Customize Start Menu dialog box and select Recent
Items.) Like the Recent Items menu in previous Windows versions, the
recent items shown on Jump Lists are derived from the contents of the
folder %UserProfile%\Recent. Note that you can't add items to recent
lists by making direct additions to %UserProfile%\Recent. For the
purposes of building these lists, Windows simply ignores anything in the
Recent folder that it didn't put there itself.
To clear all recent
items (but not pinned items) from Jump Lists and from the Recent Items
menu, right-click the Start button and choose Properties. On the Start
Menu tab of the Taskbar
And Start Menu Properties dialog box, clear the Store And Display
Recently Opened Items In The Start Menu And The Taskbar check box.
Windows clears out the %UserProfile%\Recent folder when you do this.