Like any project in real life, we start with the business requirements. At Jupiter Motors, we build custom recreational vehicles (RVs). We've recently opened a new state-of-the-art assembly plant, and implemented a new Enterprise Resource Planning (ERP)
solution. Jupiter Motors now wants to build a customer portal to
improve our relationship with our customers, and our team is tasked with
building this portal.
Project design
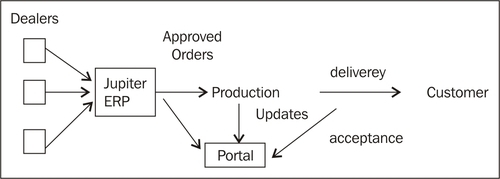
All RV sales are handled by
independent dealers, who work with our customers and place the
customers' orders directly into our ERP system using remote terminals.
All orders are reviewed by a production manager, and are approved for
production or sent back to the dealer for revision. Once an order has
been approved, it should become visible on the portal to the customer.
Assembly begins, and as the
process may take several weeks, we want to upload photos of the RV
while it's being assembled so that impatient customers can watch the
progress. Assembly teams at each stage of the process are responsible
for uploading photos as they finish their work.
When the assembly is complete, a
driver will deliver the RV to the customer. The customer inspects the
RV, and accepts the delivery by signing a tablet PC carried by the
driver.
After looking at this summary, we know our customer portal will need the following components:
A mechanism to transfer data from our ERP system to the portal.
A database on the portal to hold the transferred data.
A way to upload and store photographs of the RV.
User interface for the customers to view their RV.
Ability to print copies of their order.
Some way to make sure only customers can log in to the portal.
A way to make sure the customers can see only their vehicle and order details.
Serve
as an intermediary between customer acceptances and the ERP system.
Delivery drivers will update the order in our portal when a customer
accepts delivery, and a process in the ERP system will retrieve
acceptances and update the ERP system.
A debug mode, where we can trace events in case there are issues.
An overview of the information flow is shown in the next diagram:
Why are we choosing
Azure for our portal? Presumably, we want to use Azure for reasons other
than it being the "shiny new thing". Some of the reasons we've decided
to use Azure are:
We're already
familiar with Visual Studio, SQL Server, and .NET, so Azure will be
familiar to us. Even if we were Java or PHP developers, the Eclipse
toolkits and SDKs mean that our skills would still transfer to Azure.
In
this project, storage and retrieval of photos are a principal
component. When compared to storing photos in a SQL Server database or
on a file system, Blob hosting is easy to use and cost effective.
Photos require a great deal of bandwidth, and Azure has a content delivery network (CDN) we could utilize if necessary.
Other companies (for example, Outback a case study can be found at http://www.microsoft.com/caseStudies/Case_Study_Detail.aspx?casestudyid=4000005861)
have had great success with Azure social sites. They were able to scale
their sites as traffic increased, and could quickly scale to handle
traffic spikes.
There
is talk of adding videos, message boards, and other social features to
the site, and the Azure platform helps us add these features in short it
helps us plan the future!
Azure
is a pay-as-you-go platform. Having just invested a great deal into an
ERP implementation, management is reluctant to invest in additional
hardware and software licenses at this time. The monthly fees fit our
revenue structure better.
Integrating application with cloud features
Now it's time to pull this all
together, matching our application requirements to the different
features of Microsoft Azure. Not every feature of Azure will be used in
this project, but as we gain familiarity with Azure, we'll discuss the
major features so that we can be prepared for future projects.
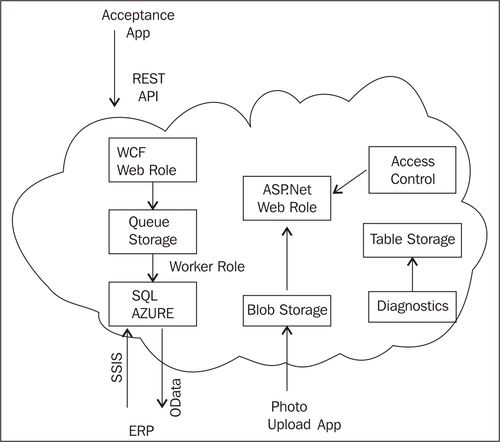
|
Requirement
|
Azure feature
|
Summary
|
|---|
|
Development environment
|
Development Fabric
|
The Azure SDK includes the Development Fabric, which we will use to develop our application.
|
|
Portal data storage
|
SQL Azure
|
An almost feature complete version of SQL Server 2008, SQL Azure will be familiar to us.
|
|
Data transfer
|
SSIS
|
SQL Server 2008 R2 supports connections to SQL Azure.
|
|
Photo upload
|
Blob storage, Client Library
|
We'll develop a simple Windows Forms Application to upload photos into blobs using a client library, rather than the REST API.
|
|
Customer portal UI
|
Web role
|
Our portal will be a custom-built ASP.NET application.
|
|
Limiting access to users
|
Access Control
|
One of AppFabric's two components is a claims-based identity service known as Access Control.
|
|
Copies of orders
|
SSRS
|
The full SSRS server is not yet supported, but we can use a local report and the ReportViewerControl.
|
|
Delivery acceptance
|
Web role/WCF, Queue, REST API
|
We'll develop a simple Windows Forms application that creates a message
in the queue via the REST API when a customer accepts delivery of their
RV.
|
|
Processing delivery acceptance
|
Worker role
|
A worker role process will read acceptances from the queue and update the database accordingly.
|
|
Debug mode
|
Diagnostics
|
Using a value in a configuration file, the portal can be placed in a
debug mode, where we can trace events. We'll retrieve logged events from
Table Storage.
|
To sum it all up, our application will look like the following diagram:
As we work through our
sample application, it's important to note that this is all sample code.
As with all sample applications, there are a lot of shortcuts in the
code that will be taken throughout the book from this point forward.
Much of the code will be used as example only, with no error handling
and very little security measures. With that said, this code should not
be used in any production environment unless security and error handling
are added. Any code herein should also be modified to comply with
coding standards, as applicable.
Creating an Azure account
A Windows Live ID (WLID)
is necessary for creating an Azure account. Any e-mail address can be
used to create a WLID so that we're free to use our corporate e-mail
addresses. The account should be chosen with care, as only one ID can be
used as the Account Administrator. The Account Administrator is
responsible for the billing account and adding services. The login
credentials will need to be shared if there are to be multiple people
responsible for overall management of the Azure account, or at least
being a backup administrator. Different WLIDs can be designated as
Service Administrators. Service Administrators are responsible for the
management of the services they've been assigned to. These tasks can
include scaling the instances of our web role or adding additional table
or queue storage.
Limiting the administration
task to a single user isn't out of the ordinary. Usually the ultimate
responsibility for production deployment should rest with one person
such as the build master or equivalent role; however, for disaster
planning, there should always be a capable backup in place. A management
API exists and its likely management tools will be developed as time
goes on. Also, MSDN Premium and higher subscriptions include Azure
benefits. This is a great way to do some prototyping and testing, but
the login is bound to the same one used for the MSDN account. However,
this means that a new account, bound to a different e-mail address,
needs to be created for the production account.
The first step in creating an Azure account is to visit http://www.microsoft.com/windowsazure/ and choose our pricing plan. (At the time of writing, one had to click the Sign up now
button to work on pricing plan.) These plans are likely to change over
time, but they come in essentially two versions pay-as-you-go where we
are billed monthly for the services we use, and pre-paid style where we
pay up front for the services we expect to use. The services in the
pre-paid plans are discounted from the pay-as-you-go plan, but require a
large up-front payment. If we use less than the resources we estimated,
this indicates we have overpaid, but if we use more than we estimated,
we need to pay for the additional services. Because estimating usage is
difficult until we've been online for a while, the pay-as-you-go plan is
a little easier to get started on. Once the site is up and running, we
can analyze our usage and change the billing plan if necessary.
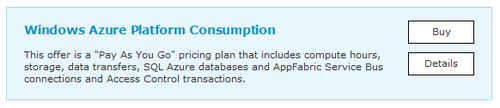
Once we've found the plan that fits our needs, we click the Buy button, and we're taken to the Microsoft Online Services Customer Portal (MOCP).
If we aren't signed in to our WLID, we're prompted to do so. The MOCP
is the portal where we'll review our Azure billing, but this is not the
portal where we actually manage Azure. Microsoft's other services, such
as Hosted Exchange and Live Meeting, are also billed through the MOCP.
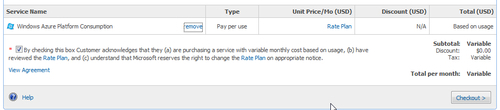
In the MOCP, we progress
through a shopping cart where we supply our billing information and
accept Microsoft's terms and conditions. Once we've completed our
purchase, our Azure account will be provisioned and a welcome e-mail
will be sent to the account's e-mail address. Now we can log in to the
Windows Azure Platform Portal at http://windows.azure.com/,
and set up the services we need. Setting up the services is a bridge
we'll cross when we get there. In the meantime, we have plenty to do to
get this project started.
