Downloading the tools
In order to build an Azure
application, we need a framework to access the underlying classes, a
development environment, and possibly a few hotfixes as well. The
downloads necessary vary by OS (32 or 64 bit, XP or 7), language choice
(.NET or PHP), and development environment (Visual Studio or Eclipse).
The most current list of tools needed for Azure development is available
at http://msdn.microsoft.com/en-us/windowsazure/cc974146.aspx.
Configuring the local machine for development
First, let's talk about operating systems; more specifically, the
operating systems supported by the Windows Azure Development Fabric.
Windows Azure is a relatively new platform, released to the world in
February 2010 as a production environment. It was developed after the
release of Windows Vista, and Windows Vista SP1 is the earliest
supported operating system for local development. Windows Vista SP1,
Windows 7, and Windows Server 2008 are also supported for local
development. The Windows Azure Tools for Microsoft Visual Studio will
install a local Development Fabric and development storage, which allows
us to develop, test, and debug locally without pushing our application
into the cloud. We can think of the local development fabric and storage
as an Azure emulator. The Development
Fabric (and other local tools) requires one of the Windows operating
systems mentioned above. When it's time to deploy our application, we'll
use these same tools to package our application for deployment.
Once we determine that we have a
supported OS, the next thing we need to do is install the .NET
Framework, enable Internet Information Services (IIS) 7.0 (or later)
features, and enable Windows Communication Foundation (WCF) HTTP
activation. To check the latest version of the .NET Framework, we can
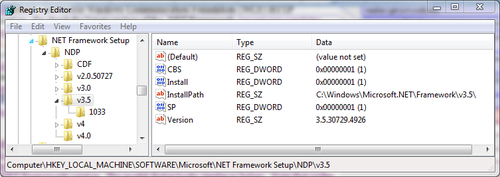
use a registry editor tool, or the regedit command to check the registry settings, at HKEY_LOCAL_MACHINE | SOFTWARE | Microsoft | NET Framework Setup | NDP. You will see each version installed. If v4 or higher is installed, there is nothing else to check. If v3.5
is the highest version listed, select that registry section to view the
registry values. We need to make sure we have version 3.5.30729.01 or
higher, which is the version for the .NET 3.5 SP1 Framework. If the .NET
3.5 SP1Framework or later is not installed, you will need to download
from http://www.microsoft.com/net/ and install the framework. The registry will appear similar to the following screenshot:
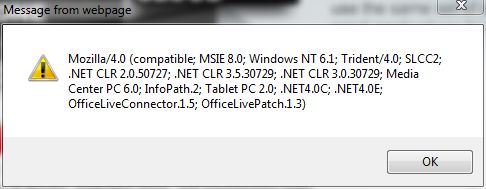
An alternative to using a registry tool is to open Internet Explorer and enter javascript:alert(navigator.userAgent)
into the address bar (this command doesn't work in other browsers).
This will open a modal dialog with the entire user-agent values,
including the .NET Framework version. The modal dialog looks similar to
the next screenshot. Note that earlier versions of the .NET framework
report as .NET CLR, but version 4 reports as simply .NET.
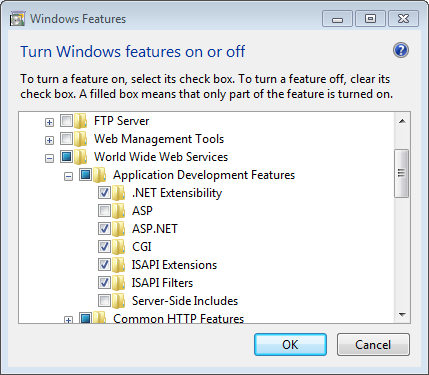
Next, we need to enable IIS features. To do this, we will need to go to the Control Panel | Programs | Turn Windows features on or off. In the Windows Features Internet Information Systems | World Wide Web Services | Application Development Features and make sure the boxes beside ASP.NET and CGI
are checked. The CGI option installs both CGI and FastCGI, and is
necessary to host PHP applications on IIS. Additionally, FastCGI aids
performance when multiple versions of the same framework are installed
on IIS. CGI is an optional IIS feature, but it is recommended to enable
it. box shown in the next screenshot, expand
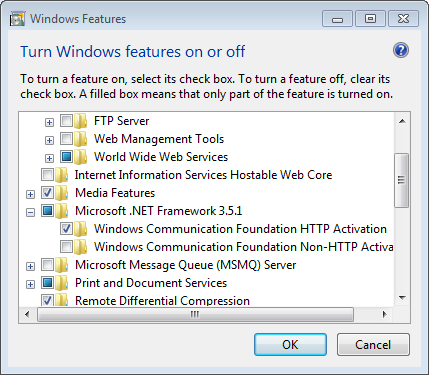
To enable WCF HTTP Activation, expand Microsoft .NET Framework 3.5.1 and make sure Windows Communication Foundation HTTP Activation is checked, as seen in the screenshot:
Our development platform
will be Microsoft Visual Studio 2008 SP1, though the free Microsoft
Visual Web Developer 2008 SP1 is supported, as is Visual Studio 2010.
In addition to Visual Studio
2008, we need to have Microsoft SQL Server 2005/2008 Express or higher
installed. This is also a free application from Microsoft. Typically,
this is installed with Visual Studio unless a custom install is done and
this option was not selected for installation.
Once we have our
development and database environments installed, there are a few
Microsoft hotfixes that may need to be applied:
KB967631: Update for Visual Studio 2008 SP1 Debugger (not needed for Visual Studio 2010)
KB963676: Improve Visual Studio Stability (not needed on Windows 7)
KB967131: Support for FastCGI on the Development Fabric (not needed for Windows 7 or Windows Server 2008 SP2 Operating Systems)
Again, the required hotfixes depend on the OS and IDE version, and the most up-to-date list can be found at http://msdn.microsoft.com/en-us/windowsazure/cc974146.aspx.
Installing Windows Azure tools and SDK
We've finally reached
the point where we're about to start installing Windows Azure-specific
features and tools. The installation of each of these is very
straightforward.
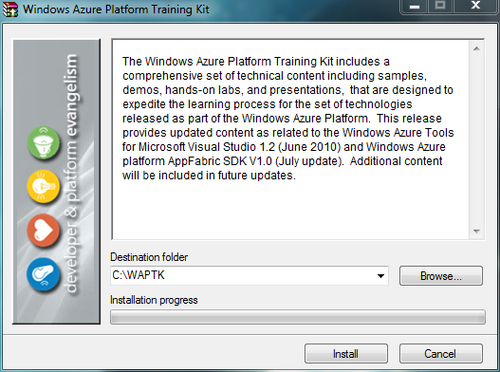
The first thing to install
is the Windows Azure Platform Training Kit. This training kit includes
presentations, demos, and hands-on labs from Microsoft, targeted at
Windows Azure Platform, SQL Azure, and .NET Services. The training kit
can be downloaded directly from Microsoft. Once you download the file
from Microsoft and execute the application, you will see the following EULA (End User License Agreement). Read over the EULA and click Accept to begin installation. Choose your install location and click Install.
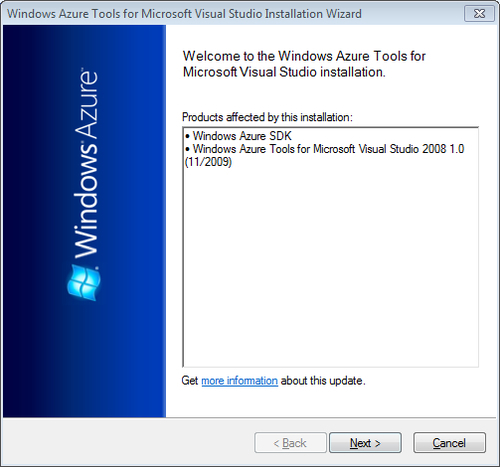
That's it for installing
the Windows Azure Platform Training Kit. What's next? We need to install
the Windows Azure Tools and SDK, which will add the necessary pieces of
the development platform to your local machine. This is also a
simple download from Microsoft and has a very simplified installation.
Once downloaded, execute the application, click Next in the installation wizard, read the EULA, check the box next to I have read and accept the license terms, and click Next to begin the installation.
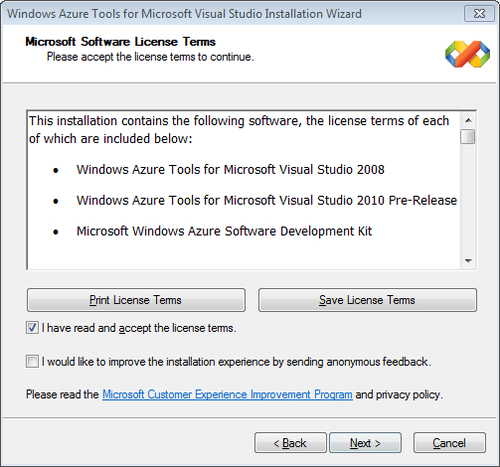
On the next screen, we
confirm what we are installing and accept the EULA. This is your last
chance to make changes, or to cancel the installation quickly. Clicking Next will begin the install process, which can take approximately 10 to 15 minutes.
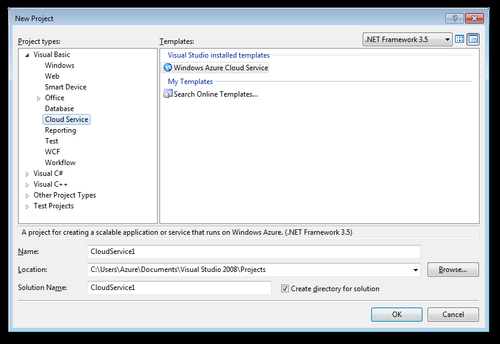
Once this installation
is complete, we can now open Visual Studio and we should see new project
types. To check, open Visual Studio (or Visual Web Developer), click File | New Project... and we should see Cloud Service as a project type and a Windows Azure Cloud Service template, as we see in the next screenshot:
We have now finished
preparing our development environment on our local machines! Now that
we're done with this, it's time to dig into the fun work!
