2. Pick a MVVM Helper SDK
Because Silverlight for Windows
Phone 7 is based on Silverlight 3, it falls short of the MVVM
capabilities available in Silverlight 4 and WPF, such as full Commanding
support. Luckily, there are quite a few third-party MVVM frameworks
available to choose from that provide Commanding support and more. The
following lists a few in no particular order:
The major benefit that these
frameworks have in varying degrees is increasing separation of
concerns, unit testing support, and support for Commanding. You can find
arguments for and against the available frameworks, so please
investigate the available options. For this example, let's take MVVM
Light Toolkit for a spin, as it is this author's opinion that MVVM Light
provides a nice balance of power and simplicity that is a great fit for
phone application development. Many others would suggest Caliburn
instead for similar reasons. The most important thing is to pick a
helper SDK, learn it, and use it.
3. GalaSoft MVVM Light Toolkit
For Windows Phone 7
development, my preference is GalaSoft's MVVM Light Toolkit. In my
opinion it has the right combination of power and as the name says,
lightness, for a mobile phone application.
|
The MVVM Light Toolkit
works across WPF and desktop Silverlight as well, which greatly aids in
porting code to another screen such as a Windows Slate application.
|
|
The MVVM Light Toolkit is up
to version 3 SP1. It was originally developed to address the Commanding
shortfalls in Silverlight 2 and Silverlight 3 that I highlighted in the
previous section when covering the BasicMVVM
sample project. The MVVM Light Toolkit also includes customized Visual
Studio 2010 templates to help you get started right away. First,
download the MVVM Light Toolkit and follow the instructions at this
page:
http://galasoft.ch/mvvm/getstarted/
If you like the MVVM Light
toolkit, I encourage you to click the Donate button at the bottom of the
above page, which goes towards the cost of running the site and the
rest goes to charity. The source code is available in CodePlex here:
http://mvvmlight.codeplex.com/
The entire range of features of the MVVM Light
Toolkit are not described end-to-end in this book, but the next couple
of sections cover the features of MVVM Light used to migrate the
BasicMVVM to MVVM Light.
3.1. MVVM Light Sample
In Visual Studio 2010, you can select File =>
New Project, and click on Silverlight for Windows Phone to filter to
the WP7 projects. Select MvvmLight (WP7) as the project template to get
started. If you don't see that option, check to ensure that you
installed the toolkit correctly before proceeding.
Once the project is created, run it and the screen in Figure 3 should appear, which indicates that all is configured correctly.
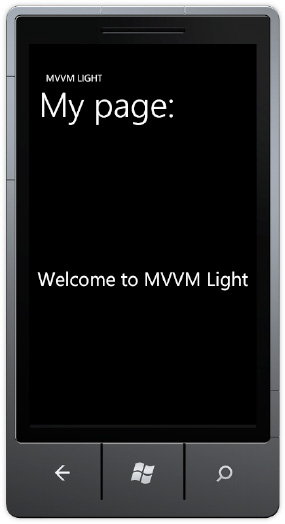
The page title, subtitle, and text are all data bound to the MainViewModel class. Let's go through the architecture of MVVM Light works so that you have a basis as we migrate the BasicMVVM app to MVVM Light. After creating a new project, the project includes the default App.xaml and MainPage.xaml
as well as the other items expected in a Silverlight for Windows Phone 7
application but with a couple of additions. There is an empty Model
folder that we populate shortly. There is also a ViewModel folder that contains two ViewModel classes named MainViewModel and ViewModelLocator. I cover these in the next section.
3.2. ViewModelLocator
The ViewModelLocator class contains a reference to every ViewModel
class in the project. This provides a centralized way to manage
creation and allow XAML configuration via a single application resource.
By default, in App.xaml a resource is added for the ViewModelLocator class. A namespace is added to the <Application> object that hosts the PhoneApplicationFrame that contains the XAML pages or View classes as they are navigated:
xmlns:vm="clr-namespace:MvvmLightSample.ViewModel"
The ViewModelLocator class is configured as an application level resource, as in the following:
<Application.Resources>
    <vm:ViewModelLocator x:Key="Locator"
                          d:IsDataSource="True" />
</Application.Resources>
This resource is
available through the entire application, just like any other
application-level resource, making the referenced ViewModel
objects available now. Now we move on to explain how MainPage.xaml data
binds to MainViewModel within this architecture. In the XAML, the
<PhoneApplicationPage> element's DataContext property data binds
to the Locator resource discussed above via this XAML code:
DataContext="{Binding Main, Source={StaticResource Locator}}"
The Path property for the Binding object is configured with the value of Main using the default syntax (it can also be written as Path=Main). This configuration makes an instance of the MainViewModel available within MainPage.xaml and allows the page title, sub-title, and text to data bind to properties available on the MainViewModel. Here's an example of one of the Application Title Bindings:
<TextBlock x:Name="ApplicationTitle"
    Text="{Binding ApplicationTitle}"
    Style="{StaticResource PhoneTextNormalStyle}" />
Listing 3 shows the default ViewModelLocator class.
Example 3. Default ViewModelLocator Class Code File
namespace MvvmLightSample.ViewModel
{
  public class ViewModelLocator
  {
    private static MainViewModel _main;

    /// <summary>
    /// Initializes a new instance of the ViewModelLocator class.
    /// </summary>
    public ViewModelLocator()
    {
      //if (ViewModelBase.IsInDesignModeStatic)
      //{
      //    // Create design time view models
      //}
      //else
      //{
      //    // Create run time view models
      //}

      CreateMain();
    }

    /// <summary>
    /// Gets the Main property.
    /// </summary>
    public static MainViewModel MainStatic
    {
      get
      {
if (_main == null)
        {
          CreateMain();
        }

        return _main;
      }
    }

    /// <summary>
    /// Gets the Main property.
    /// </summary>
    [System.Diagnostics.CodeAnalysis.SuppressMessage("Microsoft.Performance",
        "CA1822:MarkMembersAsStatic",
        Justification =
        "This non-static member is needed for data binding purposes.")]
    public MainViewModel Main
    {
      get
      {
        return MainStatic;
      }
    }

    /// <summary>
    /// Provides a deterministic way to delete the Main property.
    /// </summary>
    public static void ClearMain()
    {
      _main.Cleanup();
      _main = null;
    }

    /// <summary>
    /// Provides a deterministic way to create the Main property.
    /// </summary>
    public static void CreateMain()
    {
      if (_main == null)
      {
        _main = new MainViewModel();
      }
    }

    /// <summary>
    /// Cleans up all the resources.
    /// </summary>
    public static void Cleanup()
    {
      ClearMain();
    }
  }
}
|
Notice in Listing 3 how the MainViewModel is made available. It is created in the ViewModelLocator constructor via a call to the CreateMain() method. There is also a ClearMain()
method to provide a garbage collection safe way to clear the resource
from memory, which is important on Windows Phone 7 with the goal of
keeping application memory usage under 90MB for best performance.
The MainViewModel is available via a static property, which makes it more straightforward to find ViewModel objects by simply typing ViewModelLocator.MainStatic. MainStatic contains the reference to the MainViewModel
object but for data binding purposes it must be a non-static variable. A
second non-static property is declared named Main that can be
configured in data binding. The Main property simply returns the static
instance under the covers.
To add additional ViewModel objects, manually edit the ViewModelLocator class to include two properties for the additional ViewModel objects. There is a code snippet available to automate this process. Type mvvmlocatorproperty
and tap the Tab key twice to quickly add the property using Visual
Studio 2010's code snippet template UI. Essentially, type new values for
the default and click the Tab key to move through the template to
quickly add the property combination in the correct format.
3.3. MvvmLightSample – Model
The model class Vendor is copied from the BasicMVVM class. Edit the namespace at the top to be MVVMLightSample.Models so it makes sense for this project. A reference is added to System.Runtime.Serialization assembly. That's all that's required to add it to the MVVM Light Toolkit version.
3.4. MvvmLightSample – VendorsViewModel
The VendorsViewModel class is copied over from the BasicMVVM project, and the namespaces are fixed up for the MvvmLightSample project. To take advantage of as much of the framework as possible, replace INotifyPropertyChanged interface with the ViewModelBase class instead. Add a using clause for GalaSoft.MvvmLight. Remove the INotifyPropertyChangedPropertyChanged event and method from VendorsViweModel since we get it for free by inheriting from ViewModelBase class. Change NotifyPropertyChanged("") calls to base.RaisePropertyChanged("") to fix up compile errors.
Add a reference to Sytem.ServiceModel.Web to make the DataContractJsonSerializer class available within the VendorsViewModel. Remove the InDesignTime property and replace it with a call to GalaSoft.MvvmLight.IsInDesignMode instead. At this point, the migration is complete for the ViewModel.
3.5. MvvmLightSample – VendorsView
A new folder named View is added to the MVVMLightSample project, and the VendorsView.xaml page is copied from the BasicMVVM project to the MVVMLightSample view folder. Do a Find / Replace with BasicMVVM to replace it with MvvmLightSample with the "Look in" set to Current Project. That fixes up namespace references to compile the project successfully.
Next MainViewModel is
modified to return a more appropriate page title and sub-title as well
as string text for the Welcome message property, now configured to point
to a StoreLocatorPage property. Clicking on that text will navigate you to the VendorsView.xaml page. Fix up the margins so that everything aligns at 24px on the left and then add a NavigateToPageAction behavior to the TextBlock containing the text Store Locator Page and configure it to point to the VendorsView page.
If you run the project, it works as before, but let's configure the VendorsView to take advantage of the MVVM Light toolkit capabilities. First, add a property combination to the ViewModelLocator via the mvvmlocatorproperty code snippet. By using the code snippet, it quickly generates this code for you in the ViewModelLocator class:
private static VendorViewModel _vendors;

/// <summary>
/// Gets the Vendors property.
/// </summary>
public static VendorViewModel VendorsStatic
{
  get
  {
    if (_vendors == null)
    {
      CreateVendors();
    }

    return _vendors;
  }
}

/// <summary>
/// Gets the Vendors property.
/// </summary>
[System.Diagnostics.CodeAnalysis.SuppressMessage("Microsoft.Performance",
    "CA1822:MarkMembersAsStatic",
    Justification = "This non-static member is needed for data binding purposes.")]
public VendorViewModel Vendors
{
  get
  {
    return VendorsStatic;
  }
}

/// <summary>
/// Provides a deterministic way to delete the Vendors property.
/// </summary>
public static void ClearVendors()
{
  _vendors.Cleanup();
  _vendors = null;
}

/// <summary>
/// Provides a deterministic way to create the Vendors property.
/// </summary>
public static void CreateVendors()
{
  if (_vendors == null)
  {
    _vendors = new VendorViewModel();
  }
}
As you can see, if you are
not familiar with Visual Studio 2010 the code snippet is quite handy!
One item to note is that the snippet adds another Cleanup() method so just copy ClearVendors() to the existing Cleanup() method and delete the one added.
Now that we have the VendorsView added to the ViewModelLocator, we can configure the VendorsView
to data bind the MVVM Light Toolkit way using Expression Blend. First
compile the project to make sure everything is up to date, and then
remove the DataContext binding on the LayoutRootGrid. Also remove the VendorViewModelDataSource from the PhoneApplicationPage.Resources section in the VendorsView.xaml file.
In Expression Blend, select the PhoneApplicationPage root item in the Objects and Timeline tool window. Find the DataContext
property, click the Advanced Options... button, and select Data
Binding... to bring up the Create Data Binding Dialog Window. Select the
Locator data source and then select Vendors, as shown in Figure 4.
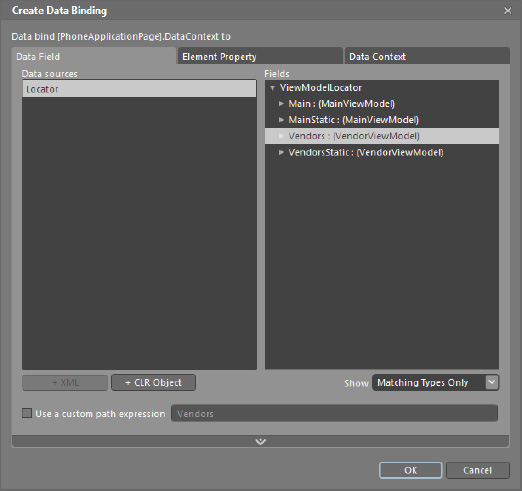
Be sure to select the non-static property so the data binding work correctly. Run the application and navigate to the VendorsView
and it displays the data as before. We still have the event handlers in
the code-behind. In the next subsection the event handlers are removed
and instead the application takes advantage Commanding support provided
by the MVVM Light toolkit.
3.6. Commanding and RelayCommand
The MVVM Light Toolkit supports Commanding, or data binding events to ViewModel methods, via the RelayCommand and RelayCommand<T> classes. In the VendorViewModel class, two RelayCommand
instances are added in a region named Commanding, one that is
parameter-less and one that takes a parameter. Here is the declaration:
#region Commanding
public RelayCommand AddAVendorCommand
{
  get;
  private set;
}

public RelayCommand<Vendor> RemoveAVendorCommand
{
  get;
  private set;
}
#endregion
The commands are instantiated in the VendorViewModel() constructor in this code:
//Instantiate Commands
AddAVendorCommand = new RelayCommand(
  () => AddVendor());

RemoveAVendorCommand = new RelayCommand<Vendor>(
  param => RemoveVendor(param));
The RelayCommand objects bridge between the ViewModel methods and the UI events. RelayCommand
has support for one parameter only so you need to pass more info,
consider encapsulating into an object. Now it's time to data bind the
commands in the UI. Currently the application uses the application bar
to execute Add and Remove. Unfortunately the ApplicationBarIconButton class does not inherit from FrameworkElement so the ButtonBaseExtension cannot be attached to a DependencyObject. You can still call the relay in code behind as before. Here is an example from the sample:
private void insertVendorAppBarBtn_Click(object sender, EventArgs e)
{
  var vm = DataContext as VendorViewModel;
  if (vm != null)
  {
    vm.AddAVendorCommand.Execute(null);
  }
}
For this sample, the two Buttons are added so that we can demonstrate the EventToCommand
Expression Blend behavior, as well as via the code-behind for the
application bar buttons. In Expression Blend, switch to the Assets tab
and select Behaviors to filter the list. Drag the EventToCommand behavior on to the Button objects and configure the correct command on each button. For the Remove Button, data bind the EventToCommandCommand property to the RemoveAVendorCommand RelayCommand. Also data bind the CommandParameter for the RemoveEventToCommand object to the vendorsListBox.SelectedItem method, which returns a Vendor object. Here is the resulting markup for Remove:
<Button x:Name="RemoveButton" Content="Remove" HorizontalAlignment="Right" VerticalAlignment="Bottom" Margin="0,0,8,18">
<Custom:Interaction.Triggers>
    <Custom:EventTrigger EventName="Click">
      <GalaSoft_MvvmLight_Command:EventToCommand Command=
             "{Binding RemoveAVendorCommand, Mode=OneWay}"
        CommandParameter="{Binding SelectedItem, ElementName=vendorsListBox}"/>
    </Custom:EventTrigger>
  </Custom:Interaction.Triggers>
</Button>
The RelayCommand class also supports CanExecute and CanExecuteChanged members as well to determine whether or not to enable or disable the element, in this case a Button object. The CanExecute method can be passed in to the constructor as a second parameter. Here's an example:
AddAVendorCommand = new RelayCommand(
  () => AddVendor(), () => CheckEnabled);
We have now completely migrated the sample over to MVVM. Listing 4 shows the source code for the updated VendorViewModel class.
Example 4. Updated VendorViewModel Code File
using System;
using System.Collections.ObjectModel;
using System.Linq;
using System.Net;
using System.Runtime.Serialization.Json;
using System.Windows;
using GalaSoft.MvvmLight;
using GalaSoft.MvvmLight.Command;
using MvvmLightSample.Models;

namespace MvvmLightSample.ViewModel
{
  public class VendorViewModel : ViewModelBase
  {
    public VendorViewModel()
    {
      if (IsInDesignMode)
      {
        LoadSampleData();
      }
      else
      {
        LoadData();
      }

      //Instantiate Commands
      AddAVendorCommand = new RelayCommand(
        () => AddVendor());

      RemoveAVendorCommand = new RelayCommand<Vendor>(
        param => RemoveVendor(param));

    }
#region Design-time support
    private void LoadSampleData()
    {
      _vendors = new ObservableCollection<Vendor>()
      {
        new Vendor(){AccountNumber="111111", CreditRating=65,
          Name="DesignTime - Fabrikam Bikes" },
        new Vendor(){AccountNumber="222222", CreditRating=40,
          Name="Contoso Sports" },
        new Vendor(){AccountNumber="333333", CreditRating=30,
          Name="Duwamish Surfing Gear" },
        new Vendor(){AccountNumber="444444", CreditRating=65,
          Name="Contoso Bikes" },
        new Vendor(){AccountNumber="555555", CreditRating=40,
          Name="Fabrikam Sports" },
        new Vendor(){AccountNumber="666666", CreditRating=30,
          Name="Duwamish Golf" },
        new Vendor(){AccountNumber="777777", CreditRating=65,
          Name="Fabrikam Sun Sports" },
        new Vendor(){AccountNumber="888888", CreditRating=40,
          Name="Contoso Lacross" },
        new Vendor(){AccountNumber="999999", CreditRating=30,
          Name="Duwamish Team Sports" },
      };
    }
    #endregion

    #region Vendors Data Load
    HttpWebRequest httpWebRequest;
    private void LoadData()
    {
      httpWebRequest =
HttpWebRequest.CreateHttp("http://localhost:9191/AdventureWorksRestJSON.svc/Vendors");
      httpWebRequest.BeginGetResponse(new AsyncCallback(GetVendors), null);
    }

    //add a reference to System.Servicemodel.web to get DataContractJsonSerializer
    void GetVendors(IAsyncResult result)
    {
      HttpWebResponse response = httpWebRequest.EndGetResponse(result) as HttpWebResponse;
      DataContractJsonSerializer ser = new
DataContractJsonSerializer(typeof(ObservableCollection<Vendor>));
      _vendors = ser.ReadObject(response.GetResponseStream()) as ObservableCollection<Vendor>;
      //Vendors is read-only so cannot set directly
      //Must call NotifyPropertyChanged notifications on UI thread
      //to update the UI and have data binding work properly
      Deployment.Current.Dispatcher.BeginInvoke(() =>
      {
        base.RaisePropertyChanged("Vendors");
      });
    }
    #endregion

    #region Vendors Business Logic
private ObservableCollection<Vendor> _vendors;
    public ObservableCollection<Vendor> Vendors
    {
      get
      {
        return _vendors;
      }
      //set
      //{
      //  _vendors = value;
      //  NotifyPropertyChanged("Vendors");
      //}
    }

    public Vendor GetVendorByAccountNumber(string accountNumber)
    {
      var vendor = from v in _vendors
                   where v.AccountNumber == accountNumber
                   select v;

      return vendor.First<Vendor>();
    }

    public void AddVendor()
    {
      Vendors.Add(new Vendor()
      {
        AccountNumber = "111111",
        CreditRating = 65,
        Name = "Fabrikam Bikes - Added"
      });
    }

    public void RemoveVendor(object vendor)
    {
      if (null != vendor)
        Vendors.Remove((Vendor)vendor);
    }
    #endregion

    #region Commanding
    public RelayCommand AddAVendorCommand
    {
      get;
      private set;
    }

    public RelayCommand<Vendor> RemoveAVendorCommand
    {
      get;
      private set;
    }
    #endregion
  }
}
|
In the next couple of sections, I cover additional features of the MVVM Light Toolkit.
3.7. MVVM Light Messenger Class
The Messenger class
provides a means to communicate within an application in a decoupled
way. Classes can register to receive messages of different types. The
message can be anything from simple values to complex objects. Likewise,
messages can specify a target type that should receive the message for
fined tuned control.
MVVM Light includes multiple message classes. The following is a list of possible messages from the docs:
MessageBase: A simple message class, carrying optional information about the message's sender.
GenericMessage<T>: A simple message with a Content property of type T.
NotificationMessage:
Used to send a notification (as a string) to a recipient. For example,
define notifications as constants in a Notifications class, and then
send Notifications. Save to recipients.
NotificationMessage<T>:
Same as the previous, but with a generic Content property. It can be
used to pass a parameter to the recipient together with the
notification.
NotificationMessageAction: Sends a notification to a recipient and allows the recipient to call the sender back.
NotificationMessageAction<T>: Sends a notification to a recipient and allows the recipient to call the sender back with a generic parameter.
DialogMessage:
Used to request that a recipient (typically a View) displays a dialog,
and passes the result back to the caller (using a callback). The
recipient can choose how to display the dialog, either with a standard
MessageBox, with a custom popup, or something similar.
PropertyChangedMessage<T>:
Used to broadcast that a property changed in the message sender.
Fulfills the same purpose as the PropertyChanged event, but in a
decoupled manner.
The Messenger class provides a powerful means to pass data and notifications between application layers and within ViewModels in a decoupled way.
