3. Application Client Area
As the basis for the entire application, the
shell is responsible for hosting your pages. This also means certain
responsibilities are given to a set of classes that exist in the Microsoft.Phone.Shell namespace; it is where you can make some decisions about how your application is displayed. The application area is broken up into a system tray, the logical client area, and the application bar (as shown in Figure 4).
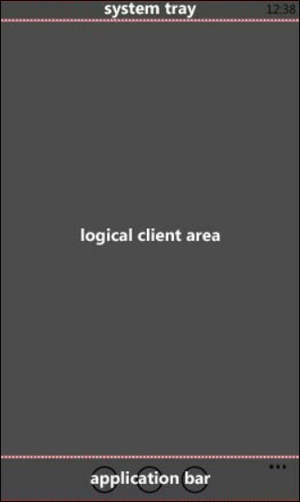
FIGURE 4 Application client area
You can decide to hide the system tray (entering a sort of “full-screen mode”) via the SystemTray class, as shown here:
void MainPage_Loaded(object sender, RoutedEventArgs e)
{
SystemTray.IsVisible = false;
}
Using the SystemTray class enables
you to change this to meet your needs. You do not have to set this in
code, but doing so is supported via an attached property in XAML:
<phone:PhoneApplicationPage ...
xmlns:shell=
"clr-namespace:Microsoft.Phone.Shell;assembly=Microsoft.Phone"
shell:SystemTray.IsVisible="True">
In addition, you can also specify the color and opacity of the SystemTray to better match any branding your application uses:
<phone:PhoneApplicationPage x:Class="DevelopingWP.MainPage"
shell:SystemTray.IsVisible="True"
shell:SystemTray.BackgroundColor="White"
shell:SystemTray.ForegroundColor="Blue"
shell:SystemTray.Opacity="0.8">
When you show the SystemTray, it reduces the size of your application. The only exception to this is when you reduce the opacity of the SystemTray. By using an opacity of less than 1, the SystemTray will be swipeable (to show it over your application). It is suggested that all applications show the SystemTray but use the opacity to enable the user to optionally show the SystemTray as needed.
Several operations on the phone also will show
over some part of your application (but not navigate away from your
application). Receiving a phone call, alarms, and the lock screen are
common examples of this. When the phone shows these over your
application, it is obscuring your application. You can react to these activities by handling the PhoneApplicationFrame’s Obscured and Unobscured events:
var rootFrame = ((App)App.Current).RootFrame;
rootFrame.Obscured += RootFrame_Obscured;
rootFrame.Unobscured += RootFrame_Unobscured;
These events will enable you to react to the
obscuring of your application. A common usage is to enter a pause screen
when you are writing a game for the phone.
4. Application Bar
Another part of the normal screen real estate
is the application bar. This bar is a mix of a toolbar and a menu.
Although you can create an application bar using Blend (that is, XAML),
programming against application bars presents a couple of small
inconveniences. In fact, the ApplicationBar is part of the operating system, and when you add an ApplicationBar
to your XAML, you’re simply instructing the underlying operating system
to show the application bar with your items on it. This means you won’t
be able to draw directly onto the application bar but simply supply
items to the operating system.
As I explained before, the ApplicationBar supports ApplicationBarIconButton and ApplicationBarMenuItem objects to enable users to interact with the application:
<phone:PhoneApplicationPage.ApplicationBar>
<shell:ApplicationBar IsVisible="True"
IsMenuEnabled="True">
<shell:ApplicationBarIconButton
IconUri="/icons/appbar.add.rest.png"
Text="add" />
<shell:ApplicationBarIconButton
IconUri="/icons/appbar.back.rest.png"
Text="revert" />
<shell:ApplicationBar.MenuItems>
<shell:ApplicationBarMenuItem Text="options" />
<shell:ApplicationBarMenuItem Text="about" />
</shell:ApplicationBar.MenuItems>
</shell:ApplicationBar>
</phone:PhoneApplicationPage.ApplicationBar>
Wiring up the Click events in XAML is possible and works the way you expect:
<shell:ApplicationBarIconButton
IconUri="/icons/appbar.add.rest.png"
x:Name="addIconButton"
Click="addIconButton_Click"
Text="add" />
But the application bar is different from
typical buttons or similar controls. The menu and icon button objects
don’t support commanding (like ButtonBase-derived controls), so you can’t use data binding with the commanding support. Even if you name elements in the ApplicationBar (like previously shown). the resultant wired-up member of the code-behind is null, so the event wiring will fail:
public partial class MainPage : PhoneApplicationPage
{
// Constructor
public MainPage()
{
InitializeComponent();
// Doesn't work because addIconButton is null!
addIconButton.Click += addIconButton_Click;
}
...
}
There is a technical reason this does not work,1
but more important than understanding the reason is to understand that
when you need to refer to the icon buttons or menu items in code, you
will need to retrieve them by ordinal from the ApplicationBar property on the PhoneApplicationPhone class. Although this is fragile and painful, it’s the only way this will work currently. Here is how to do it:
public partial class MainPage : PhoneApplicationPage
{
// Constructor
public MainPage()
{
InitializeComponent();
// Wire-up the button by ordinal
addIconButton =
(ApplicationBarIconButton)ApplicationBar.Buttons[0];
// Wire-up the menu by ordinal
optionMenuItem =
(ApplicationBarMenuItem)ApplicationBar.MenuItems[0];
// Works now that the manual wire-up was added
addIconButton.Click += addIconButton_Click;
}
...
}
