2. Working with Offline Address Books
An offline address book
(OAB) is a copy of a collection of address lists generated on an
Exchange server and then downloaded to a client computer so that a
Microsoft Outlook user can access the information it contains while
disconnected from the Exchange organization. Exchange Server 2010
generates OAB files, compresses the files, and then places them on a
local share. You can choose which address lists are available to offline
users, and you can configure the distribution method. An OAB can be
distributed to client computers using two methods:
2.1. Web-Based Distribution
Outlook 2007 and Outlook
2010 clients that are working in Cached Exchange Mode, offline, or
through a dial-up connection can access the OAB using this distribution
method. Web-based distribution does not require public folders. When the
OAB is generated, the Client Access server replicates the files.
Web-based distribution uses HTTPS and the Background Intelligent
Transfer Service (BITS).
Note:
BITS
For more information about BITS, see http://msdn.microsoft.com/en-us/library/aa362708.aspx.
Web-based
distribution supports more concurrent client computers and uses less
bandwidth than public folder distribution. It also provides more control
over the OAB distribution points. In web-based distribution, the HTTPS
web address is the distribution point from which client computers can
download the OAB.
To generate or
update the OAB, the OAB generation process, implemented by the OABGen
service, runs on the OAB generation server (typically an Exchange Server
2010 Mailbox server). The Microsoft Exchange File Distribution service
runs on Client Access servers to gather the OAB and keep its content
synchronized with the content on the Mailbox server.
The OAB virtual directory
provides the distribution point for the web-based distribution method.
When Exchange Server 2010 is installed, a new virtual directory named
OAB is by default created in the default internal web site in Internet
Information Services (IIS). If you have client-side users that connect
to Outlook from outside your organization’s firewall, you can add an
external web site. You can also use the New-OABVirtualDirectory
cmdlet in the EMS to create a new virtual directory named OAB in the
default IIS web site on the local Exchange Server 2010 Client Access
server.
Note:
CREATING AN OAB VIRTUAL DIRECTORY
For more information about creating an OAB virtual directory, see http://technet.microsoft.com/en-us/library/aa996917.aspx.
The Autodiscover service in
Outlook 2007, Outlook 2010, and some mobile devices automatically
configures clients for Exchange access. This service runs on a Client
Access server and returns the correct OAB URL for a specific client
connection.
Note:
THE AUTODISCOVER SERVICE
For more information about the Autodiscover service, see http://technet.microsoft.com/en-us/library/bb124251.aspx.
2.2. Public Folder Distribution
Outlook 2003 Service
Pack 1 or earlier clients that are working offline or through a dial-up
connection access the OAB through public folder distribution. The OAB
generation process places files directly in a public folder, and
Exchange public folder replication copies the data to other public
folder distribution points.
Using this method, every
request for a full OAB download is served immediately. This can lead to a
large volume of traffic that could potentially overload the network for
an extended period. To prevent this overload, you can set a bandwidth
threshold to limit the network bandwidth that results from OAB downloads. This process is called throttling.
By default, throttling is disabled. You can activate throttling by
editing the following registry key on all public folder servers that
host OAB system folders:
HKEY_LOCAL_MACHINE\System\CurrentControlSet\Services\MSExchangeIS\ParametersSystem
2.3. Hiding a Recipient from an Address List
The Microsoft Exchange System
Attendant service running as Local System produces OAB data. If an
administrator uses the security descriptor to prevent users from viewing
certain recipients in AD DS, users who download the OAB will be able to
view those hidden recipients. Therefore, you might need to hide a
recipient from an address list that is included in an OAB. To do this,
you configure the HiddenFromAddressListsEnabled parameter on the Set-PublicFolder, Set-MailContact, Set-MailUser, Set-DynamicDistributionGroup, Set-Mailbox, and Set-DistributionGroups cmdlets in the EMS. Alternatively, you can create a new default OAB that does not contain the hidden recipients.
Note:
ADDING OR REMOVING ADDRESS LISTS FROM AN OAB
For more information about how to add or remove address lists from an OAB, see http://technet.microsoft.com/en-us/library/bb123563.aspx.
Note:
UNDERSTANDING OABs
For more information about OABs, including some typical scenarios, see http://technet.microsoft.com/en-us/library/bb232155.aspx.
2.4. Creating an OAB
You can use the EMC to create
an OAB and specify either web-based or public folder distribution. If
you use the EMS, an OAB with web-based distribution is created by
default. To specify public folder distribution, you set the
PublicFolderDistributionEnabled parameter to a value of True.
To use the EMC to create an OAB, carry out the following procedure:
Open the EMC and click Mailbox under Organization Configuration in the Console tree.
Click New Offline Address Book in the Action pane.
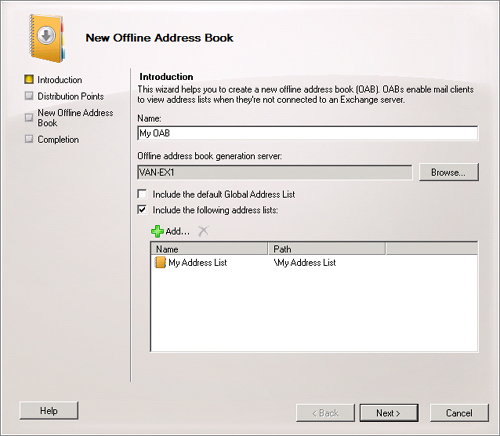
On
the Introduction page of the New Online Address Book Wizard, specify a
name for the OAB, the location of the OAB generation Mailbox server,
whether the GAL is included, and what other address lists (if any) are
included. Figure 5 shows the Introduction page. Click Next.

On
the Distribution Points page, you can enable either web-based or public
folder distribution. If you choose web-based distribution, you can
specify the OAB virtual directory. If your organization uses both
Outlook 2003 Service Pack 1 or earlier clients and Outlook 2007 Service
Pack 1 or later clients, you can specify both distribution methods.
Click Next.
On the Configuration Summary page, click New to create the new OAB.
If the wizard completes successfully, click Finish on the Completion page. Otherwise, click Back and review your settings.
You use the New-OfflineAddressBook
cmdlet in the EMS to create an OAB. For example, the following command
creates the OAB WBD-OAB on VAN-EX1 that uses the web-based distribution
method and uses the default virtual directory:
New-OfflineAddressBook -Name "WBD-OAB" -AddressLists "\My Address List" -Server VAN-EX1
-VirtualDirectories "VAN-EX1\OAB (Default Web Site)"
The following command creates
an OAB named PFD-OAB on VAN-EX1 that uses the public folder
distribution method and uses the public folder database
MyPublicDatabase:
New-OfflineAddressBook -Name "PFD-OAB" -AddressLists "My Address List" -Server VAN-
EX1 -PublicFolderDatabase "MyPublicDatabase" -PublicFolderDistributionEnabled $true
-Versions Version3,Version4
Note:
OAB VERSIONS
For more information on OAB versions, see “Understanding Offline Address Books” at http://technet.microsoft.com/en-us/library/bb232155.aspx. This link was given earlier in this section and contains a great deal of useful information.
Note:
NEW-OFFLINEADDRESSBOOK
For more information about the New-OfflineAddressBook cmdlet, see http://technet.microsoft.com/en-us/library/bb123692.aspx.
Note:
LEGACY OABs
OABs that use the public folder distribution method are sometimes termed Legacy OABs.
2.5. Creating an OAB Virtual Directory
The OAB virtual directory
is the distribution point used by the OAB web-based distribution method.
A virtual directory named OAB is created by default in the default
internal web site in IIS when Exchange Server 2010 is installed. If you
have client-side users that connect to Outlook from outside your
organization’s firewall, you can add an external web site. Exchange
permits only one OAB virtual directory, and you need to create this
directory only if there is a problem with the existing virtual
directory. If you need to create a new OAB virtual directory, you use
the New-OABVirtualDirectory
cmdlet in the EMS. In order to create an OAB virtual directory, you
first need to remove the existing virtual directory, as described later
in this lesson.
You can create an OAB
virtual directory if no such directory exists, the local Exchange Server
2010 server has the Client Access server role installed, and a default
IIS web site exists. When you have created a new OAB virtual directory,
you need to edit the settings on each OAB that uses web-based
distribution to reconnect to the OAB virtual directory. The following
command creates an OAB virtual directory on a Client Access server named
DEN-CAS1 that has SSL enabled and has an external web site configured:
New-OABVirtualDirectory -Server DEN-CAS1 -RequireSSL $true -ExternalURL https://www
.adatum.com/OAB
Note:
REMOVING, RE-CREATING, AND RECONNECTING AN OAB VIRTUAL DIRECTORY
For more information about removing, re-creating, and reconnecting an OAB virtual directory, see http://technet.microsoft.com/en-us/library/bb123595.aspx.
Note:
NEW-OABVIRTUALDIRECTORY
For more information about the New-OABVirtualDirectory cmdlet, see http://technet.microsoft.com/en-us/library/bb123735.aspx.
2.6. Adding or Removing an Address List to or from an OAB
You
can use the EMC or the EMS to add or remove an address list from an
OAB. By default, there is an OAB named the Default Offline Address Book
that contains the GAL. OABs are generated based on the address lists
that they contain. To create custom OABs that users can download, you
can add or remove address lists from OABs.
To add or remove an address
list from an OAB using the EMC, click Mailbox under Organization
Configuration in the Console tree, click the Offline Address Book tab in
the Result pane, click the OAB that you want to edit, and then click
Properties in the Action pane. This accesses the OAB Properties dialog
box.
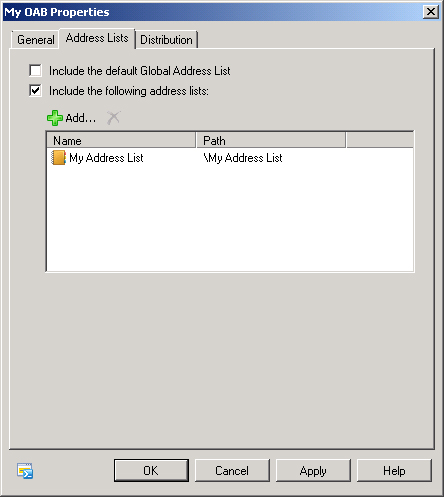
In the Address Lists tab of the Properties dialog box shown in Figure 6,
click the Add icon (green +) to add an address list. If you want to
remove an address list, click the address list. The Remove icon (red x)
then becomes active, and you click it. Click Apply to save your changes
without closing the dialog box or click OK to close the dialog box and
save your changes.

You can use the Set-OfflineAddressBook
cmdlet in the EMS to add or remove address lists from an OAB. You need
to take care when using this cmdlet. Basically, it lists the address
lists that should be in the OAB. So if you specify an address list that
is not already in the OAB, that address list is added, and if you omit
an address list that is in the OAB from the command, that address list
is removed.
Suppose, for example, that you
have an OAB named MyOAB that contains address lists MyAddressList01 and
MyAddressList02. To add the address list MyAddressList03, you would
enter the following command:
Set-OfflineAddressBook -Identity "MyOAB" -AddressLists
MyAddressList01,MyAddressList02,MyAddressList03
If you subsequently wanted to remove MyAddressList01 from the OAB, you would enter the following command:
Set-OfflineAddressBook -Identity "MyOAB" -AddressLists MyAddressList02,MyAddressList03
Note:
SET-OFFLINEADDRESSBOOK
For more information about the Set-OfflineAddressBook cmdlet, see http://technet.microsoft.com/en-us/library/aa996330.aspx.
2.7. Configuring OAB Properties
In addition to adding and
removing address lists, you can use the OAB Properties box accessed from
the EMC, as described in the previous section, to configure other OAB
properties. For example, on the General tab, you can change the name of
the OAB, select a predefined update schedule, or click Customize to
create your own update schedule. On the Address Lists tab, you can
specify whether to include the GAL on the OAB.
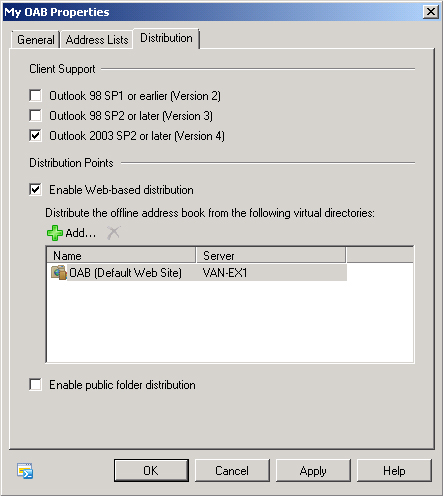
On the Distribution tab shown in Figure 7,
you can specify client support, the OAB distribution method (or
methods), and OAB distribution points. An OAB distribution point is the
web address or public folder where client computers can download the
OAB. The OAB Properties dialog box permits you to specify only web
address distribution points.

In the Client Support section, you can specify one or more OAB versions. As shown previously in Figure 2-14, you can specify one or more of Versions 2, 3, or 4, depending on the Outlook clients used in your organization. If you do not specify client support, the setting reverts to Version 4.
You can specify web-based
distribution, public folder distribution, or both to distribute the
OAB. If you specify Web-based distribution, you can specify the virtual
directory.
In the previous section, you saw that you could use the Set-OfflineAddressBook
cmdlet in the EMS to add address lists to or remove them from an OAB.
You can use the same cmdlet to configure other OAB properties. For
example, the following command modifies the time and date at which OAB
generation occurs for MyOAB:
Set-OfflineAddressBook -Identity "MyOAB" -Schedule "Sat.2:00 AM-Sat.2:15 AM"
Note:
CONFIGURING OAB DISTRIBUTION POINT PROPERTIES
In addition to
configuring OAB distribution properties, you may want to configure the
properties of individual distribution points. For more information on
this topic, see http://technet.microsoft.com/en-us/library/bb123710.aspx.
2.8. Moving an OAB Generation Server
OAB generation is the process
by which Exchange Server 2010 creates and updates the OAB. During this
process, Exchange generates new OAB files, compresses them, and then
places them on a local share.
You sometimes need to
move the generation task for an OAB from one server to another. You can
use the EMC or the EMS to perform this task. To use the EMC to move an
OAB generation server, carry out the following procedure:
Click Mailbox under Organization Configuration in the Console tree.
Click the Offline Address Book tab in the result pane and select the OAB for which you want to move the generation server.
Click Move in the Action pane. The Move Offline Address Book Wizard starts.
On
the Move Offline Address Book page, click Browse, select the server to
which you want to move the OAB generation process, and click OK. Click
Move to move the OAB generation process to the selected server.
On
the Completion page, determine whether the move occurred without
errors. If necessary, click Back to make any required changes.
Otherwise, click Finish to close the wizard.
If you choose to use the EMS to
carry out this task, you should be aware that the location of the
generation server is not considered to be an OAB property, and you
cannot use the EMS Set-OfflineAddressBook cmdlet to specify a different server. Instead, you use the Move-OfflineAddressBook cmdlet. For example, the following command moves the generation task for a custom OAB named MarketingOAB to the server VAN-EX2:
Move-OfflineAddressBook -Identity "MarketingOAB" -Server VAN-EX2
Note:
MOVE-OFFLINEADDRESSBOOK
For more information about the Move-OfflineAddressBook cmdlet, see http://technet.microsoft.com/en-us/library/aa998191.aspx.
2.9. Removing an OAB
You can use either the EMC or
the EMS to remove an OAB. To use the EMC, click Mailbox under
Organization Configuration in the Console tree, click the Offline
Address Book tab in the Result pane, click the OAB that you want to
remove, and then click Remove in the Action pane. You need to click Yes
to confirm your action.
You can use the Remove-OfflineAddressBook cmdlet in the EMS to remove an OAB. For example, the following command removes the OAB MyOAB:
Remove-OfflineAddressBook -Identity "MyOAB"
You need to enter Y to confirm your action.
If you remove an OAB that is
linked to a user or a mailbox database, the recipient downloads the
default OAB unless you assign a new OAB. If you remove the default OAB,
you must assign another OAB as the default.
Note:
CHANGING THE DEFAULT OAB
For more information about how to change the default OAB, see http://technet.microsoft.com/en-us/library/aa998569.aspx.
Note:
REMOVE-OFFLINEADDRESSBOOK
For more information about the Remove-OfflineAddressBook cmdlet, see http://technet.microsoft.com/en-us/library/bb123594.aspx.