A
feature loved by many users and disliked by many administrators in
Outlook 2007 is the ability to create a meeting workspace from a meeting
request. Savvy end users found this to be an easy way to create a
workspace on a SharePoint site at the same time that they were setting
the time and date, physical location, and inviting users to the event.
This process is worth reviewing because it is still available in Outlook
2010, just hidden by default.
To create a meeting workspace from Outlook 2007, follow these steps:
1. | Using an account that has appropriate permissions to create sites in SharePoint 2010, open Outlook 2007 (not Outlook 2010; that is covered in the next section).
|
2. | From Outlook 2007, access the calendar and click the New menu, and select Meeting Request (not Appointment, because that doesn’t provide the Workspace option).
|
3. | Enter one or more users in the To field (in this example, User1 and User3 are entered because they are being invited to a meeting being scheduled by User2), and a Subject (in this example, Strategy), and a Location (in this example, Redwood Room). Choose a start time and date in the future.
|
4. | Click
the Meeting tab if not active, and the Meeting Workspace icon should be
available. Click the Meeting Workspace tab, and the Meeting Workspace
tool pane will open on the right.
|
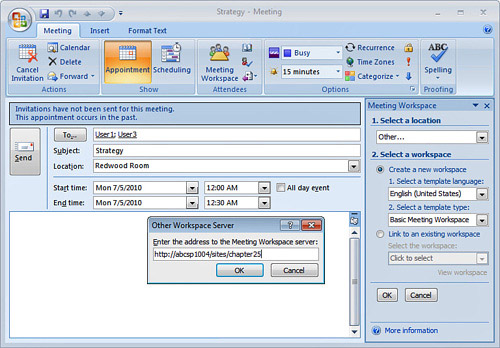
5. | The
Meeting Workspace pane may be populated with default workspace creation
information if a workspace has been created by this user in the past.
If so, click the Change Settings link to modify/review the settings.
Alternatively, if no workspaces have been created by the user, there
will be a different pane visible that allows the user to Select a
Location and Select a Workspace, as shown in Figure 1.

|
6. | In
the Select a Location drop-down menu, choose Other, and then enter the
URL of the site collection and site that will house the workspace, as
also shown in Figure 1. Click OK.
|
7. | In
the Meeting Workspace pane, in the Select a Workspace section, make
sure Create a New Workspace is checked, and then choose Basic Meeting
Workspace. Then click OK.
|
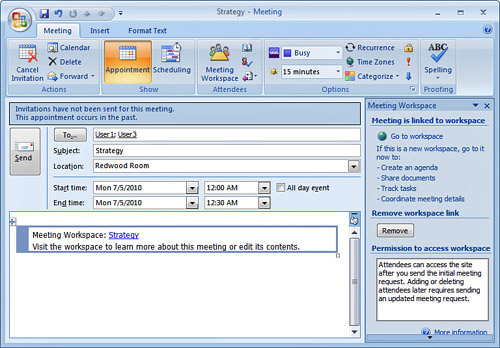
8. | The
pane will change, and a Create button will be visible. Click the Create
button, and the workspace will be created (assuming the user has
sufficient rights), and the invitation will now include the link to the
workspace and some descriptive information, as shown in Figure 2.

|
9. | Click Send to send the invite.
|
This workspace can now be
accessed by the invitees, and will show whether they’ve accepted the
invitations. It can be used to track objectives of the meeting, the
agenda, and have supporting documents uploaded to it.
Modifying Outlook 2010 to Allow Creation of Meeting Workspaces
Oddly, this feature is harder
to access in Outlook 2010, which no doubt is due to feedback that
Microsoft received about hiding this feature by default, and then either
having IT educate users on how to enable the feature or leave users to
research the steps on their own.
Follow these steps to enable meeting workspace creation in Outlook 2010:
1. | From Outlook 2010, click New Meeting.
|
2. | The
New Meeting window will open. Click the Customize Quick Access
drop-down menu in the upper-left corner of the invitation. Click More
Commands.
|
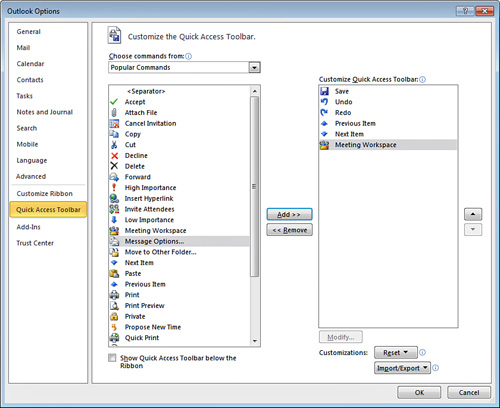
3. | Locate Meeting Workspace in the list of commands, and click the Add button, and it will appear in the right pane, as shown in Figure 3. Then click OK.

|
4. | Now
the Meeting Workspace icon will be visible from the Quick Access
toolbar at the top of the invitation. Follow the steps in the previous
section to create a workspace from Outlook 2010 at this point.
|