Configuring IPv6 in Windows Vista Using Netsh
To
configure the IPv6 settings for a network connection in Windows Vista
using the netsh.exe command, open a command prompt window with local
administrator credentials and type the appropriate netsh.exe command
from the netsh interface ipv6 context. Some examples of IPv6
configuration tasks that can be performed from this context include:
- To
add the unicast IPv6 address 2001:DB8::8:800:20C4:0 to the interface
named Local Area Connection as a persistent IPv6 address with infinite
valid and preferred lifetimes, type the following command:
netsh interface ipv6 add address “Local Area Connection” 2001:DB8::8:800:20C4:0
- To
configure a default gateway with unicast IPv6 address
2001:DB8:0:2F3B:2AA:FF:FE28:9C5A for the interface named Local Area
Connection, add a default route with this address specified as a
next-hop address by typing the following command:
netsh interface ipv6 add route ::/0 “Local Area Connection” 2001:DB8:0:2F3B:2AA:FF:FE28:9C5A
- To
configure a DNS server with unicast IPv6 address 2001:DB8:0:1::1 as the
second (alternate) DNS server on the list of DNS servers for the
interface named Local Area Connection, type the following command:
netsh interface ipv6 add dnsserver “Local Area Connection” 2001:DB8:0:1::1 index=2
For more information on using the netsh interface ipv6 context, type netsh interface ipv6 /? at a command prompt.
Other IPv6 Configuration Tasks
The
following section describes some additional IPv6 configuration tasks
that network administrators may need to know how to perform with
Windows Vista computers.
Enabling or Disabling IPv6
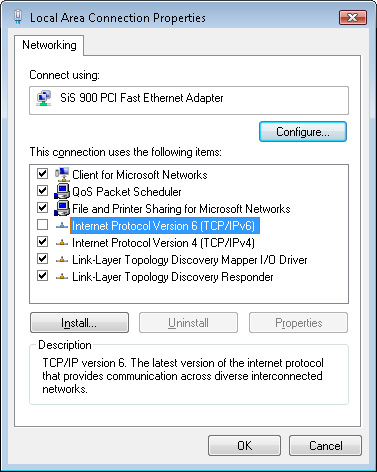
You cannot uninstall IPv6 in Windows Vista, but you can disable IPv6 on a per-connection basis. To do this, follow these steps:
1. | Open the Network And Sharing Center in Control Panel.
|
2. | Click Manage Network Connections, and then double-click the connection you want to configure.
|
3. | Clear the checkbox labeled Internet Protocol Version 6 (TCP/IPv6), and then click OK (see Figure 2).
|
If
you disable IPv6 on all your network connections using the user
interface method as described in the preceding steps, IPv6 still
remains enabled on all tunnel interfaces and on the loopback interface.
As
an alternative to using the user interface to disable IPv6 on a
per-connection basis, you can selectively disable certain features of
IPv6 by creating and configuring the following DWORD registry value:
HKLM\SYSTEM\CurrentControlSet\Services\tcpip6\Parameters\DisabledComponents
Table 1
describes the flag values that control each IPv6 feature. By combining
these flag values together into a bitmask, you can disable more than
one feature at once. (By default, DisabledComponents has the value 0.)
Table 1. Bitmask Values for Disabling IPv6 Features in Windows Vista
| Flag low-order bit | Result of setting this bit to a value of 1 |
|---|
| 0 | Disables all IPv6 tunnel interfaces, including ISATAP, 6to4, and Teredo tunnels |
| 1 | Disables all 6to4-based interfaces |
| 2 | Disables all ISATAP-based interfaces |
| 3 | Disables all Teredo-based interfaces |
| 4 | Disables IPv6 over all non-tunnel interfaces, including LAN and Point-to-Point Protocol (PPP) interfaces |
| 5 | Modifies the default prefix policy table to prefer IPv4 over IPv6 when attempting connections. |
For example, by setting the value of DisabledComponents
to 0xFF, you can simultaneously disable IPv6 on all your network
connections and tunnel interfaces. If you do this, IPv6 still remains
enabled on the loopback interface, however.
Disabling Random Interface IDs
You
can disable the default behavior of generating random interface IDs for
non-temporary autoconfigured public addresses (global addresses
registered in DNS) and link-local addresses by using the following
command:
netsh interface ipv6 set global randomizeidentifiers=disabled
To re-enable the generating of random interface IDs, use the following command:
netsh interface ipv6 set global randomizeidentifiers=enabled
Note
Disabling
random interface IDs causes link-local addresses to revert to using
48-bit MAC-layer (or 64-bit EUI) addresses for generating the interface
ID portion of the address. In Windows, this happens immediately and
does not require a reboot. |
Resetting IPv6 Configuration
To
remove all user-configured IPv6 settings and restore the IPv6
configuration of a computer to its default state, type the following
command:
netsh interface ipv6 reset
You must reboot the computer for this command to take effect.
Displaying Teredo Client Status
To
verify the current state of the Teredo client on your computer, open a
command prompt window using local administrator credentials, and then
type the following command:
netsh interface teredo show state
For a Windows Vista computer on which Teredo is currently inactive, the typical output for this command looks like this:
Teredo Parameters
---------------------------------------------
Type                    : default
Server Name             : teredo.ipv6.microsoft.com.
Client Refresh Interval : 30 seconds
Client Port             : unspecified
State                   : dormant
Client Type             : teredo client
Network                 : managed
NAT                     : none (global connectivity)
Note
| If
your command output doesn’t contain all of the preceding information,
you probably started your command prompt session using standard
credentials instead of administrator credentials. |
If
you now start an IPv6-enabled application that uses Teredo, such as
Windows Meeting Space or Windows Remote Assistance, and then type the
same Netsh command, the command output typically now looks like this:
Teredo Parameters
---------------------------------------------
Type                    : default
Server Name             : teredo.ipv6.microsoft.com.
Client Refresh Interval : 30 seconds
Client Port             : unspecified
State                   : qualified
Client Type             : teredo client
Network                 : managed
NAT                     : restricted
Comparing these two command
outputs shows that starting an application that uses Teredo changes the
Teredo client state from dormant (inactive) to qualified (active).
Note
The output of the netsh interface teredo show state
command also tells you the type of NAT your computer is behind (if
any). In the preceding example, the computer is behind a restricted
NAT. Teredo works well behind restricted and cone NATs, but not behind
symmetric NATs. If you plan to purchase a SOHO router for broadband
Internet connectivity, the best choice is a router that supports 6to4. |
