Configuring Windows DS
Once Windows DS is
installed, you will need to add the server to the management console and
then configure it. Windows DS automatically adds the local computer to
the console. If you want to add a remote server, you must add it.
To add a server to Windows DS
1. | Open the Windows DS management console by selecting Windows Deployment Services from Administrative Tools.
|
2. | Rightclick Servers in the Windows DS console tree, and then click Add Server.
|
3. | In
the Add Server dialog box, choose a computer to add to the console. The
server will be added and will now need to be configured.
|
To initially prepare the Windows DS server
1. | In the Windows DS console tree, right-click the server and click Configure Server.
|
2. | On
the Windows Deployment Services Configuration Wizard welcome page, make
sure that your environment meets the requirements and then click Next.
|
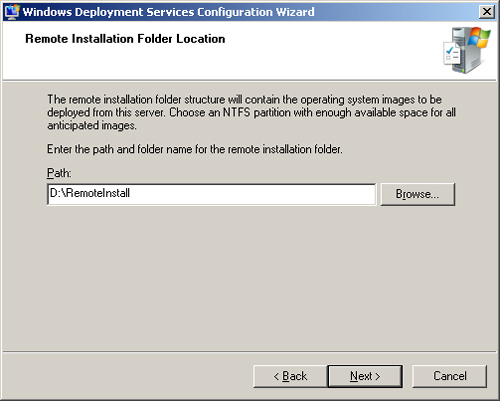
3. | Enter
a path for the image store, and then click Next. The folder should be
on a partition other than the partition containing the system files. If
you choose to create the image store on the system drive, a warning
message will appear. Click Yes to continue or click No to choose a new
installation location (recommended).
|
4. | Set a PXE Server initial settings policy and then click Finish to complete configuration.

|
5. | On
the Windows Deployment Services Configuration Complete page, you can
add images to the server (default) or clear Add Images To The Windows
Deployment Services Server Now if you want to add images at another
time. |
Preparing Discover Images
For client computers
that do not support PXE booting, you can create boot disks using a DVD, a
hard disk, or a UFD. You can create these disks by using the Windows DS
administration tools or the Windows PE administration tools from the
Windows AIK. The process begins by creating a Windows PE boot image
using the Windows DS console or Wdsutil. Once this image is created, a
bootable disk is made using Oscdimg from the Windows AIK.
To create a discover image using the management console
1. | In the Windows DS management console, click Boot Images. Boot Images is under Servers, server name, where server name is the name of the Windows DS server.
|
2. | Right-click
a boot image that you previously added to Windows DS to use as a
discover image and then click Create Discover Boot Image.
|
3. | On
the Discover Image Metadata page, type a name and description for the
discover image. Then choose the location in which to create the image,
and the Windows DS server to respond to it. Click Next.

|
4. | Click Finish.
|
To create a discover image using Wdsutil
1. | Run the following command using elevated credentials:
Wdsutil /new-discoverimage /image:boot_image/architecture:architecture /destinationimage /filepath:discover_image
Boot_image
is the name of the boot image you want to use to create the discover image (not the file name), and discover_image is the file path and file name of the new Windows PE boot image. Architecture is either x86 or x64.
|
To create a bootable DVD using the discover image
1. | To create a Windows PE build environment, open a command prompt and run the following commands:
md c:\Winpe\Boot
md c:\Winpe\Sources
|
2. | Copy the discover image created in the previous procedures to the Sources folder of the build environment:
copy d:\sources\boot.wim c:\Winpe\Sources
|
3. | Copy boot files from the Windows AIK, where architecture is the processor architecture for the computer being used (either x86 or x64):
xcopy c:\Program Files\Windows AIK\tools\architecture\boot c:\WinPE\boot
|
4. | Run the following command in the folder C:\Program files\Windows AIK\tools\architecture, where architecture is x86 or x64:
oscdimg -n -bc:\winpe\boot\etfsboot.com c:\winpe c:\winpe.iso
|
5. | Burn the .iso file winpe.iso to a DVD by using a third-party DVD mastering program. |
