Configure Windows Home Server Settings
After installing
Windows Home Server, you need to install the Windows Home Server
Connector software. The Windows Home Server Connector software does the
following:
It regularly looks at the health of your home computer.
It connects your networked computers to Windows Home Server.
It backs up your home computers daily.
It lets you to remotely administer Windows Home Server.
To install the Windows Home Server software, follow these steps:
1. | Insert
the Windows Home Server Connector CD into a computer that is connected
to your home network. The Windows Home Server Connector Wizard will
start. Click Next to continue. See Figure 2.

|
2. | On
the End-User License Agreement page, review the end-user license
agreement. To continue, click I Accept This Agreement, and then click
Next.
|
3. | Wait while the software locates your new Windows Home Server PC.
|
4. | Enter the password for the Windows Home Server. Click Next.
|
5. | After installation and configuration is complete, click Next to continue.
|
If you see a pop-up
message in the Notification area saying that Windows Home Server does
not recognize the account on the computer you just installed the
connector software on, you’ll need to create an account for the user on
the Windows Home Server PC. You also need to run the Windows Home Server
Connector Wizard on all your other home computers to connect them to
Windows Home Server. Make sure to run the wizard on only one computer at
a time.
Note
If you do not have
your Connector CD, you can install the Connector software from the
Software shared folder on Windows Home Server.
Manage Windows Home Server
With everything
installed, you can now start personalizing Windows Home Server. You’ll
need to create user accounts for everyone on your network and
familiarize yourself with the shared folders on the new server. You’ll
also want to browse the options in the Windows Home Server Console,
where you can view computers and backups, server storage, the health of
the network, and more.
User Accounts
User accounts let
Windows Home Server know that it’s all right for the people on your
network to access the shared folders on the new server. Without a user
account configured on the server itself, users won’t be able to access
the shared data on it.
To add a user account, follow these steps:
1. | From
any networked computer with Windows Home Server Connector software
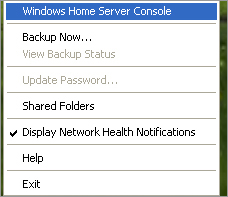
installed, right-click the Windows Home Server icon in the Notification
area of the taskbar.
|
2. | Click Windows Home Server Console. See Figure 3.
|
3. | Type
the password, and click the right arrow to proceed. The Window Home
Console opens, and you have access to the Windows Home Console on the
server. What you see here is exactly what you’d see if you logged on to
the server itself and opened the console from the Windows Home Server
PC.
|
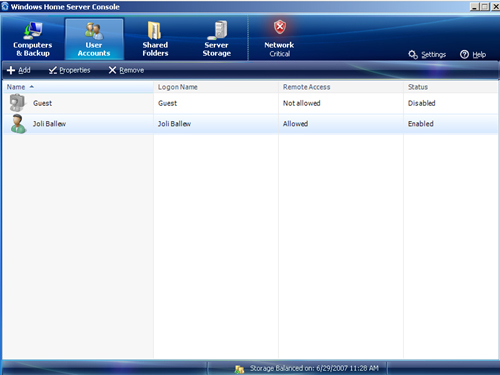
4. | Click the User Accounts tab. See Figure 4.
|
5. | Click Add, and work through the User Account Wizard. You’ll need to type the following:
First name and optionally a last name. Logon
name. (Use the same logon name used on other computers; it’s best if
they match. If they don’t, users will be prompted each time they log
on.) If you
want the user to have remote access to the server. Remote access lets
you use a Web browser to access your Windows Home Server files when you
are away from home. Password.
(Use the same password associated with the logon name used on other
computers; it’s best if they match. If they don’t, users will be
prompted each time they log on.) Access to shared folders (Full, Read, or None).
|
6. | Click Done.
|
7. | Repeat for the other users on your network computers.
|
Shared Folders
Shared folders let you
store data on your new server so that others on the network can access
them easily. Several shared folders are already created for you:
You can also add your own
folders to share and thus further personalize Windows Home Server. To
add your own shared folder and view shared folders already created,
follow these steps:
1. | From
any networked computer with Windows Home Server Connector software
installed, right-click the Windows Home Server icon in the Notification
area of taskbar.
|
2. | Click Windows Home Server Console.
|
3. | Type
the password, and click the right arrow to proceed. The Windows Home
Console opens, and you have access to the Windows Home Console on the
server. What you see here is exactly what you’d see if you logged on to
the server itself and opened the console from the Windows Home Server
PC.
|
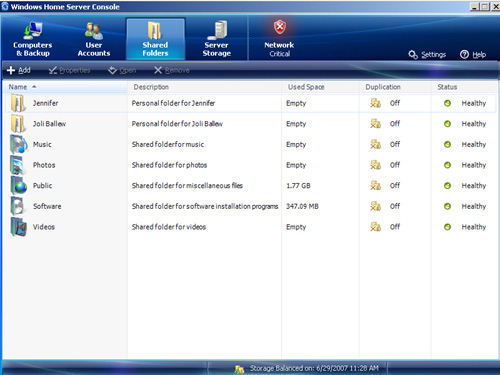
4. | Click the Shared Folders tab. See Figure 5.
|
5. | |
6. | Type
a name for the server and, optionally, a description. Click Enable
Folder Duplication if you have multiple hard drives. (Folder Duplication
folders are duplicated across multiple drives, and if one drive fails,
you have a secondary backup.) Click Next.
|
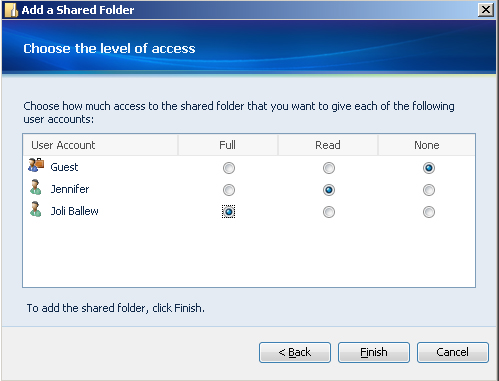
7. | Choose the level of access for each user. You can choose from Full, Read, or None. See Figure 6.
|
8. | Click Finish. Click Done. |
