1. Maintaining High Security
Microsoft
Windows Vista itself provides your computer with many built-in security
features. However, as powerful as they are, by themselves these
security features can’t protect you from every type of mischief that can
occur. You need to be active in protecting your computer, your data,
and your personal information.
Doing Your Part
Here are some things you can do to improve your security:
Log on using a Standard account instead
of an Administrator account, and use the User Account Control to run
individual items as an Administrator when required.
Make
sure you have a good, up-to-date anti-virus program installed. This
will add protection against viruses and worms that have figured out ways
around some of the security features.
In
Windows Mail (or the mail program you’re using), read your e-mail in
plain Text format instead of using the HTML format. This will prevent
any malicious code that’s hidden in the HTML code from being executed
when you open the message.
In
Windows Mail (or the mail program you’re using), don’t download
pictures and other external HTML content contained on a server unless
you trust the source. Doing so verifies your e-mail address to potential
authors of spam and can introduce malicious code.
Make
sure that your Web content zones in Internet Explorer are properly set
and that you’re not using custom settings that provide less protection
than the recommended default levels.
In
Internet Explorer, make sure you have the pop-up blocker turned on to
prevent code from being loaded, to prevent a hacker from stealing
information by making the pop-up look like a dialog box or other content
that asks for information, and to keep those annoying pop-up ads from
appearing.
In Internet Explorer, make
sure you have the phishing filter turned on to identify illicit Web
sites that look legitimate but are designed to steal your information.
In
Internet Explorer, work in Protected mode so that Internet Explorer
activities and downloads are isolated from the rest of your computer.
Keep
Windows up to date with automatic updates. Each critical update is an
urgent fix to outmaneuver a newly detected software vulnerability.
Use the Windows Security Center to verify that your basic security settings are properly configured and up to date.
Stop
and think before you do something you might regret: open an attachment,
download a file, install a program, or even answer an e-mail message.
Keep all your important data backed up so that if something nasty sneaks past all your security, you can recover all the data.
Complicated? Absolutely!
But don’t be intimidated: Windows Vista is designed to be as secure as
possible and will take care of most security issues. It also adjusts
many of your default settings to maintain the optimum balance between
security and functionality. And it monitors your security status and
alerts you when there’s a problem.
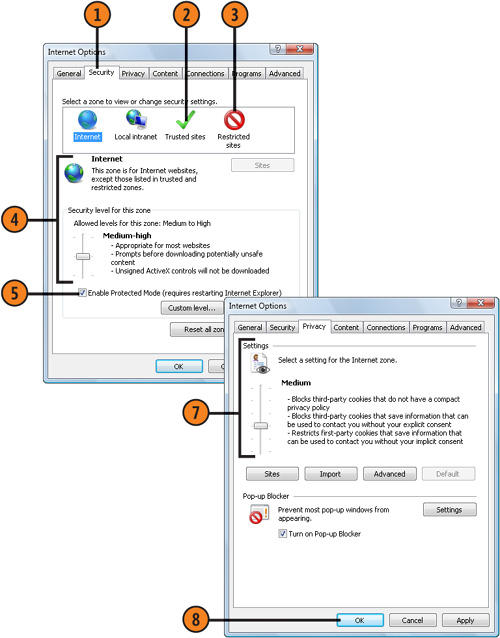
2. Setting Internet Explorer Security
Although
most Web sites pose little security threat to your computer, some sites
are designed with malicious intentions. In Internet Explorer, to
protect your computer from these sites—and to allow access to additional
features for sites you know won’t cause any harm—you can set and
customize your own security levels and can add sites to your list of
trusted or restricted Web sites.
Set Your Security
- 1. In Internet Explorer, click Tools, choose Internet Options from the
drop-down menu, and click the Security tab of the Internet Options
dialog box.
- 2. Click the Trusted Sites zone, click the Sites button, and type or paste
an address for a Web site you trust and to which you want full access.
- 3. Click the Restricted Sites zone, click the Sites button, and type or
paste an address for a Web site you believe might be dangerous and from
which you want maximum protection.
- 4. Click in a zone, and do either of the following:
Use the slider to adjust the level of
security. If the slider isn’t visible, click the Default Level button,
and then use the slider.
Click Custom Level, and select the options you want in the Security Settings dialog box. Click OK.
- 5. Select this check box, if it isn’t already selected, to use Protected mode.
- 6. Repeat steps 4 and 5 for each of the zones, and click Apply.
- 7. On the Privacy tab, set the privacy level you want to control the types
of cookies that are stored and that contain and/or collect information
about you.
- 8. Click OK.