1. Restricting Content in Windows Media Center
Windows
Media Center has its own tools to control the type of content that can
be viewed. Unlike most of the Windows Vista controls, access to the
settings is controlled by the use of a pin code rather than reliance on
Administrator access. These settings affect all users of the computer.
Set the Movie and DVD Control
- 1. With Media Center running and the main menu displayed, choose Tasks,
and then choose Settings. In the Settings window, select General, and,
in the General window that appears, select Parental Controls. Create and
enter a unique four-digit pin code to control access.
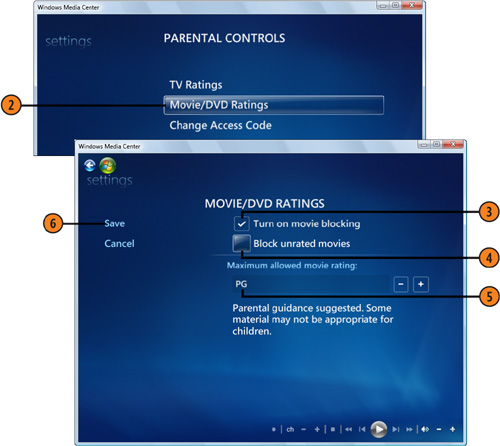
- 2. In the Parental Controls window, click Movie/DVD Ratings to display the Movie/DVD Ratings window.
- 3. Select this check box to turn on blocking.
- 4. Select this check box to block any movie that doesn’t have a rating.
- 5. Specify the maximum rating you’ll allow.
- 6. Click Save.
Set the TV Control
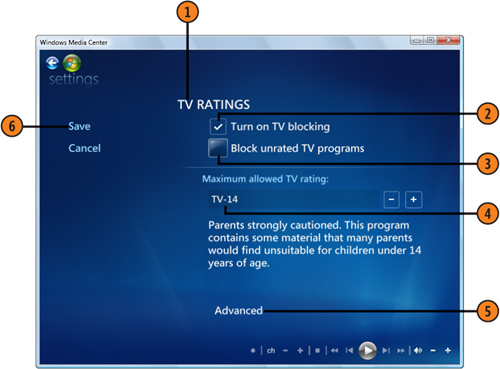
- 1. In the Parental Controls window, select TV Ratings to display the TV Ratings window.
- 2. Select this check box to turn on TV blocking.
- 3. Select this check box to block any TV program that doesn’t have a rating.
- 4. Specify the maximum rating you’ll allow.
- 5. If you want to specify certain types of content, click Advanced, select your settings, and click Save.
- 6. Click Save, and click the Windows Media Center button to return to the main menu.
Tip
When
a movie or a TV program is blocked, you can override the setting by
entering your pin code. Therefore, you must make sure that the pin code
isn’t known by or available to those whose access you’re trying to
limit. |
2. Creating Trusted Contacts
A trusted contact
is someone whose online identity you can verify. You do this by
receiving contact information from the person that contains a security
certificate, which you can then match to the person’s online identity.
Trusted contacts are especially useful when you’re using People Near Me
and Windows Meeting Space.
Exchange Contacts
- 1. Click the Start button, type contact
in the Search box, and click Windows Contacts. Open your own Contacts
file, and verify that it contains all the information you want to share,
including your e-mail address. Click OK to close the file.
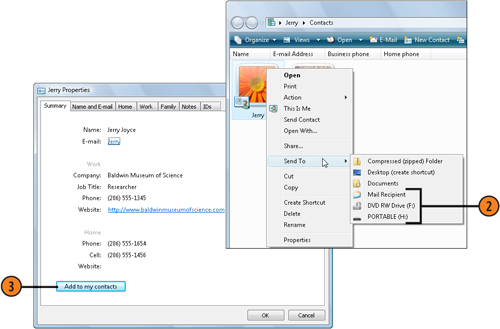
- 2. Right-click the Contacts file, point to Send To on the shortcut menu, and do either of the following:
Choose Mail Recipient, and send the message that appears to the person whom you want to list you as a trusted contact.
Choose to copy the file to a removable storage device.
- 3. When the other person receives the message or the removable storage
device, have him or her open the file and choose Add To My Contacts.
After your Contacts file has been added, your name appears in the
recipient’s Trusted Contacts list.
- 4. Now have the other person send you his or her Contacts file so that you can add it to your Trusted Contacts list.
Tip
Contact information is usually sent in one of two ways—as a Vcard
(a virtual business card) that has the .vcf file extension, or as a
Contacts file that has the .contact file extension. Only a file with the
.contact file extension contains the security certificate that you need
to create a trusted contact, so make sure when you send or receive
information that it’s contained in a Contacts file. |
