A growing number of organizations are doing what they
can to keep data off local workstations. The most obvious benefit is
that server shares are routinely backed up. If something happens to the
user's computer, data is safely waiting on the server. Data can also be
replicated between sites so that it is not only available for users
moving from computer to computer, but from site to site.
Often simply establishing a
policy that instructs users to save data to a network share is not
enough. Typically, a combination of policy, folder redirection, roaming
profiles, and security restrictions are used to keep data off local
workstations. However, in an environment where several dozen
applications are deployed, it is common to have applications that don't
behave as you would like. Some store data locally, even in the
application directory. Further, because it is still often necessary to
allow users access to some local folders, data could be stored here and
would fall outside your server backup plan.
NOTE
If
implemented, a combination of redirected folders and roaming profiles
may actually serve as a method of natural and automatic migration. In
fact, it may well be worth considering the implementation of folder
redirection and roaming profiles as a precursor to your Windows Vista
migration.
Even if you have worked
hard and succeeded in ensuring all user data is maintained on network
shares instead of the local system, there are often settings and
configuration information for the system and for specific applications
stored locally on the system. While arguably less important than data,
loss of system and application settings can be very frustrating to users
and significantly slow their first days with Windows Vista (which has
plenty of changes for the user to deal with on its own).
1. Identifying the migration scenario
There are two basic scenarios for migrating data from one system to another:
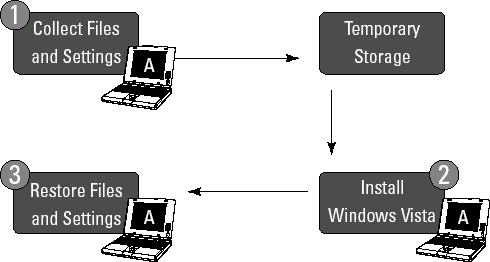
Understanding the wipe and load scenario
In a wipe and load
scenario, the user state is migrated from a source computer (computer A)
to an intermediate store because the system drive is wiped in the
process (so the data cannot be stored on this same drive). After Windows
Vista is installed, the user state is migrated back to the source
computer (computer A, see Figure 1). This is a common scenario when simply replacing the operating system on the same hardware.
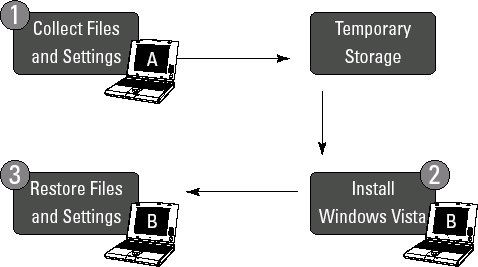
Understanding the side-by-side scenario
In a side-by-side
scenario, the user state is migrated from a source computer (computer A)
to an intermediate store. After Windows Vista is installed, the user
state is migrated to the destination computer (computer B, see Figure 2). This is a common scenario when new systems are being introduced as part of the Vista migration.
A side-by-side migration
scenario is often used to take advantage of the introduction of new
computers to a network during a Windows Vista migration. Computer
cascades or rotations may be used to move systems from one user to the
other. These new systems include improved capabilities over existing
systems and, therefore, are delivered to the organizations' most
demanding users. To make use of the replaced systems, the PCs recovered
from the first delivery may be re-imaged and delivered to a second
community of users whose systems are recovered and cascaded down to
other users, and so on.
2. Determining the data and settings to be managed
One often overlooked step
in planning a migration is to first identify what to migrate, including
personal user settings, applications and application settings, personal
data files, and folders. Identifying the applications to be migrated is
especially important because there is no point in capturing data about
applications that are not going to exist after the migration to Windows
Vista. It is important that the information restored to the new system
consist of only the information that is required. Restoring unnecessary
data or settings for applications that are not present on the target
system can introduce instability in newly deployed machines.
Additionally, it can be a
waste of time and space to back up all profiles blindly. Consider the
type of profiles that may exist on your systems:
Domain User Profiles: These are likely to be needed most in a domain environment.
Local User Profiles:
If users log on to a domain, local profiles may be unnecessary, if
users do logon locally it would be important to include them. Some
migration software can even support migrating a local profile to a
domain profile on the target system.
Roaming User Profiles:
If roaming profiles are in use, then the profile is downloaded from the
server when logging on and copied back up when logging off. In this
case the migration of user profiles may be completely unnecessary in
your environment.
Unused User Profiles:
You may encounter profiles that have not been used in a very long time,
or belong to users that have left your organization. These can be
cleaned up ahead of time, or you can utilize features that limit
migration to profiles that have been used within a specified period of
time .
In fact, it will
likely become clear during the migration-planning phase that some
applications are simply not needed following the migration. Obviously,
such application files and settings should be excluded from the
migration.
Consider the following list as key things you may consider when identifying what it is you want to migrate:
Folders:
This can be specific folders you determine necessary for migration,
including standard user profile folders, such as My Documents, My Video,
My Music, My Pictures, Desktop files, Start Menu, Quick launch
settings, and Favorites. It may also include All Users folders, such as
Shared Documents, Shared Video, Shared Music, Shared Desktop files,
Shared Pictures, Shared Start Menu, and Shared Favorites.
Files: You can specify individual files, but most commonly file types
are specified. File types are determined by their file extensions.
Standard file types to back up might include .qdf, .qsd, .qel, .qph,
.doc, .dot, .rtf, .mcw, .wps, .scd, .wri, .wpd, .xl*, .csv, .iqy, .dqy,
.oqy, .rqy, .wk*, .wq1, .slk, .dif, .ppt*, .pps*, .pot*, .sh3, .ch3,
.pre, .ppa, .txt, .pst, .one*, .mpp, .vsd, .vl*, .or6, .accdb, .mdb,
.pub.
NOTE
Wildcards are
used to cover more file types without having to specify similar file
extensions. For example, for Excel documents you can use .xl* to cover
all the Excel file types (.xlsx, .xlsm, .xlsb, .xltx, .xltm, .xls, .xlt,
.xls, .xml, .xml, .xlam, .xla, and .xlw).
Access Control Lists:
Migrate access control lists (ACLs) for files and folders to maintain
file and folder level security. For example, if a file is marked as
read-only for Users and Full Control for administrators, these settings
will still apply after the file or folder is restored to the destination
computer.
System Settings:
A number of valuable system settings may be migrated, though many such
items may be better managed by using Group Policy. Such system settings
may include Accessibility settings, custom wallpaper and wallpaper
settings, dial-up connections, Internet Explorer settings, Outlook
express mail files, regional options, remote access, and screen saver
settings.
Application
Settings: Depending upon the tool being used, a limited set of
application settings may also be available for migration. The options
and settings stored by these supported applications can be migrated so
long as the application is first installed on the destination computer
prior to restoral of user data and settings information.
Depending upon the tool
used, more or less such settings may be available to you. Microsoft's
User State Migration Tool (USMT) handles all those items specified
above. A third-party application or use of the optional Windows Easy
Transfer Companion (beta) may provide alternate migration options.
3. Determining where to store data during the migration process
Data may be stored
locally or remotely during the migration process. Locally stored
migration data can mean a faster migration process overall. To store
such data locally, you will need a separate partition or attached
storage (such as a USB device).
No matter if you are
going to store locally or on a network location, the major
consideration to be made is just how much space will be required.
Generally speaking, it is best to base calculations on the volume of
e-mail, personal documents, and system settings for each user. The best
way to estimate these is to survey several average desktops to estimate
the size the data store that you will need.
One big differentiator
when determining how much space will be needed is your organizations'
e-mail storage location. If e-mail is stored centrally, such as by an
Exchange Email server, data sets will naturally be smaller as compared
to when e-mail is stored locally (as in offline storage files). When it
comes to locally stored mail, automatically generated OST files will be
regenerated when connecting to Exchange; it is Personal Storage files
(PST) which require special attention as they cannot be recovered from
Exchange. Mobile users typically have larger data sets than workstation
users. When performing tests to estimate these sizes, we recommend that
you separate the results of mobile and workstation users and average
them separately. With local or remote e-mail also a major factor, these
tips can be helpful in determining the size needed to store migration
data (refer to Table 1 for typical requirements based on the type of user).
Table 1. User Storage Requirements to Support Migration
| Type of User | Estimated Storage |
|---|
| Desktop user with centralized e-mail storage | 50mb – 75mb plus size of collected files |
| Desktop user with local email storage | 150mb – 200mb plus size of collected files |
| Laptop user | 150mb – 300mb plus size of collected files |
Considering user documents
As a rule, it is
estimated that a typical user's documents will fit into 50MB of disk
space. Naturally this depends upon the types of files with which the
user works. The 50MB estimate assumes typical office work such as word
processing documents and spreadsheets. Types of documents used in your
organization can also have a significant impact on the size needed per
user. A user that works with high-resolution images, audio, or video for
example can quickly eat up a substantial amount of drive space.
Considering user system settings
For registry settings,
5MB is considered sufficient for a typical user. Naturally, the more
applications on a system the more space may be required, but for the
user-specific portion of the registry, it is rare that this would exceed
5MB.
Considering e-mail
As discussed, keeping
mail locally on a computer as opposed to centrally stored on a mail
server can take up a very large amount of disk space. Some users will
deal with a larger volume of e-mail than others, but when it comes to
estimating space, e-mail could be the biggest variable to consider.
Regardless, it is a good idea to have users that keep some mail local
though they have a central mail server synchronize any offline folders
with their mail server prior to migration.
Estimating space requirements with the User State Migration Tool (USMT)
With so many variables, the estimates in Table 1
may or may not be applicable in your environment. The best way to know
for sure how much space will be required is to investigate a subset of
systems and get actual numbers for your organization.
The /p option of the Scanstate tool generates a space-estimate file called Usmtsize.txt
that is saved to the specified storage path. Running this command does
not actually collect the user state but simply reports on the space
requirements of what would have been collected.
NOTE
Consider this a bit of a
bug, but except when migrating from x86-based computers running Windows
XP, this estimate is often twice as large as the actual disk space
needed on the destination computer. Consider this when calculating your
size requirements.
You can choose to have the migration store compressed when using USMT to collect data; however, the estimates generated by the /p option are applicable for both compressed and uncompressed stores because the compressed store will always be smaller.
The following example turns off compression and creates a space-estimate file at \\server\share\store\usmtsize.txt:
scanstate /i:miguser.xml /i:migapp.xml \\server\share\store /nocompress /p
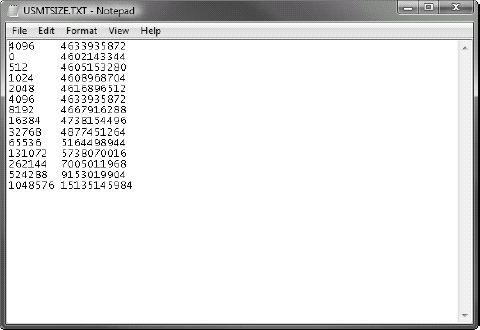
As shown in Figure 3, the usmtsize.txt
file produces a list of byte values broken down by cluster size. The
first column of numbers is the cluster size, and the second column is
what the store size will be for that cluster size. The first line is the
cluster used for the drive where usmtsize.txt was created. The estimate
to focus on is the line with the cluster size matching the storage
drive (the cluster size of your file server or local storage
destination). These estimates do use some assumed values that may not
always provide a high degree of accuracy in the estimation process.
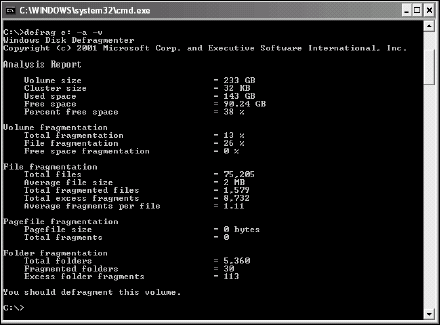
So how big are the clusters on your target storage drive? You can use Defrag.exe to determine cluster size by using the -a option to assess the need to defragment (without performing the actual defragmentation operation) and the -v
option to produce a verbose output. Specify the target drive, and the
report will provide the cluster size in the Analysis Report section at
the top of the output, as shown in Figure 4.
If you want to adjust the cluster size, the convert.exe tool may be used to convert the cluster size. In Windows 2000, convert.exe can be used to convert the partition to a 512-byte cluster size. In Windows XP, convert.exe will determine the best cluster size and will then (typically) convert the partition to a 4096-byte cluster size.
Given the
relatively high complexity in determining space requirements for
migration, it can be best to simply perform an actual collection of user
data for migration on a sampling of systems and use the resulting file
sizes in your calculations.
NOTE
No matter what
estimation you determine to be the best for your environment, it is
naturally a good idea to ensure that you have more than enough space
available. The recommendation is to allow a minimum buffer of an
additional 20 percent more than your estimate.
4. Choosing migration tools
Microsoft provides two free tools to handle the migration of user files and settings:
For most, choosing
between these tools is a very simple decision: If you are migrating more
than a handful of computers, USMT is going to be your choice when
weighing these two tools.
However, it is important
to keep in mind that there are more than just these two choices.
Although the fact that they are free is a definite selling point for the
Microsoft tools, other players in this market have established
themselves over the years as reliable alternatives with their own
enhancements and features that may mean a great deal to you.
