Face it: some sort of data loss is inevitable.
Whether it's a single lost file or a dead hard disk—whether it's
tomorrow or 12 years from now—it will happen. On that happy note, there
is plenty you can do about it.First
and foremost, there's no better method of disaster recovery than having
a good backup copy of all your data. Any stolen or damaged hardware is
easily replaced, but the data stored on your hard disk is not.
Unfortunately, hindsight is 20/20, and if you didn't back up, there's
not much you can do about it after the fact; even if your computer
equipment is insured with Lloyds of London, once your data is gone, it's
gone. Thus, a little preventative maintenance is in order.
1. Patch Windows with Windows Update
If
software manufacturers waited until their products were completely
bug-free before releasing them, then we'd all still be using
typewriters.
Windows
Vista has a fairly automated update system, wherein patches to the
operating system that Microsoft considers important are made available
on its web site, and, by default, automatically downloaded and installed
on your PC.
Just open Windows Update in Control Panel, and click the Check for updates
link on the left to compile a list of the updates you haven't yet
installed. This is a fairly straightforward procedure, but largely
unnecessary because Windows does it for you. Or is it necessary after
all?
Right out of the box, Vista asks you how you'd like to handle updates. Microsoft recommends the Install updates automatically option, and even goes so far as to alert you through Security Center
if you've selected any other option (or none at all). But if you go
this route, you're setting yourself up to have your PC indiscriminately
hijacked by Microsoft whenever it needs to install an update. That means
annoying pop-up reminders to restart Windows while you're trying to get
your work done, or worse: a long delay when you need to shut down in a
hurry.
Of course, the other end of the spectrum is Never check for updates,
which some Windows users swear by. Sure, you never get the frequent bug
fixes for Internet Explorer, but that's not such a big deal if you're a
Firefox user.
But the Download updates but let me choose whether to install them
option is the best of both worlds. This way, you can pick and choose
your updates, and more importantly, install them only when it's
convenient for you.
The
hardware drivers delivered along with the other Windows updates are a
mixed bag, at best. Sometimes the driver install fails, and other times,
it succeeds and then breaks the device. Update a driver only when
you're already using a Microsoft driver, and to be safe, only if the device isn't
working. Fortunately, drivers installed through Windows Update can be
"rolled back," but who wants to roll back drivers when you don't have
to? |
|
If,
for some reason, you need to uninstall an update, you can do so
sometimes. In Control Panel, open Programs and Features, and then click
the View installed updates link on the left. Highlight any update in the list and click Uninstall to get rid of it.
If
you're using Microsoft Office or another high-profile Microsoft
product, you can update those products along with Windows. To do this,
open Windows Update, click the Change settings link, and turn on the Use Microsoft Update option.
2. Quick, On-the-Fly Backups
In
its simplest form, a backup is simply a copy of your data. Now, a full
system backup, as described in the next topic, is obviously valuable,
but often too involved of a procedure to practice frequently enough to
be entirely effective.
While
you might perform a full backup once a week or once a month, you can do
a quick backup of your most important files several times a day. No
special software or hardware is required, and, best of all, it takes
only a few seconds.
The
following two solutions are remarkably simple, but the idea is sound,
and if you make a habit of making these quick, on-the-fly backups, it
will save you hours of work.
2.1. Solution 1: Simple copy
The
next time you've put a few hours into a document, open the folder in
Explorer, and make a duplicate of the file by dragging it to another
part of the same folder with the right mouse button and selecting Copy Here.
Then,
if you screw up a file you're working on, if it gets accidentally
deleted, or if it gets corrupted by a system crash, you'll have a fresh
backup right in the same folder.
2.2. Solution 2: Simple ZIP
At
the end of the day (or even several times a day), just right-click the
folder of a project on which you've been working, select Send To, and then select Compressed (zipped) Folder. A new .zip file containing compressed versions of all of its contents will appear next to the folder in a few seconds.
If you then need to retrieve a file from the backed-up folder, just double-click the new .zip file.
If
you've disabled Windows Vista's built-in support for ZIP files, and
have instead installed a third-party utility, such as WinZip (http://www.winzip.com), the procedure may be slightly different. In the case of WinZip, all you'd have to do is right-click the folder and select Add to
foldername
.zip. |
|
3. Back Up Your Entire System
There
are more ways to back up your data than to store it in the first place.
The sole purpose of a backup is to have a duplicate of every single
piece of data on your hard disk that can be easily retrieved in the
event of a catastrophe (or even just an accidental deletion). Imagine if
your computer were stolen and you had to restore a backup to a
brand-new computer. Could you do it? If the answer is no, you're not
backed up.
You
need to be able to complete a backup easily and often, to store the
backup in a safe place (away from the computer) and to retrieve all your
data at any time without incident. If it's too difficult or
time-consuming, odds are you won't do it—so make it easy for yourself.
A
bare-minimum backup could be little more than a single CD or USB memory
key with your last three or four important documents on it. It's better
than nothing, and it does protect your most recent work, but what about
your email, your web browser bookmarks, your digital photos, and the
thousands of documents you've written over the past six years?
I know what you're thinking, because I've heard it a thousand times: nothing on my computer is really that important, so it's really not worth the time to back up.
OK, assume that's true—how long would it take you to reinstall Windows
and all your applications, install all your drivers, reconfigure all
your hardware, and customize all your toolbars? If you have a full
backup of your system, the answer is not only "not long," but "no
problemo" as well.
Ideally,
you should be able to back up your entire hard disk on a single piece
of media. We won't even entertain the idea of CDs (you'd need 57 of them
to back up a full 40 GB hard disk), nor DVDs (you'd need nine standard
or five dual-layer discs). ZIP drives are a joke, and USB memory keys
are too slow and too small. Tapes are so far beyond passé, most
Vista-compatible backup software doesn't even support tape drives.
The
only choice for backing up a modern PC is a removable hard disk.
Shortly after the initial release of Vista, a 500 GB 3.5-inch hard disk
cost about $100, with a decent external enclosure adding only $30. (If
you're not a do-it-yourselfer, prebuilt solutions are about 50% more.)
There are basically three software-based backup technologies included with Windows Vista:
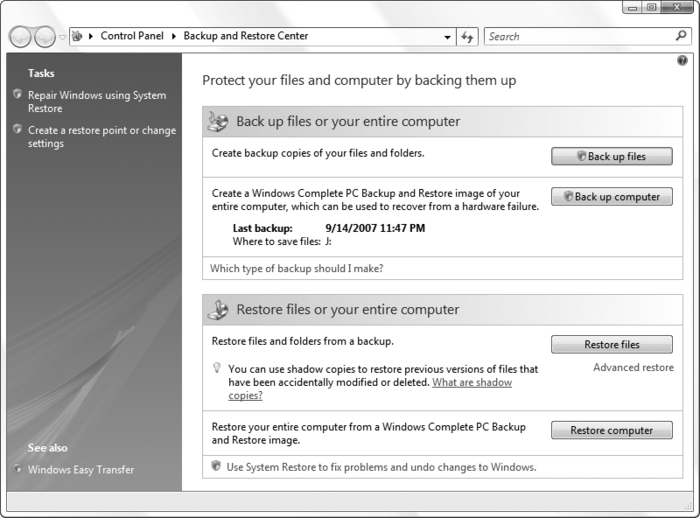
Back Up Files
The Back Up Files
wizard attempts to make it easy to back up your personal data onto any
drive—removable or otherwise—and restore individual files as needed.
Just open the Backup and Restore Center (Figure 6-11) and click the Back up files button.
Unfortunately, this feature is severely limited. For one, you can't choose which files to back up, but rather only which types
of files to back up (and there's not much latitude there, either).
Next, the Back Up Files wizard tool won't back up your system files,
your Registry, or anything else you'd need to quickly rebuild your PC in
the event of a catastrophe; for that, you'll need the Complete PC Backup and Restore tool (discussed next) or third-party backup software (such as that included with some external hard disk products).
But
what's most frustrating about Back Up Files is how easily it trips up.
The first time you use the Back Up Files wizard, it asks you to choose a
destination, select files to back up, and—in all editions except Home
Basic—schedule future backups. Thereafter, clicking Back up files
will start a backup immediately, and without any prompts. But if
Windows can't find the previous backup archives—you've deleted them,
switched media, etc.—Windows won't ask you to make it right; the backup
will just fail. To fix the problem, click the Change settings link, click Change backup settings,
and specify a new location to save the backup. (Never mind if you don't
want to choose a different destination; just change it and then change
it back.)
The Back Up Files wizard is included with all editions of Windows Vista.
Complete PC Backup and Restore
If you have the Business, Ultimate, or Enterprise edition of Windows Vista, you have access to the handy Complete PC Backup and Restore
feature. This tool copies every last byte on your hard disk to the
destination of your choice, making it possible to restore your PC easily
in the event of a hard disk crash or other catastrophe. Just open the
Backup and Restore Center (Figure 1), click the Back up computer button, and follow the prompts to create image files of each of your hard disks.
But
as though Microsoft had plotted some cruel joke, you can't restore
individual files from Complete PC backups, at least not without a little
hack demonstrated later in this section. (Microsoft's advice, if you
can believe it, is to back up your data twice—once with Complete PC Backup and once with the Back Up Files wizard—if you want complete protection and the luxury of restoring individual files.)
Shadow Copies/Previous Versions
The Shadow Copies feature, also known as previous versions,
is only available in the Business, Ultimate, and Enterprise editions of
Vista. It's an extension of the System Restore feature, which stores
older versions of system files and hardware drivers in case Windows
won't start as the result of a recent change.
Truth be told, there's a fourth means of automated backup supported by Vista; see the upcoming sidebar, "Protect Your Data with RAID," for the scoop.
RAID, or Redundant Array of Inexpensive Disks,
is a collection of two or more hard drives that your PC (and Windows)
treats as a single volume. Save your data once, and it's invisibly
stored on two different physical disks simultaneously. If one of your
drives fails, just swap it out for a new one and keep working while your
RAID subsystem rebuilds the new drive in the background. RAID comes in several varieties, but not all offer this vital redundancy. Raid 1 is the most common, safeguarding your PC by "mirroring" your data on your multiple drives. Raid 0, on the other hand, spreads your data across multiple drives to improve performance (called striping), yet offers no data redundancy. Raid 5 works similarly to Raid 0, but adds a "parity" mechanism to safeguard your data, and requires at least three drives. Finally, Raid 10
offers true mirroring (like Raid 1) and striping (like Raid 0)—the best
of both worlds—but requires four drives for the full effect. Raid 1 is
the easiest to implement and is the least expensive way to get data
protection from RAID. The
first ingredient you need is a SATA RAID controller, one either built
in to your motherboard, or, barring that, an add-on RAID card. Next, you
need two SATA hard disks of the same capacity, preferably the same
brand and model, too. To get
started, plug your drives into ports 0 and 1, respectively, unless your
documentation says otherwise. (Some controllers have dedicated RAID
plugs.) To make room, you may need to relegate any other SATA devices,
such as DVD drives, to higher-numbered ports. To set up the drives,
enter your PC's BIOS setup screen,
and make sure all of the SATA ports you're using are enabled. Next,
disable any unused SATA ports (some RAID controllers mistake unused
ports for missing drives), and then turn on the RAID feature if it's not
already on. Save your settings and reboot when you're done. After
the BIOS setup prompt but before Windows begins to load, look for a
message from your RAID controller, and then press the required keystroke
(e.g., Ctrl-I
for the Intel Matrix Storage Manager) to enter your RAID configuration
utility. Use this screen to select drives and build your array. (Since
this step may erase any data on your drives, make sure they're fully
backed up before you proceed.) When you're done, you can install Windows or restore your backup (if applicable) on the array as though it were
only a single drive. Once you're back in Windows, install the RAID
management software so you can monitor the health of your array. |
3.1. Restore a Complete PC Backup
A
saving grace of Vista's Complete PC Backup and Restore is how simple it
is. True, a few more features and interactivity would've been nice
(such as the ability to restore individual files), but at least it works
as advertised.
Restoring
a Complete PC Backup involves erasing your hard disk and replacing all
your data with the data in the backup. This means any data on your hard
disk created or modified since your last backup will be sucked into
oblivion, so you'll likely only want to use this feature if your hard
disk crashes. If you're restoring from within Windows, consider making
another, newer backup on different media before you restore the older
archive. |
|
3.2. Restore individual files from a Complete PC Backup
The
most egregious limitation of the Complete PC Backup tool is that
Microsoft made no provision for restoring individual files from backup
archives. Their solution? Create a second backup with the lesser Back Up
Files wizard and use it to restore individual files. Never mind that
your backups will take twice as long to complete, consume much more disk
space, and provide individual file restoration only for personal
documents. Why Microsoft didn't simply provide the following tools is
anybody's guess.
There is one thing to gain by running both a Complete PC Backup and a backup with the Back Up Files wizard: shadow copies. If you have plenty of disk space to spare, create a second partition .
Then use Back Up Files to schedule routine backups of your personal
documents on the new parition. |
|
Complete PC Backup creates its backups in the form of virtual hard disk image (.vhd)
files, the very same files used by Microsoft Virtual PC and Virtual
Server to store data for virtual machines. Not only does this allow
Vista's Complete PC Restore tool to rebuild a hard disk from a backup,
but it means that you can open a window to the past, so to speak, and
operate a virtual PC off your backup. It also means you can restore
individual files... with the right software.
First, download the latest version of Virtual Server 2005, freely available at http://www.microsoft.com/virtualserver/.
(Nevermind the version number; the latest release at the time of this
writing, R2 SP1, works just fine with Vista.) Get either the 32-bit or
64-bit version, depending on your edition of Vista, and save the setup.exe file in a new folder named virtualserver on your desktop.
When the download is complete, open a Command Prompt window in administrator mode and use the cd command to make the new folder the active folder, like this:
cd \users\username\desktop\virtualserver
where username
is your username. Now, if you wish, you can install the entire Virtual
Server application, but it's not necessary for the purposes of this
solution. Instead, all you need are a handful of files. Start by
extracting the .msi installer file by typing this command at the prompt:
setup /c /t .
Make sure to put spaces between
the parameters, and don't forget the lone dot at the end. Next, type
this command to install the VHDMount utility from the archive:
msiexec /i "Virtual Server 2005 Install.msi" /qn ADDLOCAL=VHDMount
Note that VHDMount
is case-sensitive, so type the command exactly as shown. When that's
done, close the Command Prompt window. If you like, you can delete both setup.exe and Virtual Server 2005 Install.msi, although it may be wise to hold on to setup.exe in case Microsoft decides to discontinue the product, or worse, start charging for it.
The installer puts the VHDMount utility in the \Program Files\Microsoft Virtual Server\Vhdmount folder. But since it's a Command Prompt program, there's one more thing to do to make it more easily accessible: download the vhdmount.reg Registry patch file from http://annoyances.org/downloads/vhdmount.reg, or type the following into Notepad and save it as vhdmount.reg:
Windows Registry Editor Version 5.00

[HKEY_CLASSES_ROOT\.vhd]
@="Virtual.Machine.HD"

[HKEY_LOCAL_MACHINE\SOFTWARE\Classes\Virtual.Machine.HD\shell]
@="Mount"

[HKEY_LOCAL_MACHINE\SOFTWARE\Classes\Virtual.Machine.HD\shell\Mount\command]
@="\"C:\\Program Files\\Microsoft Virtual Server\\Vhdmount\\vhdmount.exe\"
/p \"%1\""

[HKEY_CLASSES_ROOT\Virtual.Machine.HD\Shell\Unmount-commit]
@="Unmount (commit changes)"

[HKEY_CLASSES_ROOT\Virtual.Machine.HD\Shell\Unmount-commit\command]
@="\"C:\\Program Files\\Microsoft Virtual Server\\Vhdmount\\vhdmount.exe\"
/u /c \"%1\""

[HKEY_CLASSES_ROOT\Virtual.Machine.HD\Shell\Unmount-discard]
@="Unmount (discard changes)"

[HKEY_CLASSES_ROOT\Virtual.Machine.HD\Shell\Unmount-discard\command]
@="\"C:\\Program Files\\Microsoft Virtual Server\\Vhdmount\\vhdmount.exe\"
/u /d \"%1\""
If your Program Files folder is on a different drive than C:, edit the vhdmount.reg file and change both occurrences of the VHDMount folder path to the correct location. Double-click the vhdmount.reg file and answer Yes to merge it with your Registry.
In
theory, the aforementioned components are all you need, but in
practice, the VHDMount utility may not work until you also install the
full Microsoft Virtual PC package (not the same as Virtual Server). You
can get Virtual PC 2007 for free from http://www.microsoft.com/virtualpc/. You don't have to use the program, only have it present on your system. |
|
Now
that all the pieces are in place, open Windows Explorer and navigate to
the folder containing your backup. If you're using an external hard
disk assigned to J: as your backup drive, your .vhd files are in J:\WindowsImageBackup\{computername}\Backup {date}, where {computername} is the name of your PC and {date} is the date of your last backup.
Right-click a .vhd file and select Mount.
A Command Prompt window will appear briefly with a message; leave it
alone while it does its job. If you see any Found New Hardware messages,
click Locate and install driver software (recommended) and follow the prompts.
To confirm that all the drivers are in place, open Device Manager (devmgmt.msc). In the Disk drives category, you should see an MS Virtual Service SCSI Disk Device entry. You should also see a Microsoft Virtual Server Storage Devices category, with at least one entry by the same name. If they're not there, look in the Other devices category for any Unknown device entries. |
|
With
all the drivers in place, you should see a new drive in Windows
Explorer, from which you can restore any individual files from your
backup by just dragging and dropping. If it's not there, open Disk
Manager , and if you see a drive in the lower pane with no drive letter, right-click Change Drive Letter and Paths and assign an unused drive letter to the virtual drive.
When you're done with the backup, return to the folder containing your .vhd files, right-click the one you've mounted, and select Unmount (discard changes). (Only use the other option, commit changes, if you made changes to the virtual drive that you want to keep.) The drive should disappear from Windows Explorer immediately.
4. Recover Your System After a Crash
The
purpose of backing up is to give you the opportunity to restore your
system to its original state if something nasty should happen to your
hard disk, whether it be theft, fire, malfunction, termites, or just
your own clumsiness. You'd be surprised at how many people back up their
systems without having any idea how to restore it later should the need
arise. The backup doesn't do you any good if you can't get at your
files later, so it's important to take steps to make sure you can
restore your system from scratch if necessary.
So,
assume your hard disk is completely dead, totally empty, or missing,
and you now need to restore your PC onto an empty volume.
If
you have the Business, Ultimate, or Enterprise edition of Windows
Vista, you can use the Complete PC Backup and Restore tool for this
purpose. To restore a Complete PC backup, boot off your Vista setup disc (), and when you see the Install Now page, click the Repair your computer link and then click Windows Complete PC Restore.
Otherwise,
if you have the Home Premium or Home Basic edition, you may have more
work cut out for you. Assuming you've used the Back Up Files wizard, you'll need to install Windows or use
your PC's recovery disc before you can restore any of your files.
(You'll also need to install each of your applications if you want to
subsequently open your documents.) Once you're back in Windows, open the
Backup and Restore Center (shown previously in Figure 6-11), click the Restore files button, and follow the prompts.But
what if your hard disk isn't empty? Say Windows got hosed and won't
start, or perhaps you just lost half your data files. Unless your backup
is from this morning, you won't necessarily want to erase all your
recent files and replace them with whatever is in your backup archive.
In this case, you can place a parallel installation of Vista on your
drive. Or, you can install a new drive, restore your Complete PC
backup onto it, and then hook up your old drive and copy your recent
data onto it. (The latter solution has the advantage of allowing you to
format or discard the damaged drive.)
