2. What to Do When Windows Won't Start
Unfortunately,
Windows' inability to load itself is a common problem, usually
occurring without an error message or any obvious way to resolve it.
Sometimes you'll just get a black screen after the startup logo, or your
computer may even restart itself instead of displaying the desktop. Of
the many causes to this problem, many deal with hardware drivers,
conflicts, or file corruption.
But
when Windows won't start, how do you fix the problem? There's no
Windows Explorer to delete files, no Internet to research solutions, no
Device Manager to check and uncheck boxes, and no Solitaire
to while away the time.
Luckily, Microsoft has provided an out—actually, about a dozen of them. Gone is the frustratingly limited Recovery Console
found in Windows 2000 and XP; in its place are a handful of useful
"recovery tools" on the Vista setup disc, and several alternative ways
to get into Windows that are already on your hard disk .
2.1. Grab your Vista DVD
The
best tools are on your Windows Vista setup disc, the location of which
has probably escaped your mind. If you don't have one, and Vista came
preinstalled on your PC, you may have a "recovery partition" ;
otherwise, contact your PC manufacturer and request the original Vista
DVD (after all, you paid for it when you bought the machine).
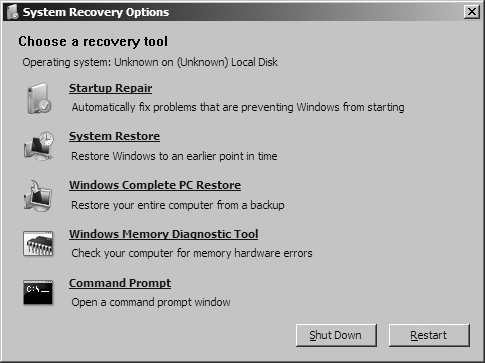
Pop the Vista disc in the drive and turn on your computer. When you see the "Install Now" page, click the Repair your computer link at the bottom to get to the System Recovery Options window shown in Figure 3.

Here's how these options work:
Startup Repair
This
is the first step you should take when Vista won't start. This tool
repairs your hard disk's master boot record (MBR) and partition boot
sector. If Vista still won't start after using Startup Repair, read on.
System Restore
This
reverts your Windows installation to an earlier incarnation, which is
useful if a recent driver installation has prevented Windows from
booting. But beware, depending on the age of the most recent restore
point, this may do nothing, or may go back too far. Use this option only
if you don't have a more recent backup (discussed next).
Windows Complete PC Restore
Use
this option to wipe your hard disk clean and restore a backup you made
with the Backup and Restore Center that comes with the Business and
Ultimate editions of Windows Vista. (Sorry, Home Basic and Home Premium
users—apparently your data is not that valuable.)
The
fact that the Windows Complete PC Restore feature wipes your hard disk
clean is a strong case for having your personal data on a separate
partition from Windows. |
|
Windows Memory Diagnostic Tool
This examines your PC's system memory (RAM) for errors; . Unlike the other tools here, this one makes no
changes to your hard disk, so it's safe to use at any time.
Command Prompt
Use
this tool to open a Command Prompt window, from which you can copy,
delete, or rename files that may be preventing Windows from loading.
Also available is the Safe Mode with Command Prompt, discussed later in
this section.
2.2. Use the F8 menu
It's
a pity that the recovery tools on the Vista disc aren't available
without the disc itself. If you can't find the Windows DVD (or CD disc
1), or your PC manufacturer was too stingy to give you one, there are
some lesser tools you can use that are already on your hard disk. Just
after you power up your PC (and after it displays its own logo or POST
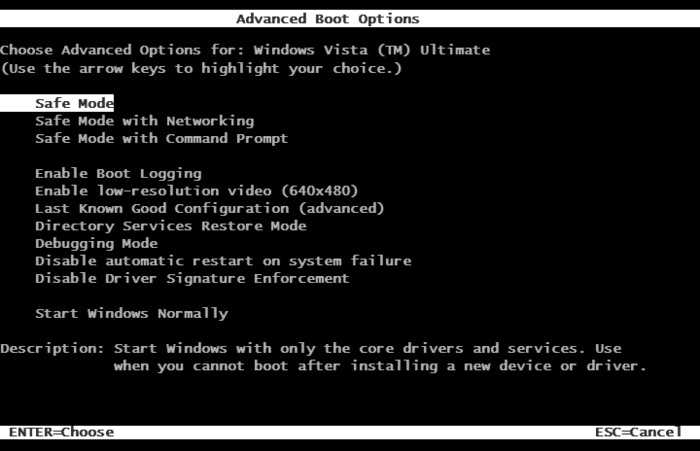
screen), but before you see the Windows logo, press the F8 key on your keyboard to invoke the Advanced Boot Options menu shown in Figure 4.

From the F8 menu, you'll have these choices:
Safe Mode
This
forces Windows to start up in a hobbled, semi-functional mode, useful
for troubleshooting or removing software or hardware drivers that
otherwise prevent Windows from booting normally. Use the next option, Safe Mode with Networking, instead of Safe Mode, unless it turns out that your network drivers are the ones responsible for breaking Windows.
Safe Mode with Networking
This
is the same as Safe Mode, except that Windows loads your network
drivers. This is vitally important if you want Internet access when you
get into Windows (useful for researching your problem).
Safe Mode with Command Prompt
Instead
of loading Windows and your desktop, all you'll see is a Command Prompt
window, sort of like the one you can get to from the System Recovery
Options window (Figure 3, earlier).
The
Safe Mode with Command Prompt option is a good choice if you suspect
that a recent driver installation is to blame for Windows' inability to
start. Once the Command Prompt appears, type devmgt.msc at the prompt and press Enter to start Device Manager. Then, find the driver in the Device Manager window, right-click the entry, and select Disable. Close Device Manager and restart Windows when you're done. To get out of the Command Prompt cleanly and restart Windows, type exit at the prompt and press Enter. If typing exit closes the Command Prompt window but leaves Windows running, press Ctrl-Alt-Del and then click the tiny arrow next to the red button at the bottom of the screen. |
|
Enable Boot Logging
This starts Windows normally, except that a log of every step is recorded into the ntbtlog.txt file, located in your \Windows folder. If Windows won't start, all you need to do is attempt to start Windows with the Enable Boot Logging option at least once. Then, reboot your PC, press F8 again, and choose one of the Safe Mode tools above (preferably, Safe Mode with Networking). When you're back in Windows, read the log with Notepad; the last entry in the log is most likely the cause of the problem.
Enable low-resolution video (640×480)
This
starts Windows normally, but in VGA mode (640×480 resolution at 16
colors). This helps you troubleshoot bad video drivers or incorrect
video settings by allowing you to boot Windows with the most compatible
(and ugliest) display mode there is.
Last Known Good Configuration (advanced)
This
starts Windows with the last set of drivers and Registry settings known
to work. Use this if a recent Registry change or hardware installation
has caused a problem that prevents Windows from starting.
Directory Services Restore Mode
Don't bother with this unless the PC is a Windows NT domain controller.
Debugging Mode
This option, typically of no use to end-users, sends debug information to your serial port to be recorded by another computer.
Disable automatic restart on system failure
Unlike
the previous eight entries here, this option merely changes a setting
so you can determine why Windows won't start. By default, if Vista
crashes while it's loading, it reboots your PC so fast, you can't read the error message on that infamous blue screen. Choose Disable automatic restart on system failure if you want to read the message and then reboot by hand.
Disable Driver Signature Enforcement
By
default, the 64-bit edition of Windows Vista won't allow you to install
any device drivers that haven't been digitally signed (a bureaucratic
requirement to get the Microsoft certification logo on a product's
packaging). In theory, you should be able to choose Disable Driver Signature Enforcement
to allow your PC to install nonsigned drivers, but in practice, this
never works. Instead, boot Windows normally, open a Command Prompt
window, and type the following:
bcdedit.exe -set loadoptions DDISABLE_INTEGRITY_CHECKS
and then press Enter.
Close the Command Prompt and restart Windows for the change to take
effect. If that doesn't help, you may have to forgo supporting a
specific device until the manufacturer makes a signed, native (64-bit)
driver available.
Repair your computer (not shown inFigure 4)
You
may see this option if your PC came with Vista preinstalled and your PC
manufacturer was too cheap to include a real Windows installation disc.
Start Windows Normally
Use this self-explanatory option to continue booting Windows normally, as though you never had invoked the F8 menu.
With
these tools , you should have
everything you need to get Windows running again. At the point you
discover the grim fact that your repair mission has turned into a recovery mission.