1. Processing Messages
Each
new message that arrives is stored in the Inbox folder’s message list
and appears in a bold font. To view the contents of any message, select
it in the message list and Outlook Express then displays the message
text in the preview pane. If you find the preview pane too confining,
you can open the selected message in its own window by double-clicking
it.
When you have a message selected, you can do
plenty of things with it (in addition to reading it, of course). You can
print it, save it to a file, move it to another folder, reply to it,
delete it, and more. Most of these operations are straightforward, so
I’ll just summarize the basic techniques here:
Dealing with attachments—
If a message has an attachment, you’ll see a paper clip icon in the
Inbox folder’s Attachment column, as well as in the upper-right corner
of the preview pane. You have two choices: To open the attachment: Click the preview pane’s paper clip icon and then click the name of the file. To save the attachment:
Click the preview pane’s paper clip icon and then click Save
Attachments. You can also select the File, Save Attachments command.
Moving a message to a different folder. To move a message to another folder,
use your mouse to drag the message from the Inbox folder and then drop
it on the destination folder. Saving a message—
Instead of storing the message in a folder, you might prefer to save it
to a file. To do this, select File, Save As and then use the Save As
dialog box to select a location, enter a filename, and select a file
type. Saving a message as stationery—
If you receive a formatted message and you like the layout, you can
save it as stationery for your own use. To do so, select File, Save As
Stationery. Printing a message— To print a copy of the message, select File, Print. Replying to a message— Outlook Express gives you two reply options: | Replying to the Message Author | This
option sends the reply to only the person who sent the original
message. Any names in the Cc line are ignored. To use this option,
select Message, Reply to Sender or press Ctrl+R. You can also click the
Reply button on the toolbar. | | Reply to All of the Message Recipients | This
option sends the reply not only to the original author, but also to
anyone else mentioned in the Cc line. To use this option, select
Message, Reply to All or press Ctrl+Shift+R. You can also click the
Reply All button on the toolbar. |
Forwarding a message— You can forward a message to another address by using either of the following commands: | Forward | Select
Message, Forward, press Ctrl+F, or click the Forward toolbar button.
The full text of the original message is inserted into the body of the
new message and a greater than sign (>) is appended to the beginning
of each line. | | Forward as Attachment | Select
Message, Forward as Attachment. In this case, Outlook Express packages
the original message as an attachment, but it makes no changes to the
message. The user who receives the forwarded message can then open this
attachment and view the original message exactly as you received it. |
Deleting a message—
To get rid of a message, select it in the folder and then press Delete
(or Ctrl+D) or click the toolbar’s Delete button. If the message is
open, press Ctrl+D or click the Delete button. Note that Outlook Express
doesn’t really delete the message. Instead, it just moves it to the
Deleted Items folder. If you change your mind and decide to keep the
message, open the Deleted Items folder and move the message back. To
remove a message permanently, open the Deleted Items folder and delete
the message from there.
2. Customizing the Message Columns
The default columns in Outlook Express tell you
the basic information you need for any message. More information is
available, however. For example, you might want to know the date and
time the message was sent, the size of the message and to whom the
message was sent. These items can be displayed as columns in the message
list. Here are the steps to follow to customize the Outlook Express
columns:
1. | Select
View, Columns. (You can also right-click any column header and then
click Columns.) Outlook Express displays the Columns dialog box, shown
in Figure 1.
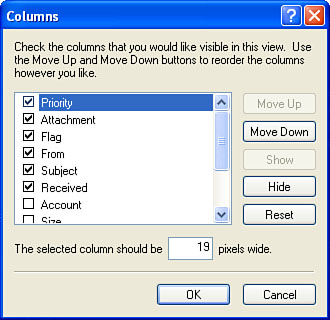
| 2. | To add a column, either activate its check box or select it and click Show.
| 3. | To remove a column, either deactivate its check box or select it and click Hide.
| 4. | To
change the order of the columns, select a column and then use the Move
Up and Move Down buttons to position the column where you want it.
(Columns listed top to bottom are displayed left to right in the message
list.)
| 5. | To control the width of a column, select it and then enter a new value in the The Selected Column Should Be X Pixels Wide text box.
| 6. | Click OK.
|
Here are a few more column customization tricks:
To change the width of a displayed column, use your mouse to drag the right edge of the column’s header to the left or right. To change the width of a displayed column to fit its widest entry, double-click the right edge of the column’s header. To change the position of a column, use your mouse to drag the column’s header left or right.
3. Setting Read Options
To help you work with your correspondence,
Outlook Express has a number of options related to reading messages. To
view them, select Tools, Options to open the Options dialog box, and
then display the Read tab, shown in Figure 2.
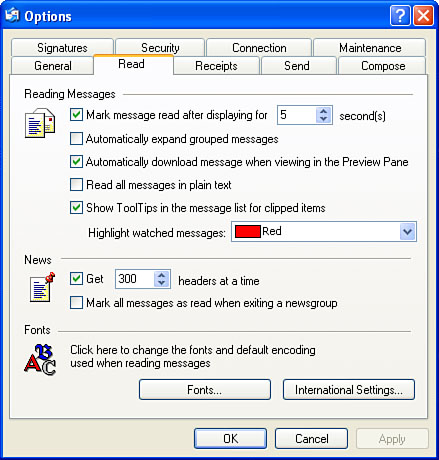
Here’s a review of the controls in this tab:
| Mark Message Read After Displaying for X Second(s) | Deactivate
this check box to prevent Outlook Express from removing the boldfacing
while you’re reading a message. Alternatively, you can use the spin box
to adjust how long it takes Outlook Express to remove the bold (the
maximum is 60 seconds). |
|
You can also control the marking of read messages via the Edit menu using the following commands:
Mark As Read—
Turns off boldfacing for the current message or messages.
Alternatively, press Ctrl+Q or Ctrl+Enter, or right-click the message
and then click Mark as Read.
Mark As Unread—
Turns on boldfacing for the current message or messages. You can also
press Ctrl+Shift+Enter or right-click the message and then click Mark as
Unread.
Mark Conversation as Read— Turns off boldfacing for all the messages in the conversation associated with the current message. (A conversation
or thread is a group of messages that have the same subject line,
ignoring the Re: and Fw: prefixes added to replies and forwards.)
Alternatively, press Ctrl+T. Note that for this command to work, you
have to group messages by conversation by selecting the View, Current
View, Group Messages By Conversation command.
Mark All Read— Turns off boldfacing on all messages in the current folder. You can also press Ctrl+Shift+A.
|
Note
Note that you can ask Outlook Express to
display only unread messages by selecting the View, Current View, Hide
Read Messages command. (Select View, Current View, Show All Messages to
return to the regular view.)
| Automatically Expand Grouped Messages | When
you group messages by conversation (by selecting the View, Current
View, Group Messages By Conversation command), Outlook Express displays
only the first message in the group and includes a plus sign (+) to its
left. You need to click the plus sign to see the other messages in the
conversation. If you prefer to see all the messages in the conversation
automatically, activate this check box. | | Automatically Download Message When Viewing in the Preview Pane | When
you’re working with a Web-based email account (such as Hotmail) or a
newsgroup, deactivate this check box to prevent Outlook Express from
downloading message text when the message header is selected. When
you’re ready to receive the text, press the spacebar. | | Read All Messages in Plain Text | Activate
this check box to convert all HTML messages to plain text, which helps
to thwart web bugs and malicious scripts. | | Show ToolTips in the Message List for Clipped Items | When
this check box is activated, Outlook Express displays clipped
information (such as a subject line that’s cut off at the end because
the Subject column is too narrow) in a ToolTip when you hover the mouse
pointer over the item. | | Highlight Watched Messages | Use
this list to specify the color that Outlook Express uses to display
messages marked as watched. To mark a message as watched, you first need
to display the Watch/Ignore column Then click inside the column beside the
message to add an eyeglasses icon to the column and to format the
message in the specified color. | | Fonts | Click
this button to display the Fonts dialog box, which displays a list of
the character sets installed on your computer. For each character set,
you can specify a proportional and fixed-width font, as well as a font
size and encoding. You can also specify which character set to use as
the default. | | International Settings | Click
this button to display the International Read Settings dialog box.
Activate the Use Default Encoding for All Incoming Messages to apply the
encoding shown in the Default Encoding box to all your messages. |
|
