Using the Whiteboard
Whiteboards have
become a standard feature in boardrooms and conference rooms.
Presenters, facilitators, and meeting leaders use them to record action
points, highlight important information, and draw charts and diagrams.
If you’re
running a remote conference via NetMeeting, you can use its Whiteboard
feature for the same purposes. The Whiteboard is basically a revamped
version of the Paint window that enables you to enter text, highlight
information, and draw lines and shapes. Everything you add to the
Whiteboard is reflected on the other users’ screens, so they see exactly
what you’re typing and drawing. You can create multiple Whiteboard
pages, and even save pages for later use.
To work with the Whiteboard, each user must display it by using any of the following techniques:
For basic
operations, you use Whiteboard just as you use Paint. That is, you
select a tool to work with, select a line width (if applicable for the
tool), select a color, and then draw your shape or type your text.
However, Whiteboard has quite a few other techniques that aren’t found
in the Paint program. Here’s a summary:
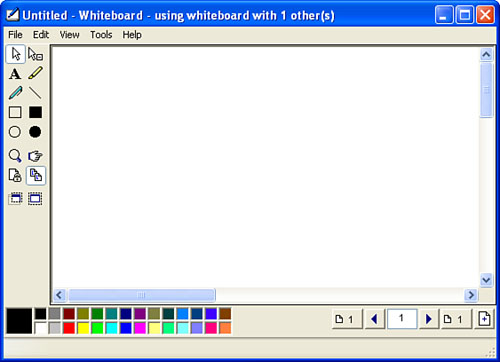
Figure 1 shows the Whiteboard window that appears.
 Locking the Whiteboard contents—To
prevent the other users from changing the Whiteboard screen while you
work, either select View, Lock Contents or click the Lock Contents tool.
Locking the Whiteboard contents—To
prevent the other users from changing the Whiteboard screen while you
work, either select View, Lock Contents or click the Lock Contents tool.
 Using the remote pointer—Whiteboard
has a remote pointer that, when activated, appears on each user’s
Whiteboard. To activate it, either select View, Remote Pointer or click
the Remote Pointer On tool. When the pointer appears, use the mouse to
drag it around the screen.
Using the remote pointer—Whiteboard
has a remote pointer that, when activated, appears on each user’s
Whiteboard. To activate it, either select View, Remote Pointer or click
the Remote Pointer On tool. When the pointer appears, use the mouse to
drag it around the screen.
 Displaying the contents of another window in the Whiteboard—
Whiteboard has a Select Window feature that enables you to display the
contents of another open window inside the Whiteboard. To activate this
feature, either select Tools, Select Window or click the Select Window
tool. Click OK in the Whiteboard Select Window dialog box that appears,
and then click the window you want to display.
Displaying the contents of another window in the Whiteboard—
Whiteboard has a Select Window feature that enables you to display the
contents of another open window inside the Whiteboard. To activate this
feature, either select Tools, Select Window or click the Select Window
tool. Click OK in the Whiteboard Select Window dialog box that appears,
and then click the window you want to display.
 Displaying part of the screen in the Whiteboard—
Rather than an entire window, you might prefer to display only part of
the screen in the Whiteboard. To do this, either select Tools, Select
Area or click the Select Area tool. Click OK in the Whiteboard Select
Area dialog box that appears, and then use the mouse to select the
screen area you want to display.
Displaying part of the screen in the Whiteboard—
Rather than an entire window, you might prefer to display only part of
the screen in the Whiteboard. To do this, either select Tools, Select
Area or click the Select Area tool. Click OK in the Whiteboard Select
Area dialog box that appears, and then use the mouse to select the
screen area you want to display.
Clearing the Whiteboard—
If you want to start over, you can clear the contents of the Whiteboard
either by selecting Edit, Clear Page or by pressing Ctrl+Delete. Click
Yes when NetMeeting asks you to confirm the deletion.
 Adding another page to the Whiteboard—The
Whiteboard is capable of displaying multiple pages. To add a new page,
either select Edit, Insert Page After or click the Insert New Page
button.
Adding another page to the Whiteboard—The
Whiteboard is capable of displaying multiple pages. To add a new page,
either select Edit, Insert Page After or click the Insert New Page
button.
Navigating Whiteboard pages— When
you have multiple pages in the Whiteboard, you can navigate among them
by pressing Ctrl+Page Up (to move to the next page) or Ctrl+Page Down
(to move to the previous page). Note that as you move from page to page,
the remote users’ Whiteboards also change pages. You can also use the
following navigation buttons:
| Previous Page |

|
| Next Page |

|
Deleting a Whiteboard page— To remove the current page from the Whiteboard, select Edit, Delete page.
Preventing remote users from seeing your changes—
If you want to make some changes to a page without the other users
seeing them, deactivate the View, Synchronize command, move to the page
and make your changes, and then activate View, Synchronize again. The
remote users will remain on the original page while you make your edits.
Saving the Whiteboard—
If you think you’ll need to use your Whiteboard again, select File,
Save and then choose a location and name for the new file. (Whiteboard
files use the .nmw extension.) To reuse the Whiteboard, select File, Open and choose the Whiteboard file from the Open dialog box.
Sharing Programs
Chat and the Whiteboard
are handy features, but their functionality is limited to text and
simple drawings or screenshots. For truly collaborative computing, you
need the ability to run a program on one computer and display what’s
happening on the remote machines. An even better scenario is one in
which all the users can work with an application at the same time.
The good news is that
NetMeeting can handle both situations, albeit with a few quirks and
security concerns. The next two sections take you through NetMeeting’s
program sharing features.
Caution
Program sharing works
best when all users have their screens set to the same resolution. If a
user running at high resolution (for example, 1,024×768) shares a
maximized application with a user running at low resolution (for
example, 800×600), the user with the lower resolution sees only part of
the shared program’s window. However, that user can still see more of
the window by scrolling vertically and horizontally within the window
that contains the shared program.
Demonstrating a Program
NetMeeting’s
default method for application sharing is to select one of your running
programs to share, and the program’s window appears on the other users’
screens. However, only you can access the program’s features and edit
the program’s documents. This is perfect if you just want to demonstrate
a feature or display a document.
To share an application in this way, follow these steps:
1. | Use any of the following techniques to start the Sharing feature:
|
2. | As you can see in Figure 2, the Sharing window appears with a list of your running applications. Click the application you want to share.
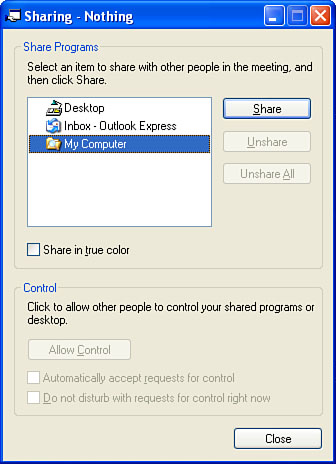
|
3. | Click Share. A copy of the application’s window is sent to each user.
|
4. | If you want to share multiple programs, repeat steps 2 and 3 for each program you want to work with.
|
5. | If
you’re sharing over a network or a fast connection, activate the Share
in True Color check box to enable each user to see the window in full
color.
|
6. | Activate the window you want to share.
|
Tip
If you have
data in an application window that you want to hide from others, use
another open window to cover that portion of the shared window. The
remote users will see a pattern over the obscured section of the window.
Any actions you perform within this window (including mouse movements) are mirrored on the remote screens.
Allowing Remote Users to Assume Control
Instead of merely
demonstrating a program to the other users, you might prefer a more
interactive approach that allows each user to work with the shared
application. This is called giving a remote user control. After you’ve shared an application, you switch to this mode by following these steps:
1. | Return to the Sharing window.
|
2. | Click Allow Control.
|
3. | Set the control options:
| Automatically Accept Requests for Control | Activate this check box to enable remote users to assume control without your permission. | | Do Not Disturb with Requests for Control Right Now | Activate
this check box to temporarily prevent remote users from assuming
control. This is useful if you want to leave control turned on, but you
require the control yourself for a short time. |
|
4. | Activate the window you’re sharing.
|
Caution
When you allow other
people to assume control over a program, they can use it just as though
they were sitting at your keyboard. Depending on the program, this might
include the ability to open, save, and delete files, or even to launch
programs. Therefore, exercise some caution when allowing others to
control certain programs.
On the remote user’s screen, the Control window (that is, the window within which the shared program appears) displays controllable in the title bar. To request control of the window, the remote user has two choices:
On
your screen, the Request Control dialog box appears (unless you
activated the Automatically Accept Requests for Control check box).
Click Accept to allow the user to assume control of the window, or click
Reject to prevent the user from taking control.
Stopping Program Sharing
To end the program sharing, either exit the shared program or return to the Sharing window and perform one of the following:
If you only want to stop others from assuming control of the program, click Prevent Control.
To
stop sharing the program, select it in the list of programs and then
click Unshare. If you’re sharing multiple programs, you can stop sharing
all of them at once by clicking Unshare All.
Setting NetMeeting Options
To finish our look at
NetMeeting, this section shows you how to customize the program using
its extensive list of properties. To work with these options, select
Tools, Options to display the Options dialog box.
The options in the General tab control a mixed bag of NetMeeting settings. Here’s a review:
| My Directory Information | The
controls in this group display the personal NetMeeting data that you
specified when configuring the program. Feel free to edit this
information as needed. |
| Directory | Use this list to specify the default directory server you want NetMeeting to use. |
| Do Not List My Name in the Directory | Activate this check box if you prefer that your data not appear in the directory server. |
| Log On to the Directory Server When NetMeeting Starts | If you activate this check box, NetMeeting will log you on to the directory server each time you start the program. |
| Run NetMeeting in the Background When Windows Starts | Activate this check box to launch NetMeeting automatically when you start Windows XP. |
| Show the NetMeeting Icon on the Taskbar | This check box toggles the NetMeeting icon on and off in the taskbar’s notification area. |
| Bandwidth Settings | Click this button to select your connection speed. |
| Advanced Calling | Click this button to enable and configure a gatekeeper or gateway server on your network. |
The options in the Security tab enable you to configure secure calling:
| Incoming Calls | Activate this check box to force NetMeeting to accept only secure incoming calls. |
| Outgoing Calls | Activate this check box to force NetMeeting to place all your calls as secure calls. |
| Use Privacy (Encryption) Only | Activate this option to use the standard NetMeeting Certificate to encrypt your secure calls. |
| Use this Certificate for Privacy and Authentication | Activate
this option to use a digital ID to both encrypt your calls and to
authenticate yourself as the caller. Use the list below this option to
select the digital ID you want to use. |
The Audio tab controls various settings related to the audio portion of the NetMeeting show. Here’s a summary:
Note
Not all sound cards
support all the options in the Audio tab. If a check box is disabled,
your sound card doesn’t support that feature.
| Enable Full-Duplex Audio So I Can Speak While Receiving Audio | This check box toggles full-duplex (two-way) audio on and off. |
| Enable Auto-Gain Control | NetMeeting’s
Auto-Gain feature adjusts the microphone volume based on the volume of
your voice. That is, if you speak quietly, NetMeeting increases the
microphone volume to compensate; if you speak loudly, the value is
decreased accordingly. If a noisy work environment causes the micro
phone level to fluctuate unpredictably, deactivate this check box to
shut off automatic gain. |
| Automatically Adjust Microphone Volume While in a Call | This is similar to the Auto-Gain feature. If your sound card doesn’t support auto-gain, activate this check box instead. |
| Enable DirectSound for Improved Audio Performance | Activate this check box to use DirectSound, which reduces the delay between the time that audio is sent and when it is heard. |
| Tuning Wizard | Click this button to run the Audio Tuning Wizard. This is a good idea if you change your sound card or the speed of your
connection. (You can also launch the Audio Tuning Wizard by selecting
Tools, Audio Tuning Wizard. Note that this command is unavailable while
you’re in an audio conference.) |
| Advanced | Click
this button if you’d like to configure your own audio codecs. In the
Advanced Compression Settings dialog box, activate the Manually
Configure Compression Settings check box. Then use the Preferred Codec
for Audio Compression list to choose the default codec. |
| Silence Detection | The
sensitivity of your microphone to the detection of silence is a measure
of how it handles background noises. A high sensitivity setting means
the microphone will pick up back ground noises. By default, NetMeeting
adjusts this sensitivity automatically (that is, the Adjust Silence
Detection Automatically option button is activated). If you prefer to
make the adjustments yourself, activate the Let Me Adjust Silence
Detection Myself option, and then use the slider to choose a setting
(move the slider to the right for higher sensitivity; move it to the
left for lower sensitivity). |
If you have video capability on your system, use the controls in the Video tab to set up your video conferencing:
| Automatically Send Video at the Start of Each Call | Activate this check box to configure NetMeeting to start sending the video immediately after connecting to the remote user. |
| Automatically Receive Video at the Start of Each Call | When
this check box is activated, NetMeeting displays the incoming video
stream when the call connects. If you’d prefer not to see incoming
video, deactivate this check box. |
| Send Image Size | These options determine the default size of the video image you send. |
| Video Quality | As
usual with video applications, in NetMeeting there is a trade-off
between video speed and video quality. You can use this slider to set
the level of quality you prefer. Move the slider to the left for a
better frame rate; move the slider to the right for higher quality
within each frame. |
| The Video Capture Device I Wish to Use Is | This
list shows you the video device NetMeeting is using. If you have more
than one device on your system, use this list to select the one you want
to use. Click the Source button to display the Video Source dialog box,
which enables you to adjust various settings related to the device.
Click Format to set video capture properties, if your capture card
supports this option. |
| Show Mirror Image in Preview Video Window | Activate
this check box to show your video preview as though you were looking in
a mirror. (Note that only you see this mirror image; the remote user
sees the normal image.) |
