Configuring NetMeeting
Assuming you have an Internet or network connection set up, let’s run
through the steps necessary to configure NetMeeting. Begin by selecting
Start, Run, typing conf in the Run dialog
box, and then clicking OK. The first time you do this, Windows XP
launches the NetMeeting Wizard. Follow these steps to use this wizard to
configure NetMeeting.
Tip
If you plan on using
NetMeeting regularly, consider setting up a shortcut for it on your
Start menu (for instance, in the Communications folder). The Conf.exe file is located in the %SystemDrive%\Program Files\NetMeeting folder.
1. | The initial dialog box just gives you an overview of NetMeeting’s capabilities, so click Next to proceed.
|
2. | The
next dialog box asks for some personal data. At a minimum, you have to
specify your first and last names and your email address to coax
NetMeeting into continuing. (Don’t worry: you can tell NetMeeting not to
publish this information if you’d prefer to be incognito.) When you’re
done, click Next.
|
3. | You can find other NetMeeting users (and they can find you), by logging in to a directory server (also known as an Internet Locator Server). You have two options (click Next when you’ve made your choices):
| Log On to a Directory Server When NetMeeting Starts | If
you activate this check box, NetMeeting will automatically log you in
to one of these servers at startup. Use the Server Name list to select
the directory server. | | Do Not List My Name in the Directory | Activate
this check box if you don’t want the personal data you entered in the
previous dialog box to be published on the server. |
|
4. | Now
the wizard wonders what connection speed you’ll be using for your
NetMeeting collaborations. (Not surprisingly, the faster the connection,
the better NetMeeting performs. However, for best results, you
shouldn’t select a connection speed that’s faster than the one you’ll be
using.) Activate the appropriate connection speed and then click Next.
|
5. | In
the next dialog box, you can choose whether the wizard adds shortcuts
for NetMeeting on your desktop and the Quick Launch bar. Click Next.
|
6. | NetMeeting
now launches the Audio Tuning Wizard, which checks your sound card to
see whether it supports full-duplex (two-way) or half-duplex (one-way)
sound. First, make sure that no other programs that use your sound card
are running. This includes Windows Media Player, programs that use the
sound card to broadcast messages (“You have mail!”), multimedia
software, and so on. When that’s done, click Next.
|
7. | The
Audio Tuning Wizard first checks to see whether you have multiple audio
devices in your computer. If you do, you’ll see a dialog box that
enables you to select your Recording and Playback devices. Make your
choices and then click Next.
|
8. | In
the Audio Tuning Wizard’s next dialog box, click Test to play a sound,
and then adjust the Volume slider to taste. Click Next when you’re done.
|
9. | You
use the next dialog box to adjust the input (microphone) volume. Make
sure that you have your sound card microphone plugged in and at the
ready. Then speak into the microphone using your normal voice (the
wizard displays some suggested text to read). As you speak, the wizard
adjusts the Record Volume slider automatically. Keep speaking until the
slider stabilizes. When the recording is complete, click Next.
|
10. | Click Finish in the final wizard dialog box to continue loading NetMeeting.
|
11. | If the Windows Security Alert dialog box appears, click Unblock to stop Windows Firewall from blocking NetMeeting.
|
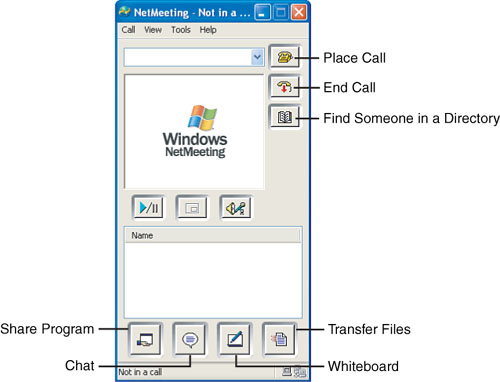
The NetMeeting window appears, as shown in Figure 1.
Note
Windows Firewall
must be configured to allow Internet-based NetMeeting connections. Here
are the ports NetMeeting uses for its connections:
| Port | Purpose | Protocol |
|---|
| 389 | Internet locator service | TCP |
| 522 | User location service | TCP |
| 1503 | T.120 | TCP |
| 1720 | H.323 call setup | TCP |
| 1731 | Audio call control | TCP |
In other words, Windows Firewall must be configured to allow TCP connections on ports 389, 522, 1503, 1720, and 1731.
