Setting Phone Dialer’s Options
Phone Dialer has a
few options you can use to configure your phone dialing. For example, if
you have multiple modems or multiple lines on your phone, you can tell
Phone Dialer which ones to use. To work with these options, select Edit,
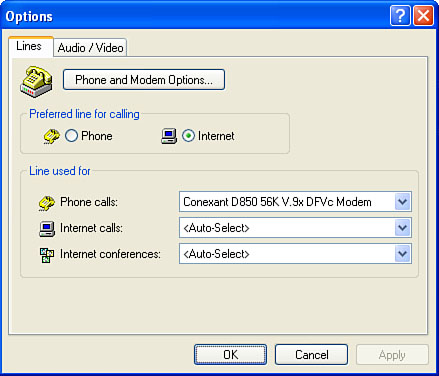
Options to display the Options dialog box. You use the controls in the
Lines tab, shown in Figure 1, to configure the lines that Phone Dialer uses for calls and conferences:
| Preferred Line for Calling | Activate either Phone or Internet to set the default call types that Phone Dialer uses when you initiate a call. |
| Line Used For | Use
the Phone Calls, Internet Calls, and Internet Conferences lists to
choose the line you want to use for each type of call. If you have
multiple modems attached to your computer, choose the modem you want to
use in the Phone Calls list. You should leave both Internet Calls and
Internet Conferences set to <Auto-Select> to allow Phone Dialer to
choose the appropriate line. |
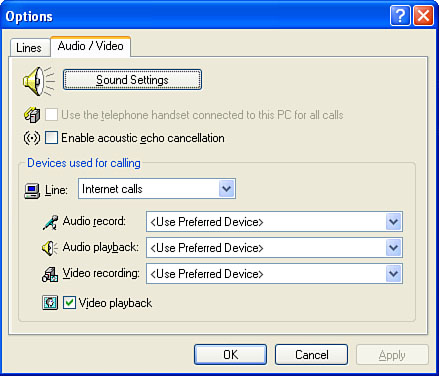
You use the controls in the Audio/Video tab, shown in Figure 2, to configure Phone Dialer’s sound and video options:
| Sound Settings | Click
this button to open the Sounds and Audio Devices property sheet. This
is the same as double-clicking Control Panel’s Sounds and Audio Devices
icon. |
| Use the Telephone Handset Connected to This PC for All Calls | Activate this check box to use a USB telephone handset for all your calls. |
| Enable Acoustic Echo Cancellation | Activate this check box to prevent hearing your own voice through your computer’s speakers on Internet calls. |
| Devices Used for Calling | Use
the Line list to select the type of call you want to configure (Phone
Calls, Internet Calls, or Internet Conferences). Then use the Audio
Record, Audio Playback, and Video Recording lists to select the device
you want to use for each action. You can choose <Use Preferred
Device> (as defined in the Sounds and Audio Devices property sheet),
<None>, or an installed device. |
Quick Connections with Speed Dial
Phone
Dialer is certainly handy, but it becomes downright useful when you
take advantage of the Speed Dial feature. If you have numbers that you
call frequently, add the numbers to the Speed Dial list to make them
accessible with just a couple of mouse clicks.
Follow these steps to add a number to the Speed Dial list:
1. | Pull
down the Speed list and click Edit Speed Dial List (or select Edit,
Speed Dial List). The Edit Speed Dial List dialog box appears.
|
2. | Click Add to display the Speed Dial dialog box.
|
3. | Use the Display Name text box to type a name for the Speed Dial entry.
|
4. | Use
the Number or Address text box to type the phone number, IP address, or
computer name that you want associated with this Speed Dial entry.
|
5. | In the Dial As group, activate Phone Call, Internet Call, or Internet Conference, as appropriate.
|
6. | Click OK. Phone Dialer adds the new Speed Dial item to the Entries list.
|
7. | Repeat steps 2–6 to add other Speed Dial list entries.
|
8. | To make changes to an entry, select it in the Entries list and click Edit.
|
9. | To change the order of the Speed Dial list items, select an item in the Entries list and then click either Move Up or Move Down.
|
10. | When you’re done, click OK.
|
Tip
You
can also add a Speed Dial list entry on the fly. When you initiate a
call, the active call window has an Add to Speed Dial icon . Click this icon to display the Speed Dial dialog box.
To place a speed dial call, you have three choices:
In the Speed
Dial branch of the Phone Dialer window, click the Speed Dial entry and
then click Speed. Alternatively, double-click the Speed Dial entry.
Pull down the Speed button and click the Speed Dial entry.
Select Phone, Speed Dial, and then select the Speed Dial entry in the submenu that appears.
