The next task is to use the Windows Easy Transfer
Wizard to move your application and user data from the old Windows XP
installation into the Windows 7 installation. In this section, we’ll
discuss how to move your application data out of Windows XP so that it
will be available for installation into Windows 7.
First, download and install the Windows Easy Transfer Wizard. Point your browser to www.microsoft.com,
hover your mouse over the Downloads and Trials button, and from the
drop-down menu that appears select Download Center. Then, in the search
box, type Windows Easy Transfer Wizard and press Enter.
We suggest that you
download the installer to your system before running it, rather than
running it directly from the download link. Why? Because you’re going to
need to install it again when you move your application profiles into
the Windows 7 installation.
Although the Easy
Transfer Wizard asks for a data transfer cable, you don’t need one; in
fact, many of the more efficient methods don’t use the data transfer
cable. We recommend the following:
If you’re
moving your applications from Windows XP on one computer to Windows 7 on
a new computer, you should use the network transfer mode. If
you’re moving your applications from Windows XP to Windows 7 on the
same computer, you should use the CD/DVD/removable media option.
The only time we’ve found
the data transfer cable to be superior is when you are migrating between
two computers, without any networking capability. If networking is
available, we’ll use it, for the simple reason that transfers over Fast
Ethernet are much faster than using the transfer cable.
One thing we’ve found
very useful for same-system transfers like this is a suitably sized
flash drive, or a USB external hard disk. The reason for using an
external drive of this sort is that it allows you to wipe and rewrite
the computer’s internal hard disk—which is actually a very good idea
under most circumstances. A decent USB external disk can be had online
for under $50, with enough room to move most system installations. This
approach has three other benefits:
You can
easily archive the system state before reinstalling applications and the
like by simply copying the archive files, to a file server, to DVDs, or
to another storage drive. You
can reuse the same external drive as you upgrade multiple
computers—upgrade one, erase the data, move on to the next computer, and
so on. After all your migrating is done, you can use the same external drive as a backup device.
Note
From this point
forward, our examples are based on the assumption that you are
installing Windows 7 on the same computer on which you have Windows XP
installed and that you have a suitable external drive.
|
Computer hard disks
are defined both by their physical capabilities and by the logical
breakdown of those capabilities. The logical breakdown is referred to as
partitioning and involves creating logical “drives” that your computer
recognizes as separate disk drives. The best analogy is to think of your
house—the physical drive is the building, while each logical drive
would be a separate room.
That being said, for
almost all normal users, there is no real reason to create multiple
partitions on your hard disk, other than those that your Windows 7
system installation requires (such as a separate recovery partition).
The reason for this is that virtually anything that can be done with a
partition, you can also do with folders, which are less of an issue to
manage. Thus, using the default partitioning scheme that the Windows 7
installer creates is probably your best approach.
If, however, you know what
you are doing with regard to disk partitioning, feel free to adjust the
partition tables as appropriate to your system requirements. Some more
advanced users do create separate partitions for their Windows operating
system and data files (music, photos, documents, and so on). Doing so
allows you to reinstall a good Windows installation gone bad without
needing to back up and restore all of your data files.
For a short discussion of disk partitioning, and some of its benefits, see http://en.wikipedia.org/wiki/Disk_partitioning.
|
After you’ve installed Windows Easy Transfer Wizard, your next step is to start transferring files:
1. | Close all the applications currently open on the computer, and start the Easy Transfer Wizard (see Figure 1).
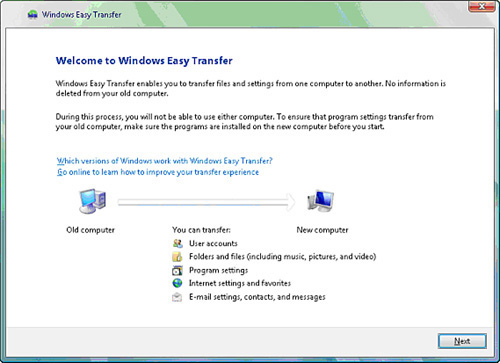
| 2. | Click Next. The file transfer methods screen appears.
| 3. | Select an external hard disk or flash drive.
| 4. | Easy Transfer asks if this is your old or new computer. Select This Is My Old Computer (see Figure 2).
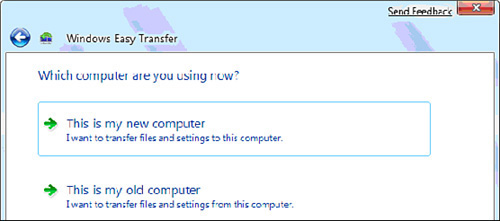
| 5. | Select what you want to transfer (see Figure 3).
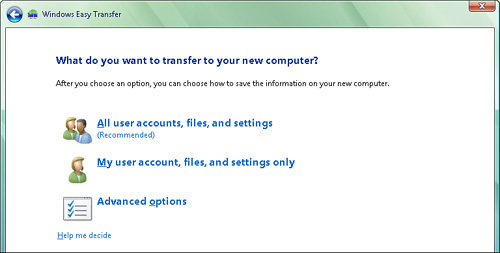
Tip
We’ve been using the
Easy Transfer Wizard for quite a while, and we’ve found that it’s much
easier to migrate all user accounts, files, and settings and then clean
up any potential issues after the migration. If, however, you want
fine-grained control over your migration, you can use the My User
Account, Files, and Settings Only option to migrate a single user
account, or the Advanced Options option for custom migrations.
|
If you’re like most of us,
you’ve been using your computer for quite a while, accumulating
pictures, documents, video, music, spreadsheet files, a greeting card
database, and assorted other files. Those files are important to you,
and easily overlooked in an upgrade when you’re paying attention to
things such as system files and application programs. Don’t forget your
documents, photos, music files, and the like!
For instance:
Check the
location of your Internet Explorer email files. When you installed IE,
you were asked to specify where to store files that will show up within
IE as being in your Inbox, Sent, Trash, and other folders. If you’ve set
up a location other than the defaults, make sure these files are
included in the transfer. You
have probably generated a huge number of documents, spreadsheets,
presentations, and other data files and they’re not all stored under My
Documents, although you may have some files stored there, too. Unless
you want to risk losing these files, make sure they’re included in the
transfer. Is all
of your stored music in the My Music folder, or have you stored some of
your tunes elsewhere? If you have created playlists in your music
player, look at your music player’s documentation to see if those
playlists can be transferred or exported so that you can back them up,
too. The My Pictures
folder might include a lot of your photos and other pictures, but you’ve
probably stored some of your pictures in other folders, particularly if
you’ve used more than one application program to process your pictures.
Be sure to check all the non-default folders where those important
pictures might be stored and include them in the transfer. If
you’ve been using a previous version of Media Center, your picture,
music, and video files may have been stored separately. Make sure they
are transferred. If
you have partitioned your hard disk into two or more virtual hard disks
(such as Drive F: and Drive G:, for instance), it can be easy to forget
to look at the folders on those disks when you’re compiling the list of
files to transfer. Be sure to include them. You
don’t have to include files on removable media, such as thumb drives.
If they’re not plugged into the computer when you go through the upgrade
process, they should still be readable when the upgrade is finished.
|
| 6. | When you’re ready, click Next.
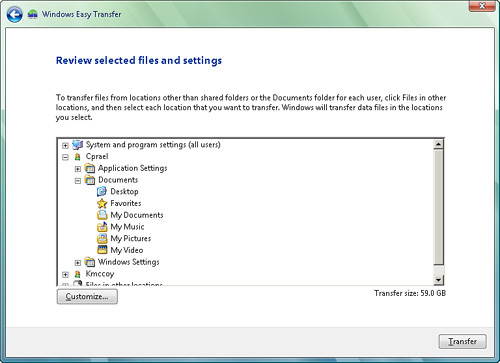
Before performing the transfer, the Easy Transfer Wizard gives you an opportunity to review what is being migrated (see Figure 3.8). Check through the list to make sure you haven’t missed something important; then click Next to start the migration process.
In the example in Figure 4,
the user has assembled all of the files he wants to save in the folder
“Joel” to make the transfer easy. This screen may not look the same way
if you’ve chosen multiple folders and files from different locations.
| 7. | When
the Easy Transfer Wizard is finished, check your external drive to make
sure that the settings files were stored properly. You should find a
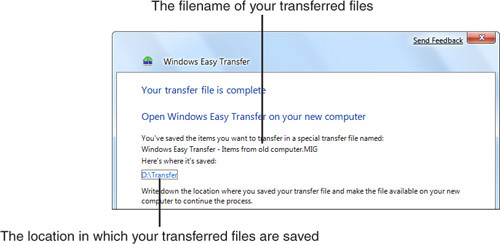
.MIG file with the name you gave it earlier (see Figure 5). Depending on what you have on your system, the migration file may easily be several hundred megabytes (or even gigabytes).
|
Tip
One way to make your
transfer a bit easier at this point is to copy the Windows Easy Transfer
Wizard installer onto the external drive. That way, you can easily load
it after you’ve installed Windows 7.
Caution
You need to be aware of
one issue: Windows Easy Transfer doesn’t move applications; it moves
only their settings. This makes for a much smaller migration package,
but it has its own issues.
|