Receiving Faxes
This
section explains how the Fax service handles incoming faxes and shows
you how to view those faxes when they’re sitting in your Inbox.
Specifying Receive Options
Before getting to
the specifics of receiving a fax, let’s take a quick look at the various
options that the Fax service provides for receiving. To see these
options, follow these steps:
1. | In the Fax Console, select Tools, Fax Printer Configuration to display the Fax Properties dialog box.
|
2. | Display the Devices tab.
|
3. | If you have multiple fax/modems installed on your computer, select the fax/modem you want to use to send faxes.
|
4. | Click Properties. The modem’s property sheet appears.
|
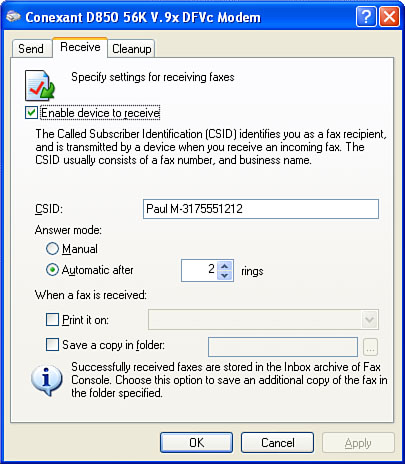
5. | The Receive tab, shown in Figure 4, has the following options:
| Enable Device to Receive | Activate this check box if you want to be able to receive faxes on your computer. | | CSID | Use this text box to type your Called Subscriber Identification. | | Manual | Activate this option to answer incoming calls manually. | | Automatically After x Rings | Activate this option to have the Fax service answer incoming calls automatically. | | Print It On | Activate
this check box to have Windows XP automatically print any received fax.
Use the list that becomes activated to choose the printer you want to
use. | | Store a Copy in Folder | Activate
this check box to store a second copy of each fax in the folder that
you specify. The original copy of the fax is saved in the Fax Console. |
|
Answering Incoming Calls
How the Fax service
handles incoming calls from remote fax systems depends on how you set up
your fax/modem: manually or automatically. I describe both options in
the next two sections.
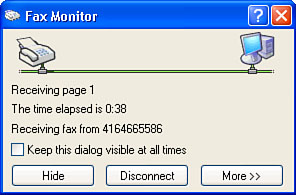
Answering Calls Automatically
Enabling the Answer After x
Rings option is the easiest way to handle incoming calls. In this mode,
the Fax service constantly polls the modem’s serial port for calls.
When it detects a call coming in, it waits for whatever number of rings
you specified (which can be as few as one ring or as many as 99) and
then leaps into action. Without any prodding from you, it answers the
phone and immediately starts conversing with the remote fax machine. The
Fax Monitor window appears onscreen so that you can see the progress of
the transfer, as shown in Figure 5.
Tip
If you find
the Fax service’s sounds (such as the ringing associated with an
incoming call) annoying, you can disable them. In the Fax Console,
select Tools, Fax Printer Configuration and then display the Tracking
tab. Click Configure Sound Settings and then deactivate the check boxes
for each sound you want to silence.
Answering Calls Manually
If you work with the
Fax service in manual mode, when a call comes in you hear a ringing tone
and the taskbar’s notification area pops up a message that says The line is ringing. Click that message to receive the fax. If you happen to have the Fax Monitor open already, click the Answer Now button.
This mode is ideal if you
receive both voice calls and fax calls on the same phone line. Here’s
the basic procedure you need to follow for incoming calls:
1. | When the phone rings, pick up the receiver.
|
2. | If
you hear a series of tones, you know that a fax is on its way. In this
case, click the notification message or the Answer Now button, as
described earlier.
|
3. | The Fax service initializes the modem to handle the call. Wait until the Fax service reports Receiving fax in the Fax Monitor window and then hang up the receiver. If you hang up before you see this message, you disconnect the call. |
Working with Received Faxes
Depending on the
size of the fax transmission, the Fax service takes from a few seconds
to a few minutes to process the data. Eventually, though, your fax
appears in the Inbox. From there, you can perform the following chores:
Read the fax—
Double-click the fax in the Fax Console’s Inbox folder (or select the
fax and then select File, View). This launches the Windows Picture and
Fax Viewer, which displays your fax and enables you to annotate it.
Print the fax— Select the fax and then select File, Print.
Save the fax as an image—
Select the fax and then select File, Save As. Use the Save As dialog
box to choose a name and location for the file and then click Save. Note
that the fax is saved as a TIF image.
Email the fax as an attachment— Select the fax and then select File, Mail To. Use the New Message window to set up the e-mail message and then click Send.
Delete the fax— Select the fax and then select File, Delete (or just press the Delete key).
