After NetMeeting has been configured and you have the
Internet or network connection established, you can get right down to
business.
Placing Simple Calls
If you know who you want to call, NetMeeting is simple to use. Here are the steps to follow:
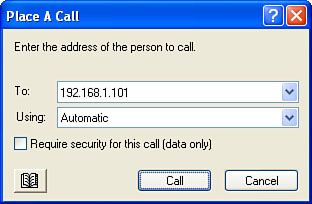
1. | Select
the Call, New Call command, or press Ctrl+N. (You can also click the
Place Call button.) You’ll see the Place a Call dialog box, shown in Figure 1.
|
2. | In the To text box, specify the person you want to call by entering one of the following:
If you want to contact someone with a voice call, type the recipient’s phone number. Note
Voice calls in
NetMeeting must go through a gateway server on your network. To specify
the gateway, select Tools, Options to open the Options dialog box. In
the General tab, click Advanced Calling to display the Advanced Calling
Options dialog box. Activate the Use a Gateway to Call Telephones and
Videoconferencing Systems check box, and then use the Gateway text box
to enter the computer name or IP address of the gateway system. Note
that some networks use a gatekeeper, a computer that enables you to connect to other people and other
computers. In this case, activate the Use a Gatekeeper to Place Calls
check box instead, and then enter the computer’s name or IP address in
the Gatekeeper text box.
If
the person is logged on to a directory server, type the server name, a
slash (/), and then the person’s email address, as in this example: logon.netmeeting.microsoft.com/[email protected] If you’re on a network, type the name that the person’s computer uses on the network, or the computer’s IP address. If the person is connected to the Internet, type the IP address of their computer.
|
3. | In
the Using list, select either Network or Directory. (Alternatively, you
can select Automatic and let NetMeeting figure it out.)
|
4. | Click Call.
|
When NetMeeting finds the user and places the call, the other person hears a ring and sees the dialog shown in Figure 2.
The remote user clicks Accept to answer the call, or clicks Ignore to
reject the call. (NetMeeting automatically rejects an incoming call if
it isn’t answered after five rings.)

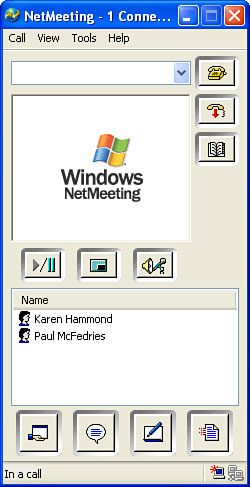
If the call goes through, your name and the remote user’s name are added to the Name list, and NetMeeting displays In a call in the status bar, as shown in Figure 3.
Here are some notes to bear in mind when you’re connected:
To talk to the
other person, just speak into your microphone. If the sound cards used
by you and the remote user can handle full-duplex audio, both of you can
speak at the same time. If the cards support only half-duplex audio,
only one of you can speak at a time.
If
the remote user complains that your voice isn’t loud enough, you can
increase your microphone volume or the remote user can increase his
speaker volume.
To
find out the email address and other particulars about the remote user
(depending on what that person entered into her NetMeeting
configuration), right-click the user and select Properties from the
context menu.
Users
who have voice capability are shown with an icon in the audio column.
Similarly, users with video capability have an icon in the video column.
In
a conference, only two people can communicate by voice or video at one
time. If a third person joins the conference, that person can
communicate only via Chat, Whiteboard, or some other NetMeeting feature.
Ending a Call
When it’s time to end a NetMeeting call, use any of the following techniques to hang up:
NetMeeting disconnects
the call. If you began the conference and it includes three or more
people, NetMeeting displays the warning that hanging up will disconnect
everyone you invited. To disconnect everyone in the conference, click
Yes.
Using the SpeedDial Feature
If you call
certain people frequently, you can use NetMeeting’s SpeedDial feature to
connect to these users with only a couple of mouse clicks or
keystrokes. Follow these steps to create a SpeedDial entry:
1. | Select Call, Create SpeedDial to display the Create SpeedDial dialog box.
|
2. | In
the Address text box, type the person’s computer name, IP address, or
directory entry. (You can’t create telephone number SpeedDial entries.)
|
3. | In the Call Using list, select either Directory or Network.
|
4. | Make sure that the Add to SpeedDial option is activated.
|
5. | Click OK.
|
After you’ve added
someone to the SpeedDial, you can call that person by selecting Call,
Directory to open the Find Someone window. In the Select a Directory
list, select Speed Dial to display your SpeedDial list, and the
double-click the entry you want to call.
Tip
The list of
SpeedDial entries has two columns: Name and Address. Unfortunately,
NetMeeting puts the entry’s address value in both columns, which is the
opposite of helpful. To fix this, open the SpeedDial folder:
%SystemDrive%\Program Files\NetMeeting\SpeedDial
Here you’ll see a
shortcut for each SpeedDial entry. Rename each shortcut to the name of
the person it represents. Now return to the Find Someone window and
reselect SpeedDial in the Select a Directory list. This time the
shortcut names you created appear in the Name list.
Tip
If you want to give
other people a SpeedDial shortcut that connects to you, create a new
SpeedDial entry that uses your computer name, IP address, or directory
entry. Activate the Save on the Desktop option and click OK. Display the
desktop, right-click the shortcut icon, and then select Send To, Mail
Recipient. Send the message to the person you want to call you.
Hanging a “Do Not Disturb” Sign
If you have NetMeeting
running but you don’t want to accept any new calls for a while, you can
hang an electronic Do Not Disturb sign by activating the Call, Do Not
Disturb command (click OK in the dialog box that appears). While this
command is active, others attempting to call you will receive a message
telling them The other party did not accept your call.
