Displaying the Built-In Taskbar Toolbars
In Service Pack 2, the Windows XP taskbar comes with five default toolbars:
| Address | This
toolbar contains a text box into which you can type a local address
(such as a folder or file path), a network address (a UNC path), or an
Internet address. When you press Enter or click the Go button, Windows
XP loads the address into Windows Explorer (if you entered a local or
network folder address), an application (if you entered a file path), or
Internet Explorer (if you entered an Internet address). In other words,
this toolbar works just like the Address Bar used by Windows Explorer
and Internet Explorer. | | Links | This
toolbar contains several buttons that link to predefined Internet
sites. This is the same as the Links toolbar that appears in Internet
Explorer. | | Windows Media Player | This
toolbar contains controls for playing media. When you activate this
toolbar, it appears when you minimize the Windows Media Player window. | | Quick Launch | This
is a collection of one-click icons that launch Internet Explorer or
Media Player, or clear the desktop. Other applications—such as Microsoft
Office—also add icons to this toolbar. | | Desktop | This
toolbar contains all the desktop icons, as well as an icon for Internet
Explorer and submenus for My Documents, My Computer, and My Network
Places. |
To
toggle these toolbars on and off, you must first right-click an empty
spot on the taskbar. In the shortcut menu that appears, click Toolbars
and then click the toolbar you want to work with. Setting Some Taskbar Toolbar Options
After you’ve displayed a
toolbar, there are a number of options you can set to customize the
look of the toolbar and to make the toolbars easier to work with.
Right-click an empty section of the toolbar and then click one of the
following commands:
| View | This
command displays a submenu with two options: Large Icons and Small
Icons. These commands determine the size of the toolbar’s icons. For
example, if a toolbar has more icons than can be shown given its current
size, switch to the Small Icons view. | | Show Text | This
command toggles the icon titles on and off. If you turn on the titles,
it makes it easier to decipher what each icon does, but you’ll see fewer
icons in a given space. | | Show Title | This command toggles the toolbar title (displayed to the left of the icons) on and off. |
Creating New Taskbar Toolbars
In addition to
the predefined taskbar toolbars, you can also create new toolbars that
display the contents of any folder on your system. For example, if you
have a folder of programs or documents that you launch regularly, you
can get one-click access to those items by displaying that folder as a
toolbar. Here are the steps to follow:
1. | Right-click an empty spot on the toolbar, and then click Toolbars, New Toolbar. Windows XP displays the New Toolbar dialog box.
| 2. | Use
the folder list provided to highlight the folder you want to display as
a toolbar. (Or click Make New Folder to create a new subfolder within
the currently highlighted folder.)
| 3. | Click OK. Windows XP creates the new toolbar.
|
Putting Taskbar Toolbars to Good Use
Now that you know how to
display, create, and customize taskbar toolbars, you can take advantage
of them to get one-click access to large numbers of programs and
documents. The basic idea is to create a toolbar, populate its folder
with shortcuts to programs and documents, and then display the toolbar
on the left side of the screen for easy access. Here’s how it’s done:
Note
Before you begin
these steps, make sure that the taskbar isn’t locked. Right-click an
empty section of the taskbar and then click Lock the Taskbar to
deactivate it. Also, make sure that the desktop is visible by minimizing
all open windows (right-click the taskbar and then click Show the
Desktop).
1. | Create a new folder.
| 2. | Create shortcuts in this new folder for your favorite documents and programs.
| 3. | Create a new taskbar toolbar that displays the contents of the new folder.
| 4. | Drag the left edge of the new toolbar and drop it on the desktop. Windows XP displays the toolbar as a window.
| 5. | Drag the toolbar window to the left edge of the screen and drop it when the toolbar expands to fill the left edge.
| 6. | Right-click
an empty section of the toolbar and activate the Show Title, Show Text,
and Always on Top commands. The Always on Top command ensures that the
toolbar is always visible, even if other windows are maximized.
|
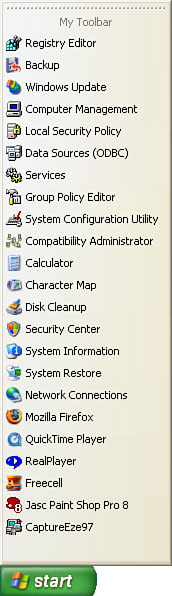
As you can see in Figure 1, the new toolbar is displayed on the left. Here are some notes about this arrangement:
You can size the toolbar by dragging (in this case) the right edge to the left or right. If
you prefer, you can display the toolbar on the right or top edge of the
window. To move it, first drag it from the edge and drop it on the
desktop. Then drag the toolbar window and drop it on the edge you want
to use. If
you have enough room, you can display multiple toolbars on one edge of
the window. For example, you could add the Quick Launch and Links
toolbars for easy access to their shortcuts. To do this, display the
other toolbar, drag it off the taskbar, drop
it on the desktop, and then drag the toolbar window to the edge of the
window and drop it on the toolbar that’s already in place. You might
need to drag the top edge of the toolbar up or down to see its icons.
Improving Productivity by Setting Taskbar Options
The taskbar comes with a
few options that can help you be more productive either by saving a few
mouse clicks or by giving you more screen room to display your
applications. Follow these steps to set these taskbar options:
1. | Right-click
the taskbar and then click Properties. (Alternatively, open Control
Panel’s Taskbar and Start Menu icon.) The Taskbar and Start Menu
Properties dialog box appears with the Taskbar tab displayed, as shown
in Figure 2.
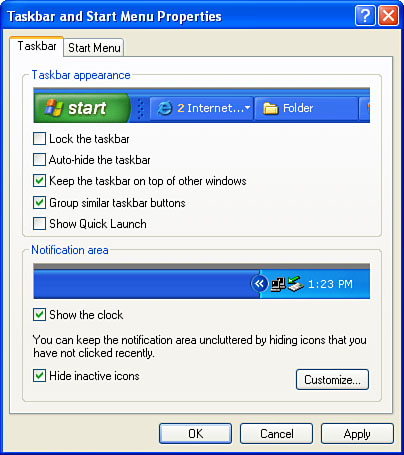
| 2. | Activate or deactivate the following options, as required to boost your productivity:
| Lock the Taskbar | When
this check box is activated, you can’t resize the taskbar and you can’t
resize or move any taskbar toolbars. This is useful if you share your
computer with other users and you don’t want to waste time resetting the
taskbar if it’s changed by someone else. | | Auto-Hide the Taskbar | When
this check box is activated, Windows XP reduces the taskbar to a thin,
blue line at the bottom of the screen when you’re not using it. This is
useful if you want a bit more screen room for your applications. To
redisplay the taskbar, move the mouse to the bottom of the screen. Note,
however, that you should consider leaving this option deactivated if
you use the taskbar frequently; otherwise, auto-hiding it will slow you
down because it takes Windows XP a second or two to restore the taskbar
when you hover the mouse over it. | | Keep the Taskbar on Top of Other Windows | If
you deactivate this option, Windows XP hides the taskbar behind any
window that’s either maximized or moved over the taskbar. To get to the
taskbar, you need to either minimize or move the window or you need to
press the Windows logo key. This isn’t a very efficient way to work, so I
recommend leaving this option activated. | | Group Similar Taskbar Buttons |
| | Show Quick Launch | Activate this check box to display the Quick Launch toolbar, discussed earlier .
Quick Launch is a handy way to access Internet Explorer, the desktop,
and Windows Media Player (as well as any other shortcuts you add to the
Quick Launch folder), so I recommend activating this option. | | Show the Clock | Leave this check box activated to keep the clock displayed in the notification area. | | Hide Inactive Icons | When
this check box is activated, Windows XP hides notification area icons
that you haven’t used for a while. This gives the taskbar a bit more
room to display program buttons, so leave this option activated if you
don’t use the notification area icons all that often. If you don’t use
the icons frequently, deactivate this option to avoid having to click
the arrow to display the hidden icons. |
Note
If your
notification area is crowded with icons, it’s inefficient to display all
the icons if you use only a few of them. Instead of showing them all,
leave the Hide Inactive Icons check box activated and click Customize.
For the icons you use often, click the item’s Behavior column and then
click Always Show in the list that appears. This tells Windows XP to
always display the icon in the notification area.
| 3. | Click OK.
|
|
