10. Microsoft Assessment and Planning (MAP) Toolkit
One utility that you can use
to help design your network is the Microsoft Assessment and Planning (MAP) toolkit.
MAP is a utility that will locate computers on a network and then
perform a thorough inventory of them. To obtain this inventory, MAP uses
multiple utilities, such as Windows Management Instrumentation (WMI),
the Remote Registry Service, and the Simple Network Management Protocol
(SNMP).
Having this information will
allow an administrator to determine if the machines on their network
will be able to load Microsoft Windows Vista, Windows 7, Windows Server
2008, Microsoft Office 2007, and Microsoft Application Virtualization.
One advantage of using MAP when determining the needs for Windows 7 is
that MAP will also advise you of any hardware upgrades needed for a
machine or of device driver availability.
Anyone who has been in the
industry for a while can see the potential of using MAP. A utility that
goes out and discovers your network hardware and then advises you of the
resources you need for the operating system to operate properly is a
tool that should be in every administrator's arsenal.
You have multiple ways to
locate the computers on your network. The following are your discovery
options and how they try to discover the computers:
Use Active Directory Domain Services Select this checkbox to find computer objects in Active Directory.
Use The Windows Networking Protocols Select this check box to find computers in workgroups and Windows NT 4.0 domains.
Import Computer Names From A File Select this check box to import computer names from a file.
Scan An IP Address Range Select this check box to find computers within a specified IP address range.
Manually Enter Computer Names And Credentials Select this check box to enter computer names individually.
As a network administrator,
one thing that is always difficult to determine is how many servers are
needed for your Windows 7 end users and where to place them on your
network. One feature included with MAP is the ability to obtain
performance metric data from the computers. MAP will also generate a
report that recommends which machines can be used for Windows 7.
MAP generates your report in
both Microsoft Excel and Microsoft Word. These reports can provide
information to you in both summary and full detail modes. MAP can
generate reports for you for some of the following scenarios:
Currently installed client operating systems and their requirements for migrating to Windows 7
Currently installed Windows Server systems and their requirements for migrating to Windows Server 2008
Currently installed Microsoft Office software and their requirements for migrating to Microsoft Office 2007
Server performance by using the Performance Metrics Wizard
Hyper-V or Virtual Server 2005 server consolidation and placement
Assessment of machines (Clients, Servers) for installation of Microsoft Application Virtualization (formally known as Soft Grid)
Next we'll look at system requirements and how to install MAP.
10.1. MAP System Requirements
Your system must meet these requirements to use MAP:
Supported Operating Systems Windows Server 2008; Windows Server 2003; Windows 7, Windows Vista with Service Pack 1; Windows XP Professional Edition.
CPU Architecture
One advantage to the Microsoft Assessment and Planning Solution
Accelerator is that it can be installed on both the 32-bit and 64-bit
versions of any of the operating systems listed above.
Hardware Requirements Your system must meet the following hardware requirements:
1.6-GHz-or-faster processor minimum or dual-core for Windows 7
1.5 GB of RAM minimum / 2,0 GB for Windows 7 or Windows Vista
Minimum 1 GB of available hard-disk space
Network card that supports 10/100 Mbps
Additional Requirements Microsoft SQL Server 2005 Express Edition, Microsoft Word (2003 with SP2 or 2007), and Microsoft Excel (2003 with SP2 or 2007).
Microsoft Assessment
and Planning toolkit is free to use but it must be downloaded from
Microsoft's website or installed from the Windows AIK installation disk.
Exercise 8 will walk you through the steps to install the Microsoft Assessment and Planning toolkit from the Windows AIK installation utility.
Insert the Windows AIK DVD on your machine. When
Autoplay starts, click Run StartCD.exe. If Autorun does not start, open
Windows Explorer and click StartCD.exe under the DVD drive. At the User Account Control screen, click the Yes button. The
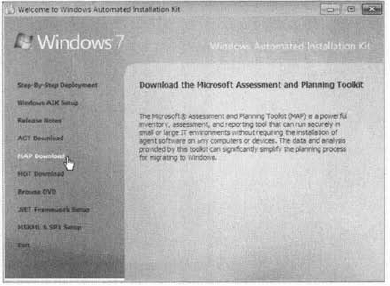
Welcome To Windows Automated Installation Kit screen appears. Click the
MAP Download link. This will take you to the Microsoft website where
you can download MAP.

Scroll down to the bottom of the page and click the download button for the Microsoft_Assessment_and_Planning_Solution_Setup.x64.exe or x86.exe. Click the Save Button. Save the file to your hard drive. After the file is downloaded to your hard drive, click the Run button. The
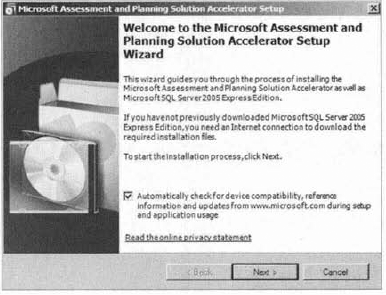
Microsoft Assessment and Planning Solution Accelerator Setup Wizard
appears. Make sure the check box to automatically check for device
compatibility is checked and click Next.

The License Agreement screen appears next. Click the I Accept The Terms Of The License Agreement radio button and click Next. At the Installation Folder screen, just accept the default location by clicking Next. A
screen appears asking about SQL Server 2005 Express. If you have a
previous version of SQL Server 2005 Express on your machine, click the
Install From Previous Downloaded Installation Files radio button. If you
do not have a previous copy of SQL, make sure the Download And Install
radio button is checked. Click Next. The
SQL Server 2005 Express License Agreement screen appears next. Click
the I Accept The Terms Of The License Agreement radio button and click
Next. At the Ready to Install screen, click the Install button. The
Installing The Microsoft Assessment And Planning Solution Accelerator
status screen will appear and show you the status of the install. After the installation is complete, the Installation Successful screen will appear.
|
Now that you have installed the Microsoft Assessment and Planning toolkit, it's time to configure and test your server. In Exercise 9, you will create your database for testing.
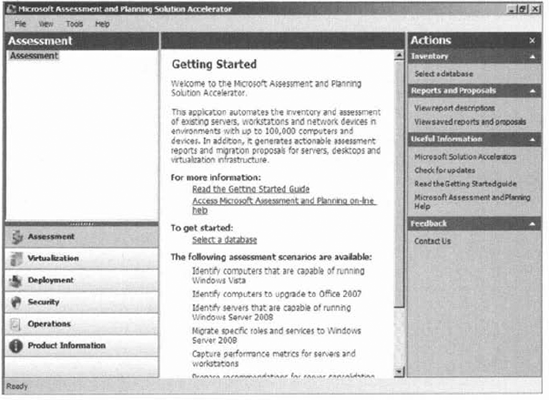
Start the Microsoft Assessment and Planning toolkit by choosing Start => All Programs => Microsoft Planning And Assessment Solution Accelerator => Microsoft Planning And Assessment Solution. The
first thing you need to do is select your database. You are going to
create your database at this time. To accomplish this, click Select A
Database in either the center or right window pane.

The
Create Or Select A Database screen appears. Make sure the Create An
Inventory Database radio button is clicked. In the Name Field, type Windows 7 and click the OK button.
|
After your database is
created, you have the ability to run the different options to test the
machines and servers. This is where you decide which scenarios you would
tike to test for your network.
As a consultant and system
administrator for many years, I find it very useful to have a utility
like MAP to help not only detect the network and its operating systems
but also recommend enhancements.