As the container that holds your controls, the
Windows Form is one of the most important elements in building Windows
applications. The Windows Form is your application's foundation, and
it's highly customizable.
The following sections explore some properties and controls that you can use to modify how your Windows Forms look and behave.
1. Setting common form properties
You can probably spot a typical Windows Form from ten paces:
It usually has the familiar little red Close button in its upper-right corner.
If it's like most windows, it has menus and toolbars.
It's displayed on the taskbar along the bottom of the screen.
All these features of a
typical window are determined by properties. Simply turning a property
on or off can give a Windows Form a complete makeover. The default
Windows Form that Visual Studio creates in all new Windows projects has
most of these typical properties. You have to set some properties, such
as menus, on your own.
Table 1 describes some common Windows Forms properties, sorted by property group.
Table 1. Common Windows Forms Properties
| Property | What It Does |
|---|
| FormBorderStyle | Determines whether the window is resizable |
| Text | Sets the caption that appears on the form's title bar |
| ContextMenuStrip | Sets the shortcut menu that's displayed when a user right-clicks the form |
| Name | Sets the identifier used to access the form in code |
| StartPosition | Determines where the form appears when it's first opened |
| AcceptButton | Sets the default Enter button |
| CancelButton | Sets the default Esc button |
| ControlBox | Toggles the form's minimize, maximize, and close controls on and off |
| IsMdiContainer | Determines whether the form is a parent container in a Multiple Document Interface (MDI) application |
| Icon | Sets the icon displayed on the title bar and the taskbar when the form is minimized |
| ShowInTaskBar | Shows the form on the Windows taskbar |
| MainMenuStrip | Sets the form's menu control |
You set these properties by using the Properties window.
2. Creating dialog boxes
A dialog box is a Windows
Form with attitude. The dialog box pops up on top of forms that are
already open and refuses to leave until the user responds. Many Windows
applications use dialog boxes to get a user's attention.
Most dialog boxes are modal,
which means that they must be closed or hidden before users can
continue working with other windows. Modeless forms can remain open
alongside other windows. Modeless dialog boxes are harder to manage
because you have to keep track of the different windows a user works
with. Visual Studio provides a modal dialog form that you can add to
your application.
To add a modal dialog box to an existing Windows project, follow these steps:
Press Ctrl+Shift+A to open the Add New Item window.
Select the Dialog template.
Enter a name for the dialog box, such as MyDialog.
Click Add.
Visual Studio adds the dialog box to your project.
NOTE
The difference
between a modal and a modeless dialog box is the method with which you
invoke it. For modal dialog boxes, you use the ShowDialog method after the dialog object has been created. For modeless dialogs, you use the Show method after the dialog object has been created.
The dialog box is just a regular Windows Form with the modified properties shown in Table 2.
Table 2. Modified Properties
| Property | Sets To |
|---|
| AcceptButton | The form's OK button |
| CancelButton | The form's Cancel button |
| FormBorderStyle | FixedDialog |
| MinimizeBox | False |
| MaximizeBox | False |
| ShowInTaskbar | False |
| StartPosition | CenterParent |
The dialog box also has an OK button and a Cancel button. The Cancel button's DialogResult property is set to Cancel. The DialogResult property returns the selected value to the parent form of the dialog box when the button is clicked.
To use the dialog box, follow these steps:
Add a label and a text box to the dialog box you create in the preceding set of steps; set the Text property of the text box to txtFromDialog and set the Modifiers property to Public in the Properties view.
Set the OK button's DialogResult property to OK.
When the user clicks the OK button in the dialog box, the value set in the DialogResult property is sent to the parent form.
Add a label, text box, and button to the project's parent form.
If no other forms exist in the project, press Ctrl+Shift+A to open the Add New Items window and add a Windows Form.
Double-click the button you created in Step 3 to access the button's Click event.
The Code Editor appears.
In the button's Click event, type this code:
VB
Dim dlg As New MyDialog

If dlg.ShowDialog() = DialogResult.OK Then
   Me.TextBox1.Text = dlg.txtFromDialog.Text
End If
C#
MyDialog dlg = new MyDialog();

if (dlg.ShowDialog() == DialogResult.OK)
{
   this.textBox1.Text = dlg.txtFromDialog.Text;
}
The first two lines of code open the dialog box you create in the preceding set of steps. The remaining four lines test the DialogResult property of the dialog box and set the Text property on the text box of the parent form.
Press Ctrl+F5 to run the application.
To test the sapplication, follow these steps:
On the parent form, click the button that launches the dialog box.
The dialog box appears.
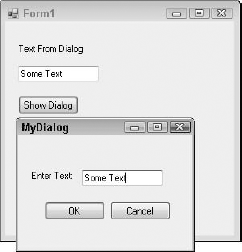
In the dialog box, type Some Text in the text box and then click OK.
The dialog box closes.
The phrase Some Text appears in the text box in the parent form.
Figure 1 shows you the parent form with the dialog box open.
Visual Studio has a number of
preconfigured dialog-box components that you can use in your
applications. You work with the dialog-box components in the Visual
Studio toolbox by using code (unlike working with the dialog box you
create in this section). The preconfigured dialog boxes create a
consistent way for you to provide access to common features, such as
printing and opening files. Table 3 lists the preconfigured dialog boxes.
Table 3. Preconfigured Dialog Boxes
| Toolbox Tab | Dialog Box | What It Does |
|---|
| Dialogs | ColorDialog | Displays a color palette and controls for selecting a color |
| | FolderBrowserDialog | Prompts user to select a folder |
| | FontDialog | Prompts user to select a font |
| | OpenFileDialog | Prompts user to open a file |
| | SaveFileDialog | Prompts user to save a file |
| Printing | PrintDialog | Prompts user to select a printer and configure settings |
| | PageSetupDialog | Prompts user to change page-related settings |
| | PrintPreviewDialog | Previews the document to be printed |
|
Use the preconfigured dialog
boxes, rather than create your own. The steps for using a preconfigured
dialog box vary slightly because each dialog box has its own set of
properties you must set.
|
|
To use the ColorDialog dialog box, follow these steps:
Create a new Windows Form.
Drag and drop a text box and button onto the form.
Drag and drop a ColorDialog control onto the form from the Dialogs tab of the toolbox.
The ColorDialog appears at the bottom of the Windows Forms Designer, rather than on the Windows Form.
Set the ColorDialog control's Name property to MyColorDialog.
Double-click the button on the Windows Form.
The Code Editor appears.
Type the following code in the Code Editor:
VB
If MyColorDialog.ShowDialog() = Windows.Forms.DialogResult.OK Then
    txtSelectedColor.BackColor = MyColorDialog.Color
End If
C#
if( MyColorDialog.ShowDialog() == DialogResult.OK )
{
    txtSelectedColor.BackColor = MyColorDialog.Color;
}
|
Use the ShowDialog() method to display preconfigured dialog boxes.
|
|
Press Ctrl+F5 to run the application.
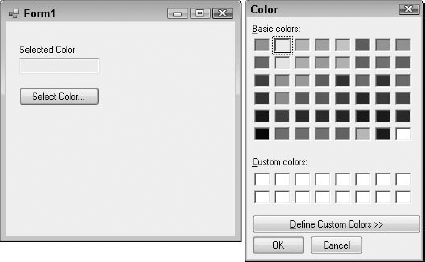
Click the button on the form to launch the ColorDialog control.
The ColorDialog appears, as shown in Figure 2.
Select a color and then click OK.
The background color of the text box changes.