2.2. Maintaining Linked Deployment Shares
Linked deployment shares can be synchronized again
after you have modified the settings or content on your master
deployment share. To synchronize the linked deployment share, follow
these steps:
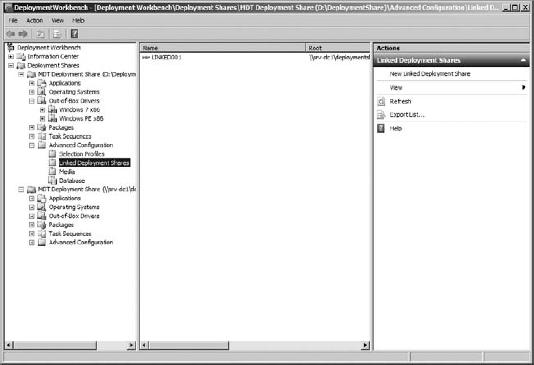
Open
the Deployment Workbench connected to your master deployment server and
navigate to Deployment Shares. Then select the master deployment
share—in this example, the MDT Deployment Share, which resides locally (D:\DeploymentShare)—and navigate to Advanced Configuration => Linked Deployment Shares, as shown in Figure 1.
Select the linked deployment share that you want to synchronize, and select Replicate Content from the Actions pane.
The Replicate To Linked Deployment Share wizard launches and displays its progress on the Progress page.
Just
like in the previous series of steps, you also have the ability to save
the status presented on the screen to a log file by selecting Save
Output and providing a filename to save the output to. Also notice that
you can view the PowerShell script that was used to create the linked
deployment share by selecting View Script. You can later use this script
as a basis to replicate linked deployment shares automatically.
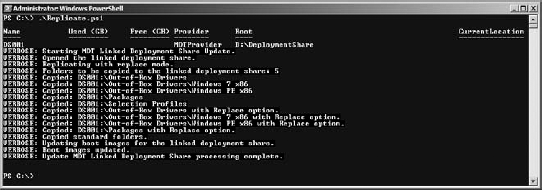
Here is the view script information after updating
the linked replication share, which you can execute directly in a
PowerShell command prompt or save to a PowerShell script file (PS1). The
output when running this script is presented in Figure 2.
Add-PSSnapIn Microsoft.BDD.PSSnapIn
New-PSDrive -Name "DS001" -PSProvider MDTProvider -Root "D:\Dep1oymentShare"
Update-MDTLinkedOS -path "DS001:\Linked Deployment Shares\LINKED001" -Verbose
While you could use PowerShell in combination with
Task Scheduler to create a replication schedule, using DFS-R will make
your deployment solution more robust.
2.2.1. Using DFS-R as a Replication Mechanism
DFS-R is the replacement for File Replication
Services (FRS) and has been available within Windows Server since 2003
R2. DFS-R features a replication engine that is capable of keeping
folders synchronized between servers across connections with limited
bandwidth. DFS-R uses Remote Differential Compression (RDC) as a
compression algorithm so that only changed file blocks are replicated
instead of the entire file.
Follow these steps to set up DFS Replication on Windows Server 2008 R2:
Open the DFS management node from Server Manager.
Select Replication and, from the Actions pane, select New Replication Group.
Make sure that Multipurpose Replication Group is selected on the Replication Group Type page and click Next.
Provide
a name and optionally a description for the replication group. If you
have a multiple-domain environment, select the domain in which you are
going to create your replication group. Click Next.
On
the Replication Group Members page, indicate which servers should
become members of the replication group. Make sure you select your MDT
server here, and at least one server to which you want to replicate your
content. Click Next.
If
you selected only one server besides your MDT server on the Replication
Group Members page, specify Full Mesh as the topology. If you selected
two or more servers besides your MDT server, choose Hub And Spoke. Click
Next.
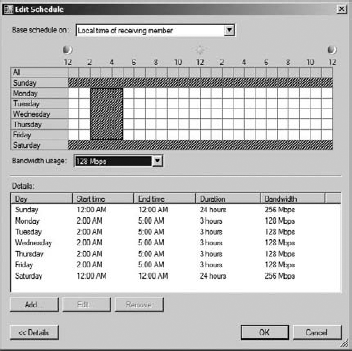
On
the Replication Group Schedule And Bandwidth page, indicate whether you
want to replicate constantly or only during specified hours. You can
also specify how much bandwidth should be used for replication, ranging
from 16 Kbps to 256 Mbps, or you can choose the Full Bandwidth setting.
If you plan to replicate on specified days and times, you can create a
detailed schedule that specifies when you want to replicate using what
bandwidth, as shown in Figure 3. Click Next when finished.
On the Primary Member page, select your MDT server, which contains the source of the to-be replicated content. Click Next.
On
the Folders To Replicate page, click Add to add the folders that you
want to synchronize. On the Add Folder To Replicate page, select the D:\Dep1oymentShare
folder. Select the option Use Custom Name to provide a custom name for
that folder. Or you can choose the Use Name Based On Path option if you
want to use the name of the folder which you want to use. To modify the
NTFS permissions, click Permissions. To replicate the boot images as
well, add the \RemoteInstall\Boot folder. Click Next.
On
the Local Path Of Deployment Share Or Other Members page, specify the
local path on the receiving server where the content you just selected
should be replicated to. Choose another name for the folder so that you
can distinguish between the source and the destination. You have to
provide the local path separately on every destination server in order
to enable the membership. Click Next.
On
the Review Settings And Create Replication Group page, check over the
settings displayed and click Create to create the new replication group.
Click
Close on the Confirmation page to finish the wizard. The replication
group you just created should now appear under the Replication icon in
the DFS management node.
2.2.2. Removing Hard References to the Deployment Share
When using DFS-R as a replication mechanism, there is
one challenge that you need to address. Because the exact content of
the master deployment share is replicated, you must use a variable
instead of a hard reference to the WDS server. This variable will be
used in the CustomSettings.ini file. The WDS server you are using when booting an MDT-generated boot image will be available in the %WDSServer% variable. You should therefore change the DeployRoot value in your Bootstrap.ini file to %WDSServer%. Also check if you made any references in your CustomSettings.ini that you want to replace with this %WDSServer%
variable. Make sure that you update your deployment share so that these
changes are integrated into the boot image and replicated to the DFS-R
receiving members.
Because refresh and replace scenarios do not leverage the WDS server, the %WDSServer% variable will not work. When you need to support these scenarios as well, you should use the DefaultGateway definition in your bootstrap.ini. An example is provided in Listing 1, where for each gateway another deployment server is defined.
Example 1. Sample bootstrap.ini using the DefaultGateway variable to determine the MDT server
[Settings]
Priority=DefaultGateway,Default
[192.168.0.254]
DeployRoot=\\SRV-MDT1\deploymentshare$
[192.168.1.254]
DeployRoot=\\SRV-MDT2\deploymentshare$

[Default]
SkipBDDWelcome=YES
|
When you don't use WDS as a mechanism to boot your
MDT boot images, you can still have multiple replicated MDT shares. In
this scenario you should not provide a DeployRoot property in your bootstrap.ini. Having no DeployRoot
property in your bootstrap.ini will be detected by the MDT scripts
which will prompt the user to provide the details for the server to
connect to. You can also use a LocationServer.xml file, which
you should include as an extra file in your boot image (which will be
included during boot image creation, ending up in the \Deploy\sControl
folder). This XML file specifies the available MDT shares within your
organization. MDT will then provide the user with a selection screen.
|
You can add extra files and folders to your boot
image by specifying a custom folder to include when boot image creation
takes place. You can specify this folder for the x86 and X64 Windows PE
images when you request the properties of the deployment share. On the
Windows PE x86 Settings or the Windows PE X64 Settings tab, you will
find the Extra Directory To Add option in the Windows PE Customizations
section. Point this setting to a folder that contains a structure that
will be applied to the root of the Windows PE image. If you want to have
files added to the Control folder as mentioned earlier, you should create the \Deploy\Control folder structure in your directory which you provide at the "to add folder" option.
|
The following example shows a LocationServer.xml configuration where you can choose between booting from the deployment share in Amsterdam HQ or in Amersfoort. The weight
value determines how often the server is used compared to the total
use, or weight, specified. In this case, the SRV-MDT1 server is selected
two out of six times and the SRV-MDT2 server is selected four out of
six times.
<?xm1 version="1.0" encoding="utf-8" ?>
<servers>
   <QueryDefau1t></QueryDefau1t>
   <server>
      <serverid>1</serverid>
      <friend1yname>
        Amsterdam HQ, the Netherlands
      </friend1yname>
      <Server1>\\SRV-MDT1\Dep1oymentShare$</Server1>
      <Server2>\\SRV-MDT2\Dep1oymentShare$</Server2>
      <Server weight="2">\\SRV-MDT1\Dep1oymentShare$</Server>
      <Server weight="4">\\SRV-MDT2\Dep1oymentShare$</Server>
  </server>
  <server>
      <serverid>2</serverid>
      <friend1yname>
        Amersfoort, the Netherlands
      </friend1yname>
      <UNCPath>\\SRV-DC1\Dep1oymentShare$</UNCPath>
  </server>
</servers>
2.3. Securing Linked Deployment Shares
You can connect to a deployment share in one of two ways. The first method is to specify a user ID, password, and domain in the bootstrap.ini
file. These credentials are then used in Windows PE to make a
connection to the deployment share and from that point a deployment can
be started. Keep in mind that if you use this method, you should use an
account with least privilege rights. Also keep in mind that when using
MDT in a refresh scenario, the contents of bootstrap.ini are
sent over the network in clear text, making it easy for someone with a
network sniffer to record the settings in that file. When you are using
an MDT database, you should also give the specified account the db_datareader rights within that database.
The second option is to not specify these settings in the bootstrap.ini
file and allow the MDT wizard to prompt the user who booted into
Windows PE for a username and password. Based on the NTFS and Share
Security settings that you specified on the deployment share, access is
granted to the user who wants to perform the installation.
