1. | Figure 3
shows a first glimpse at Visio’s web output. Take a moment to examine
the result. You can navigate between pages using the three links on the
left, which is pretty cool. Your multi-page documents get exported into
a single mini-website.
The drawing crowds the browser window, though, and you have to use the
scrollbars to see everything. Don’t worry; it gets better.
|
2. | If
you’re using Internet Explorer, you see a warning about restricting
scripts and controls. On my machine, using the IE9 beta, the warning
appears at the bottom of the window and says: “Internet Explorer has
restricted this webpage from running scripts or ActiveX controls.”
Older browsers might display a similar warning in a bar at the top of
the window.
|
3. | Click Allow Blocked Content or similar to ignore the warning to let the special content run.
|
4. | You
might run into one more hurdle. If you don’t have the Silverlight
plug-in installed for your browser, you see a message like “To enable
full functionality such as Pan and Zoom, click here to install the
Silverlight plug-in.” Click the link and install the Silverlight
plug-in.
Silverlight is a Microsoft technology similar to Adobe Flash. The plug-in is small, installs in seconds, and is nothing to fear.
|
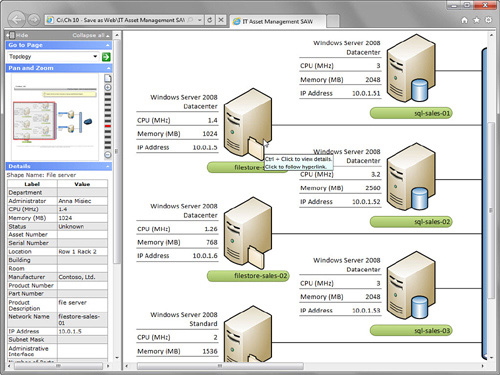
5. | Finally your web page transforms into something much friendlier looking, as shown in Figure 4.

|
6. | Note
the controls in the column on the left. Each blue heading can be
collapsed or expanded to hide or show controls and information. You see
Go to Page, Pan and Zoom, Details, and Search. Note the scroll bar for
the left panel, which lets you access off-page controls.
|
7. | Experiment
with Go to Page, which is now a sleek drop-down list. Select one of the
three pages from the list and then click the green arrow to the right.
|
8. | Click your browser’s Back button to return to the Topology page.
|
9. | Click
on the top-left server shape. You jump to another page. This is the
shape to which you added three hyperlinks. Notice that you didn’t get a
choice of which link to jump to. This is a bug in the product,
discussed later.
|
10. | Click
the Pan and Zoom control. This is similar to the Pan and Zoom control
in Visio itself. You resize the red rectangle to zoom in or out and
drag the rectangle around to pan. You can also click anywhere between
the + and − icons on the right to zoom in and out, or fit the entire
drawing to the browser window by clicking the sheet of paper icon.
Notice also that no matter how far in you zoom, text and graphics
remain smooth. This is one of the signature features of Visio’s web
export: it displays a vector representation of your drawing, not a
bitmap. If the diagram was displayed as a bitmap image, zooming would
show magnified dots resulting in a jagged representation. Vectors are
mathematical descriptions of graphics and utilize the full resolution
of the screen, no matter the zoom.
|
11. | The
Details control enables you to examine Shape Data fields. To view Shape
Data, hold down the Ctrl key while clicking a shape in the browser. In Figure 4, the Shape Data for the server in the top-left corner is showing.
|
12. | Collapse the Details area by clicking the little arrow on the right end of the blue bar.
|
13. | Notice
the Search Pages field. If you expand the Advanced item, you see a long
list of options that hint at what can be searched. You see that a
shape’s text, name, and data fields are all candidates for
searching—another cool feature! However, due to yet another frustrating
bug, you get almost no search results for this particular drawing. More
on this in the next section as well. |