Logo
programming4us
programming4us
programming4us
programming4us
Home
programming4us
XP
programming4us
Windows Vista
programming4us
Windows 7
programming4us
Windows Azure
programming4us
Windows Server
programming4us
Windows Phone
 
programming4us
Windows 7

Microsoft Visio 2010 : Linking External Data to Shapes (part 3) - Using the Database Wizard - Setting Up the Excel File as a Data Source

- Free product key for windows 10
- Free Product Key for Microsoft office 365
- Malwarebytes Premium 3.7.1 Serial Keys (LifeTime) 2019
3/20/2014 3:04:48 AM
Configuring Links Between Data and Shape Data
1.
Continuing with the Database Wizard where you last left off, you should now be looking at the Choose Table screen, as shown in Figure 3.

Figure 3. After you set up the data source, the named range of cells shows up as a table in the Database Wizard.


2.
Notice the Database Objects list. You should see ModelTypePower. This is the named range of cells that you defined when you first created the Excel file. Select ModelTypePower and click Next.

3.
For Choose the Number of Fields..., select 1 and then click Next. The ID field is sufficient to identify rows in our data.

4.
For Choose the Primary Key Field..., select ID from the list and then click Next.

5.
For Choose a Default Key Value..., click None instead of selecting an item from the list. The default light bulb shape won’t be linked to any particular record in the data. The wizard advances to the next screen.

6.
The Choose the Events and Actions... screen allows you to add and remove features from the data-linked shape’s right-click menu. Uncheck Delete Shape and Database Record but leave the rest of the settings as they are. Click Next.

7.
For Choose the Shape Cell to Be Used for Storing the Primary Key Field Value, select the default: Prop.ID.

If you look at the drop-down list, you see the names of the other Shape Data fields that exist in the light bulb master. Even though you didn’t add an ID field, the wizard creates it for you automatically. Click Next.

8.
The Link ShapeSheet Cells to Database Fields screen is the place where you map shape data fields to columns in the Excel file. You work in classic “chooser” style, creating pairings by moving from left to right. So first, select a value in the Cells list and a value in the Database Fields list, and then click Add. Do this for the three light bulb values:

a. Prop.BulbType, Bulb Type, Add.

b. Prop.Model, Model, Add.

c. Prop.Power, Power (Watts), Add.

9.
Now you can see why you needed to rename the Shape Data field row names. If you hadn’t, you would have to map Prop.Row_1 to Power (Watts), Prop.Row_2 to Model, and Prop.Row_3 to Bulb Type. It would be difficult to ensure that you properly mapped the right Shape Data fields to the right data fields.

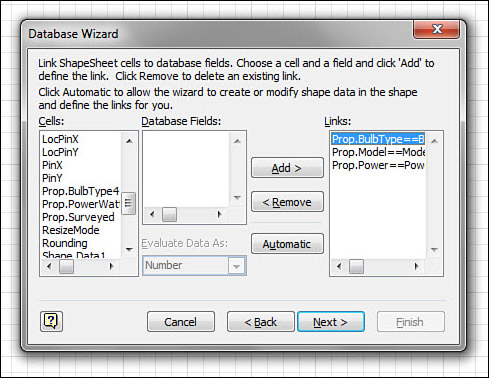
When all three fields have been mapped and appear in the Links column, as in Figure 4, click Next.


Figure 4. Shape Data fields properly mapped to Excel data fields.


10.
Nod your head thoughtfully at the final summary screen and then click Finish. Congratulate yourself for your patience. Your Light Bulb master is now linked to the data in the Excel file.

11.
Save the drawing.

I know that reading step-by-step procedures for using the Database Wizard is tedious at best, but after a few times through, you’ll see that it’s not difficult. Each step of the wizard reminds you what to do, so there isn’t a lot that needs memorizing.

The trickiest part is remembering the Read Only setting when you set up the data source. This box is checked by default, which means you aren’t able to change values in Shape Data fields and push them back to the database. This is fine for many applications, where you simply want to visualize existing data in Visio but not change it from within Visio.

Other -----------------
- Microsoft Visio 2010 : Linking External Data to Shapes (part 3) - Using the Database Wizard - Setting Up the Excel File as a Data Source
- Microsoft Visio 2010 : Working with Data - Creating Reports (part 3) - Using Reports with Other Documents
- Microsoft Visio 2010 : Working with Data - Creating Reports (part 2) - Grouping and Totaling Items in a Report
- Microsoft Visio 2010 : Working with Data - Creating Reports (part 1) - Introducing the Report Definition Wizard
- Microsoft Visio 2010 : Creating and Using Shape Data Fields (part 5) - Shape Data Labels versus Names
- Microsoft Visio 2010 : Creating and Using Shape Data Fields (part 4) - Displaying Shape Data in Shape Text
- Microsoft Visio 2010 : Creating and Using Shape Data Fields (part 3) - Saving Sets of Shape Data Fields
- Microsoft Visio 2010 : Creating and Using Shape Data Fields (part 2) - Choosing Shape Data Field Types , Creating Lists and Controlling Formatting
- Microsoft Visio 2010 : Creating and Using Shape Data Fields (part 1) - Adding Simple Data Fields
- Microsoft Visio 2010 : Working with Data - Introducing Shape Data Fields
 
 
Top 10
- Microsoft Visio 2013 : Adding Structure to Your Diagrams - Finding containers and lists in Visio (part 2) - Wireframes,Legends
- Microsoft Visio 2013 : Adding Structure to Your Diagrams - Finding containers and lists in Visio (part 1) - Swimlanes
- Microsoft Visio 2013 : Adding Structure to Your Diagrams - Formatting and sizing lists
- Microsoft Visio 2013 : Adding Structure to Your Diagrams - Adding shapes to lists
- Microsoft Visio 2013 : Adding Structure to Your Diagrams - Sizing containers
- Microsoft Access 2010 : Control Properties and Why to Use Them (part 3) - The Other Properties of a Control
- Microsoft Access 2010 : Control Properties and Why to Use Them (part 2) - The Data Properties of a Control
- Microsoft Access 2010 : Control Properties and Why to Use Them (part 1) - The Format Properties of a Control
- Microsoft Access 2010 : Form Properties and Why Should You Use Them - Working with the Properties Window
- Microsoft Visio 2013 : Using the Organization Chart Wizard with new data
 
programming4us
Windows Vista
programming4us
Windows 7
programming4us
Windows Azure
programming4us
Windows Server