Logo
programming4us
programming4us
programming4us
programming4us
Home
programming4us
XP
programming4us
Windows Vista
programming4us
Windows 7
programming4us
Windows Azure
programming4us
Windows Server
programming4us
Windows Phone
 
programming4us
Windows 7

Microsoft Visio 2010 : Creating and Using Shape Data Fields (part 4) - Displaying Shape Data in Shape Text

- Free product key for windows 10
- Free Product Key for Microsoft office 365
- Malwarebytes Premium 3.7.1 Serial Keys (LifeTime) 2019
3/13/2014 1:56:52 AM

5. Displaying Shape Data in Shape Text

Having data behind shapes is useful if you’re interacting with Visio. But if you need a printout or a quick overview, it’s nice to be able to see the data at a glance.

Linking Text to Shape Data
 
1.
Continue working with Ch7 Shape Data.vsd.

2.
Select one of the light bulbs. It should have four data fields, filled with meaningful data.

3.
On the Insert tab, click Field.

4.
Select Shape Data from the Category list.

5.
Choose Power and then click OK. The power value is displayed in the shape’s text.

6.
Note that the W is missing after the power value. This is special formatting for displaying the value in the Shape Data window, which unfortunately isn’t picked up when you insert text. No worries, though. You can mix inserted fields with free-form text. Just place your cursor at the end of the line, then enter a space and a W.

7.
Continue adding fields. Select the bulb again, press F2 to enter text edit mode, place the cursor at the end of the text, and then press Enter to start a new line.

8.
Revisit the Insert Field dialog, but select the Model field this time.

9.
In a similar fashion, add the Bulb Type to the last line of the text.
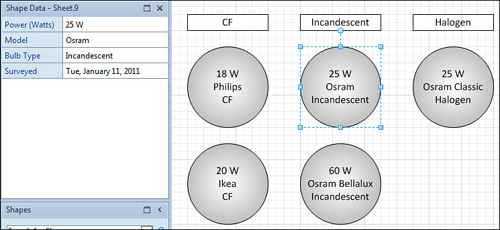
10.
Verify that the shape’s text is dynamic by changing Shape Data values. The text changes to reflect the new data.

11.
Save your work for the next exercise.

Adding fields to shapes to display data is fairly easy, doing so to lots of shapes can become tedious. Right now, your drawing has numerous shapes with the same set of fields, but only one has text fields linked to data.

You would think that the solution is to copy the text from one shape and then paste to another shape. But this doesn’t quite work. Your target shape ends up with nondynamic text that looks correct until you realize that changing the data doesn’t change the text any more. Luckily, there is a solution.

1.
Select a shape that has inserted fields.

2.
Copy the shape. Copy the whole shape; not just the text inside the shape.

3.
Select a target shape that has the same data fields.

4.
Press F2 to enter text edit mode.

5.
Paste.

Yes, you are copying a shape but pasting it into a text block. This tells Visio to work a bit harder and hook the text to the Shape Data. Figure 4 shows four different rectangles, with smart text displaying different data.

Figure 4. Text fields displaying Shape Data values.

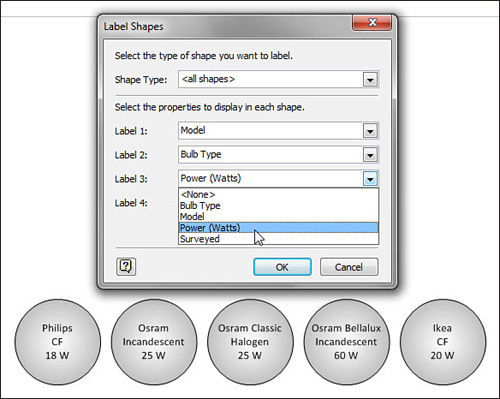
If you have Visio Pro or Premium, an add-on makes it easy to configure shape text to display up to four Shape Data fields and to change them at any time.

The Label Shapes add-on can be found by going to View, Macros, Add-ons, Maps and Floor Plans, Label Shapes.

You can apply the smart text to a selection of shapes, all shapes on the page, or all instances of a particular master. Figure 5 shows the light bulbs being modified by the Label Shapes tool.

Figure 5. For Premium and Pro owners, the Label Shapes add-on makes it easy to link text to Shape Data.
Other -----------------
- Microsoft Visio 2010 : Working with Data - Introducing Shape Data Fields
- Advanced Windows 7 Programming : Working in the Background - DEVELOPING TRIGGER-START SERVICES (part 7)
- Advanced Windows 7 Programming : Working in the Background - DEVELOPING TRIGGER-START SERVICES (part 6)
- Advanced Windows 7 Programming : Working in the Background - DEVELOPING TRIGGER-START SERVICES (part 5)
- Advanced Windows 7 Programming : Working in the Background - DEVELOPING TRIGGER-START SERVICES (part 4)
- Advanced Windows 7 Programming : Working in the Background - DEVELOPING TRIGGER-START SERVICES (part 3)
- Advanced Windows 7 Programming : Working in the Background - DEVELOPING TRIGGER-START SERVICES (part 2)
- Advanced Windows 7 Programming : Working in the Background - DEVELOPING TRIGGER-START SERVICES (part 1)
- Advanced Windows 7 Programming : Working in the Background - ADVANTAGES OF WORKING IN THE BACKGROUND
- Microsoft Visio 2010 : Importing Graphics (part 6) - Importing AutoCAD Drawings - Manipulating an Imported AutoCAD Drawing and Adding Furniture
 
 
Top 10
- Microsoft Visio 2013 : Adding Structure to Your Diagrams - Finding containers and lists in Visio (part 2) - Wireframes,Legends
- Microsoft Visio 2013 : Adding Structure to Your Diagrams - Finding containers and lists in Visio (part 1) - Swimlanes
- Microsoft Visio 2013 : Adding Structure to Your Diagrams - Formatting and sizing lists
- Microsoft Visio 2013 : Adding Structure to Your Diagrams - Adding shapes to lists
- Microsoft Visio 2013 : Adding Structure to Your Diagrams - Sizing containers
- Microsoft Access 2010 : Control Properties and Why to Use Them (part 3) - The Other Properties of a Control
- Microsoft Access 2010 : Control Properties and Why to Use Them (part 2) - The Data Properties of a Control
- Microsoft Access 2010 : Control Properties and Why to Use Them (part 1) - The Format Properties of a Control
- Microsoft Access 2010 : Form Properties and Why Should You Use Them - Working with the Properties Window
- Microsoft Visio 2013 : Using the Organization Chart Wizard with new data
 
programming4us
Windows Vista
programming4us
Windows 7
programming4us
Windows Azure
programming4us
Windows Server