2. Choosing Shape Data Field Types
You just created Shape Data fields of type string
and number. Be aware that Shape Data fields can hold eight different
data types of data. Here’s a rundown of the different data types you
can specify for your fields:
String— This data type holds general text information. Number— This data type can be pure numbers, such as 1 or 3.14159265358, or number-unit pairs, such as 1.5 in. or 38.1 mm. Fixed List— This data type provides a noneditable drop-down list of items. Variable List— This data type provides an editable drop-down list of items. You can select from the list or type in a custom entry. Boolean— This term is Geek-speak for true or false, which appear in a drop-down list for this data type. Currency—
Entering a pure number for this data type results in your system’s
default currency being used, so 1.5 ends up as $1.50, for example. You
can specify other currencies by entering the proper symbol or
three-letter abbreviation before or after the number. Some common
examples are EUR, GBP, JPY, CAD, AUD, CHF, HKD, CNY. No, Visio doesn’t
convert currencies, nor does it charge a service fee. Date—
If you click the field for this data type, an ellipses (...) button
appears, which lets you pick a date from a calendar control.
Alternatively, you can type a date. Visio seems relatively good at
recognizing date text. For example, I typed in Jul 23, 2011 and
2011.7.23, and Visio recognized them both, displaying 7/23/2011 after I
pressed Enter. Visio takes your system’s date settings into account
too, so don’t worry about having to view month-day-year if you’re used
to day-year-month. Duration—
This data type relates to time but isn’t a calendar value. Duration
denotes elapsed time and is useful for timeline diagrams and other
scheduling applications. For example, instead of Start Date and End
Date fields, you could have Start Date and Duration fields. The End
Date then could be calculated by adding the two together. If
you enter a pure number, the default units are elapsed day, which
appear as “ed.” You can explicitly specify other durations: elapsed
day, hour, minute, second, or week values. Just type these units after
a number—ed., eh., em., es., or ew.—making sure to include the trailing
period.
3. Creating Lists and Controlling Formatting
You can practice defining a few more of these data types by adding a drop-down list and a date value to the light bulb shape.
Creating Lists and Formatting Shape Data Values
1. | Continue working with Ch7 Shape Data.vsd.
| 2. | Make sure that you have several copies of the bulb shape.
| 3. | Select all of them and then open the Define Shape Data window.
| 4. | Add a fixed list type field with five choices. They appear in a drop-down list.
- a. Click the New button.
- b. Change Property3 to Bulb Type.
- c. Set the Type to Fixed List.
- d. In the Format field, type CF;Halogen;Incandescent;LED;Other. Notice that each item is separated by a semicolon. This is the way you indicate list items for Shape Data fields.
- e. Click OK. All the selected shapes now have a blank Bulb Type field, but their other data fields remain unchanged.
- f. Experiment
with setting the Bulb Type value for individual shapes. Note the cool
drop-down control that lets you pick from the list.
| 5. | Select all the shapes again and open the Define Shape Data window.
| 6. | Add a date type field and set the display formatting.
- a. Click the New button.
- b. Change Property4 to Surveyed.
- c. Set the Type to Date.
- d. In the Format cell, click the arrow button on the right. Note the variety of date formats.
- e. Select a date format that you like from the list. Notice that a format string is inserted as editable text in the Format field.
For example, choosing “Sunday, October 03, 1993” results in a Format of
“{{dddd, MMMM dd, yyyy}}”. You can experiment with these codes and
modify them to get options that aren’t in the list.
I
frequently work with Americans and Europeans, who can’t agree where the
month and day should be in date formats. To avoid confusion, I like to
use a sortable date format. So I type a format string of
“{{yyyy.MM.dd}}” which displays 1993.10.03 in the Shape Data window.
- f. Click OK to accept the changes. The bulbs all have a new, blank “Surveyed” field.
- g. Experiment
with
setting values for the Surveyed field. When you click the field,
an ellipses (...) button appears. You can also type date text, which
will be reformatted as soon as you press Enter or Tab away from the
field.
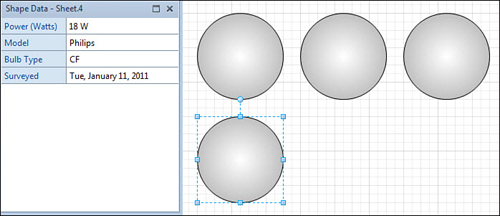
| 7. | Save the drawing. Figure 2 shows an example of how your shapes should look.
|
|
