5. Testing the TriggerStartService
At this point, you have a trigger-start service you
can use to monitor Telnet utility Port 23. Of course, before you can
use Telnet, you need a Telnet server and the proper system setup. Once
you do have a Telnet setup installed and tested, you need to install
and check the service. Finally, after all this effort, you can open a
Telnet connection, check something simple, and then close the Telnet
connection. Viewing the event log shows the result of all the work to
date. The following sections help you configure and test the service.
5.1. Configuring Telnet
Many networks don't use a Telnet setup any longer
because Telnet can become a security liability if it isn't managed
correctly. You can find a host of articles on the Internet about Telnet
security — one of the better articles is at http://www.interwork.com/blog/2008/11/18/qa-how-to-eliminate-the-security-risks-associated-with-telnet-ftp/.
Telnet is still a useful protocol because it works on nearly any
system, it's reliable, and it's simple. Even if you don't currently
have a Telnet setup to use, you can still configure Windows 7 to
provide localized Telnet services using the following steps:
Open the Programs and Features applet in the Control Panel. You'll see the Programs and Features window.
Click Turn Windows Features On or Off. You'll see the Windows Features dialog box, shown in Figure 4.
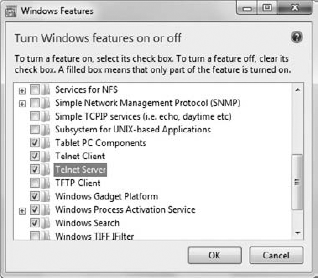
Check
the Telnet Server option and click OK. Windows will install the Telnet
Server feature on your system. However, the Telnet Server won't be
available immediately because the Telnet service is installed in a
disabled state.
Open the Services console found in the Administrative Tools folder of the Control Panel. Locate the Telnet service.
Double-click the Telnet service entry, and you'll see the Telnet Properties dialog box shown in Figure 5. The figure shows the Telnet service as it will appear after Step 7.
Select
Manual in the Startup Type field and click Apply. This action will
enable the Start button near the bottom of the Telnet Properties dialog
box.
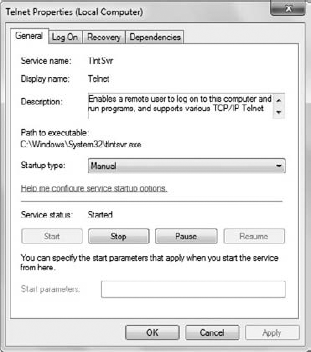
Click
Start and click OK. Windows will start the Telnet service. However, you
still can't access Telnet because Windows has placed a security
obstacle in your way.
Open the Computer Management console found in the Administrative Tools folder of the Control Panel.
Open the Computer Management\System Tools\Local Users and Groups\Users folder.
Double-click your account in the Users folder. You'll see the Properties dialog box for your account.
Select the Member Of tab. You see the list of groups that you're a member of.
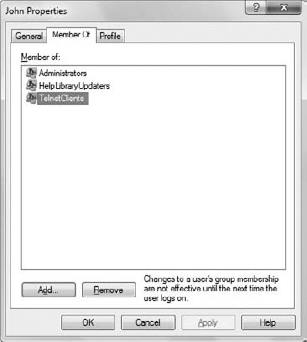
Click Add. You'll see the Select Groups dialog box.
Type TelnetClients in the Enter the Object Names to Select field. Click OK. Your Properties dialog box should look similar to the one shown in Figure 6 (with TelnetClients in the Member Of list).
Click OK to close the Properties dialog box.
Choose Start => All Programs =>
Accessories. Right-click the Command Prompt entry and choose Run As
Administrator from the Context menu. You'll see a command prompt open.
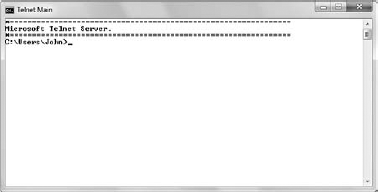
Type Telnet MachineName and press Enter, where MachineName
is the name of your system. You'll see a prompt that tells you about a
potential security risk of using Telnet (sending your password over the
network). Because this is a localized test, you shouldn't have anything
to worry about — no information is actually going across the network.
Type Y and press Enter. You'll see a command prompt like the one shown in Figure 7.
This is a command prompt accessed using Telnet. If you see this command
prompt, you know your Telnet setup is configured and working properly.
Type Exit and press Enter to end the Telnet session. Telnet will display the "Connection to host lost" message in the command prompt.
In the Services console, right-click the Telnet entry and choose Stop from the Context menu. This action closes Port 23.
