6. Shape Data Labels versus Names
Shape
Data fields actually have two names. Visio does its best to shield end
users from this fact, but you will run into situations in which it
helps to understand the nitpicky details.
Warning: This section is a bit technical, so you might choose to skip it or skim it quickly.
However, if you think Shape Data fields are the
coolest, you plan on using them often in your Visio work, are
interested in doing calculations with them, and want to link them to
data using the Database Wizard, you need to understand how they are
named.
Shape Data used to be known as Custom Properties
until Visio 2007. You see vestiges of in the ShapeSheet, where you see
that cells which hold Shape Data information are prefixed with “Prop.”
If you search the Internet for information on Visio Shape Data, you
will run into the term “Custom Properties” in older articles, and will
probably find more information if you include the term in your search.
When you define a Shape Data field, note that you
enter its name in a field called “Label.” If you turn on the Developer
tab (via Customize the Ribbon), Visio switches to “developer mode” and
adds extra elements to the user interface. In the Define Shape Data
dialog, you see additional fields, one of which is the “Name” field.
Figure 6 compares the non-developer-mode dialog (left) with the developer-mode dialog (right).
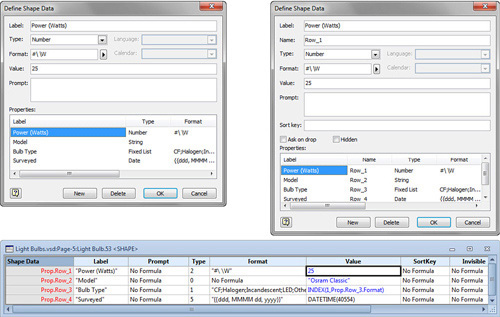
In Figure 6,
take a look at the Name field that appears just below Label. The Name
is the row name of the Shape Data field, as represented in the
ShapeSheet.
The ShapeSheet is how a developer views Visio
shapes. It is an Excel-like spreadsheet that lives behind every Visio
shape,
“Developing Custom Visio Solutions.” Normally, you don’t need to go
into the ShapeSheet, and you should probably stay away from it. But
I’ve already warned you that this was a technical section, so have a
glance at the ShapeSheet at the bottom of Figure 6.
Even though I’ve given the data fields nice names
like “Power (Watts)” and “Bulb Type”, the fields are internally
represented with dull automatic row names such as Prop.Row_1 and
Prop.Row_3. You can see these row names in the developer version of the
Define Shape Data dialog at right in Figure 6.
Visio tries to shield the average user from Row_1,
Row_2, and Row_3 by showing only labels by default. However, if you try
to map fields to a database using the (older) Database Wizard or try to
do calculations with Shape Data fields, you run into them. This can
make it hard to know what you’re mapping or calculating. If you have
Visio 2010 Standard, the Database Wizard is your only data-linking
option, so you’re even more likely to run into the problem.
Turning on the Developer tab on the Ribbon gives you
a chance to change these names when defining Shape Data fields. For the
light bulb shapes, you can change Row_1
to Power_W and Row_3 to Bulb_Type, for example. Note that row names
can’t contain spaces, commas, colons, semicolons, and so on.
You don’t have to be a ShapeSheet developer to make
use of this seemingly obscure knowledge. The insert field function lets
you create calculations based on Shape Data fields using the Custom
Formula option. To create custom formulas, you need to reference the
row names, not the labels. And this feature is too cool to ignore, so
let’s see how it works.
Creating a Simple Calculation Using Shape Data
1. | Continue working with Ch7 Shape Data.vsd.
|
2. | Turn on the Developer tab via Customizing the Ribbon.
|
3. | Copy
a light bulb shape and clear the text from it. (I do it like this:
Select the shape, type space, Backspace, Esc. No more text!)
|
4. | Bring up the Define Shape Data window for the shape.
|
5. | So that you can better understand where the power row is, change the row Name field from Row_1 to Power_W. Then click OK to accept the change.
|
6. | With the shape still selected, go to Insert, Field. The Insert Field dialog appears.
|
7. | Select Custom Formula from the Category list.
|
8. | In the Custom Formula field, type
= Prop.Power_W/1000 & “kW”
Notice that as you type Prop...,
a drop-down list of Shape Data fields appears to assist you. Most of
them still have “Row_” style names, but Prop.Power_W should be atop the
list. The descriptive Shape Data labels are nowhere to be seen and you
can see why changing row names is important.
|
9. | After
you enter the complete formula, click OK. The shape’s text displays the
kilowatts for the light bulb, calculated from the watts.
Prop.Power_W refers to the value stored in the Shape Data field. You
then divide it by 1000 using the division symbol. Finally, you
concatenate (append text) the units by using the “&” character and
the letters kW.
|
10. | Change the Shape Data value of Power (Watts) to check that the text responds to data changes.
|
For the intrepid who would
like a bit more control, there is a function that allows you to specify
the formatting of calculations. To show two decimal units for the
kilowatt value, you can enter the following formula:
FORMAT(Prop.Power_W/1000,“0.00”)&“kW”
