Taking the Data-Linked Light Bulb Shape for a Spin
1. | Create a new, empty page in your Ch7 Shape Data.vsd drawing and name it DB Wiz.
|
2. | Drag the Light Bulb master from the Document Stencil and drop it on the page.
|
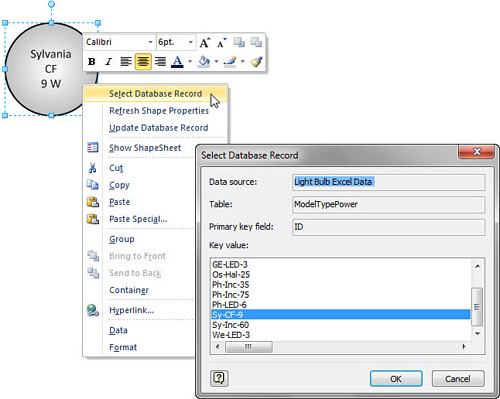
3. | Right-click the shape and notice the top three items, as shown in Figure 5. They have all been added by the Database Wizard to the master shape, and allow you to access the data-linking features.
|
4. | Choose Select Database Record. The Select Database Record dialog appears, showing a list of light bulbs by ID, as shown in Figure 5.
This dialog comes from the Database Wizard and is your interface into
the actual Excel data. You should recognize the list of IDs as the
first column in the Excel file.
|
5. | Choose
a value from the list and then click OK. Notice that the fields in the
Shape Data window now have new values. You can compare them with the
values in the Excel file.
|
6. | Notice
also that the Light Bulb shape now has an ID Shape Data field. This
field was added by the Database Wizard to hold the key that identifies
the data record stored in the shape.
|
7. | Open the Excel file and make a change. Make sure you change a record that is linked to a shape on the page. Append XXXX onto the model name.
For example, in Figure 5, change Sylvania to SylvaniaXXXX in the Excel file and then save the change.
|
8. | Back
in Visio, the Sylvania light bulb shape is now out of sync with the
data. You can easily rectify this problem. Right-click shape and choose
Refresh Shape Properties. The shape’s Model value immediately updates
to SylvaniaXXXX.
|
9. | Make a copy of this shape.
|
10. | Using
the Shape Data window, remove XXXX from the Model name for just one of
the shapes. You now have two shapes that are out of sync with each
other, and one of them is out of sync with the database.
|
11. | Right-click
the modified shape and choose Update Database Record. If you heck the
Excel file, you see that it now says Sylvania instead of SylvaniaXXXX.
|
12. | The
copied shape is still out of sync, however. Make several more copies of
this shape. The Excel record and one shape in the drawing now say
“Sylvania,” but several shapes display “SylvaniaXXXX” in their Model
field.
|
13. | Right-click
one of the copies and choose Refresh Shape Properties. The Model
reverts to Sylvania, but the other copies still display XXXX, which is
no longer in the Excel file. How can we refresh all of the shapes on
the page at once?
|
14. | You can easily refresh the whole drawing at once by:
- a. Making sure that no shapes are selected in the drawing window.
- b. Going
to View, Add-ons, Visio Extras, and clicking Database Refresh. All of
the out-of-sync copies are refreshed and no longer have XXXX in the
model name.
|
You have now successfully created a data source,
linked Visio shapes to rows in that data, and synchronized changes made
to the data in both the data source and Visio. Congratulations!
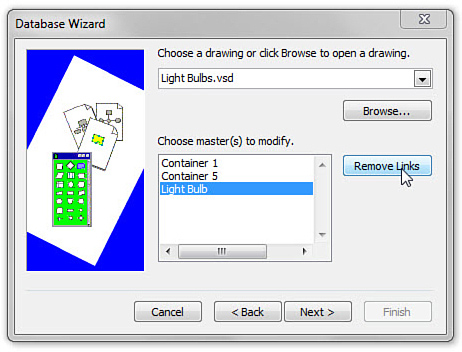
You can change the data-linking settings for the
Light Bulb master at any time. Just start the Database Wizard from the
Add-ins menu and follow the screens. The wizard reads your shape,
recognizes the settings inside, and presents them to you for
modification in each screen.
For example, you can remove the data linking
altogether by visiting the fourth screen in the wizard. As soon as you
select the Light Bulb master from the list, the Remove Links button to
the right is enabled, allowing you to remove the database connection to
the shape. Figure 6 illustrates this.
Another modification that you might want to make is
to add or remove some of the data-related right-click menu items from
the shape.
You’ve just seen a brief glimpse of what the
Database Wizard can do. Whether you have lists of network equipment or
standard business processes stored in some database or spreadsheet, you
can now quickly get that data into a Visio drawing, create an
illustration of a system, and then generate reports when the diagram
looks correct.
By linking shapes to data sources, you
avoid tedious rekeying and enforce consistency by allowing only
standardized or realistic sets of data. If GE doesn’t make a 30,000W
LED bulb, there’s no chance of picking one when you select Database
Record.
