Logo
programming4us
programming4us
programming4us
programming4us
Home
programming4us
XP
programming4us
Windows Vista
programming4us
Windows 7
programming4us
Windows Azure
programming4us
Windows Server
programming4us
Windows Phone
 
programming4us
Windows 7

Microsoft Visio 2010 : Creating a New Diagram - Selecting Shapes

- Free product key for windows 10
- Free Product Key for Microsoft office 365
- Malwarebytes Premium 3.7.1 Serial Keys (LifeTime) 2019
6/12/2011 9:09:40 AM
You can use several techniques for selecting shapes in Visio. The most obvious is that you can click once on a shape to select it. To select more than one shape using this method, hold down the Shift key or the Ctrl key while clicking additional shapes. You can remove shapes from an existing selection with the same method.

A second common technique is to draw a bounding box around one or more shapes. You draw a bounding box by clicking anywhere on the page background and moving the mouse while holding down the mouse button. The bounding box appears as a dashed rectangle.

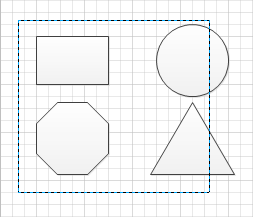
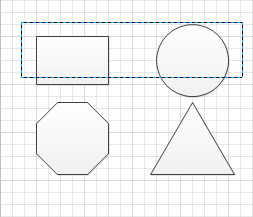
The default behavior in Visio is to select any shapes that are fully surrounded by a bounding box. For example, in the following graphic on the left, the rectangle and octagon will be selected when you release the mouse button. In the graphic on the right, no shapes will be selected.

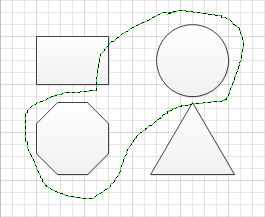
Visio offers an alternative to a bounding box that lets you select shapes with a freeform lasso. To change from area select (another name for the bounding box technique) to lasso select, on the Home tab, in the Editing group, click the Select button, and then click Lasso Select. A lasso selection appears as shown in the following graphic; releasing the mouse button in this example will select the circle and the octagon.


Tip:

To revert to using bounding boxes, on the Home tab, in the Editing group, click the Select button, and then click Area Select.


You can change selection behavior in Visio so it will select shapes that are partially enclosed by a bounding box or lasso. On the File tab, click Options, and then click Advanced; clear the Select Shapes Partially Within Area check box.

Area/lasso selection and click selection are not mutually exclusive. You can select one or more shapes by clicking first, and then add additional shapes by holding down Shift or Ctrl while drawing a bounding box or lasso loop. The reverse works as well: you can start with a bounding box or lasso selection and add additional shapes with the same keyboard and mouse combination.


Note:

You can select all shapes on a page by pressing the standard Windows keyboard shortcut Ctrl+A.

Other -----------------
- Microsoft Visio 2010 : Creating a New Diagram - Using Basic Shapes and the Dynamic Grid
- Managing Security in Windows 7 : Windows Firewall
- Managing Security in Windows 7 : Designing BitLocker Support
- Microsoft PowerPoint 2010 : Working Together on Office Documents - Comparing the Desktop App to Web App
- Microsoft PowerPoint 2010 : Working Together on Office Documents - Saving and Opening Documents with Windows Live
- Microsoft PowerPoint 2010 : Working Together on Office Documents - Setting Up to Use Office Web Apps
- Managing Security in Windows 7 : Security Policies (part 3) - System Services & Removable Storage Access Policy
- Managing Security in Windows 7 : Security Policies (part 2) - Local Policies
- Managing Security in Windows 7 : Security Policies (part 1) - Account Policies
- Managing Security in Windows 7 : User Account Control
 
 
Top 10
- Microsoft Visio 2013 : Adding Structure to Your Diagrams - Finding containers and lists in Visio (part 2) - Wireframes,Legends
- Microsoft Visio 2013 : Adding Structure to Your Diagrams - Finding containers and lists in Visio (part 1) - Swimlanes
- Microsoft Visio 2013 : Adding Structure to Your Diagrams - Formatting and sizing lists
- Microsoft Visio 2013 : Adding Structure to Your Diagrams - Adding shapes to lists
- Microsoft Visio 2013 : Adding Structure to Your Diagrams - Sizing containers
- Microsoft Access 2010 : Control Properties and Why to Use Them (part 3) - The Other Properties of a Control
- Microsoft Access 2010 : Control Properties and Why to Use Them (part 2) - The Data Properties of a Control
- Microsoft Access 2010 : Control Properties and Why to Use Them (part 1) - The Format Properties of a Control
- Microsoft Access 2010 : Form Properties and Why Should You Use Them - Working with the Properties Window
- Microsoft Visio 2013 : Using the Organization Chart Wizard with new data
 
programming4us
Windows Vista
programming4us
Windows 7
programming4us
Windows Azure
programming4us
Windows Server