3. Local Policies
The Local Policies node includes three nodes that contain several security settings:
Audit Policy
User Rights Assignment
Security Options
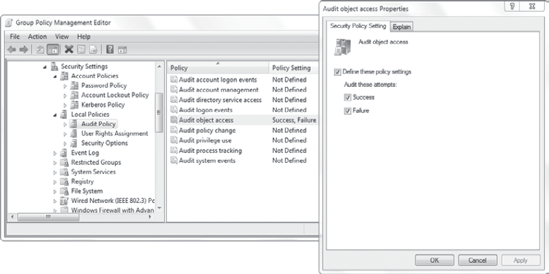
3.1. Audit Policies
Audit Policies
can be set to ensure that different categories of auditable events are
logged. When they are configured, these events are logged in the
Security log of Event Viewer.
Figure 5
shows the Audit Policy node with the Audit Object Access setting
opened. Notice that for any of these settings, you can select Success,
Failure, or both. Each of the Audit Policy settings has a detailed
explanation that can be viewed in the Explain tab.
You can modify the Audit Policy to log events in the following categories:
Audit Account Logon Events
When enabled,
this setting logs each time a computer validates an account's
credentials. The accounts can be validated using Active Directory in a
domain or the local Security Accounts Manager on a local computer.
Audit Account Management
Enable this setting if you
want to log any time a user account or group is created, changed, or
deleted. It will also log if a user account is renamed, disabled, or
enabled. Last, it will log when passwords are set or changed.
Audit Directory Service Access
This setting applies only
to Active Directory objects. When enabled, it allows auditing to occur
for any objects, such as OUs, users, groups, computers, and more.
Audit Logon Events
Each time a user attempts to log on or log off a computer, a logon event can be generated.
Audit Policy Change
When this setting is
enabled, any changes to the user rights assignment policy, audit policy,
account policy, or trust policy can be logged. As with all the
settings, both success and failure events can be selected.
Audit Privilege Use
When a user executes a
right, it is also referred to as using a privilege. This setting
triggers log entries for the use of most user rights. However, a few
commonly used rights aren't logged by default to avoid filling up the
Security log. If you want to log all events, you can modify the
Registry, as described in the Explain tab of this setting.
Audit Process Tracking
Software developers may
sometimes use this to track process-related events. It can be useful
during the debugging process of a new application.
Audit System Events
System events include
changing the system time, startups and shutdowns, loss of audited events
because of an auditing system failure, and when the Security log
exceeds the configured warning threshold.
Audit Object Access
When this setting is
enabled, auditing can be enabled for access to any non–Active Directory
objects such as files, folders, and printers. It's important to realize
that just enabling this setting will not turn on auditing for all files,
folders, and printers within the scope of the policy. Instead, you must
also go to the object and enable auditing. This is demonstrated in Exercise 2.
As an example of object
access, assume that you want to audit anytime anyone deletes or even
tries to delete a file in a folder named Data. You would first enable Audit Object Access as part of the Audit Policy. You would then go to the Data folder and enable auditing on the folder.
Figure 6 shows the Auditing tab on a folder named Data.
When Audit Object Access is enabled, and auditing is also enabled on
the object as shown in the figure, then auditing will occur for objects
in the folder.
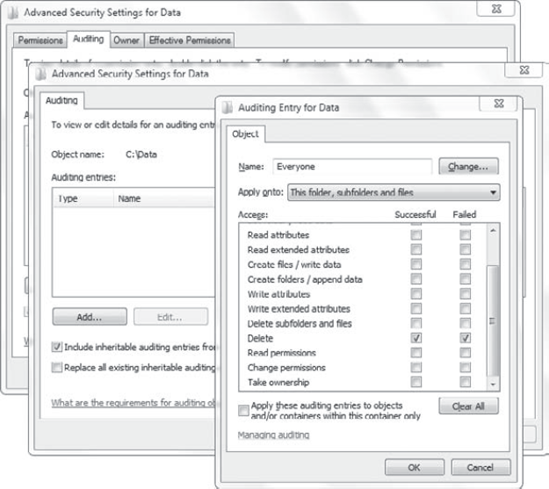
Notice that only
successful and failed attempts to delete objects in the folder are
selected. You can select all possible actions, but you should enable
auditing only for what you need.
Exercise 2
shows how to enable auditing on individual folders. As a reminder,
these settings have an impact only if Audit Object Access has been
enabled in the Audit Policy. If Audit Object Access isn't enabled, the
settings in the exercise will not apply.
Launch Windows Explorer by clicking Start => Computer. Browse to the C: drive, and right-click a folder that you want to audit. Select the Security tab. Click Advanced. Select the Auditing tab. If prompted by UAC to view the auditing properties, click Continue. When the Auditing screen appears, click Add. Add the user or group that you want to audit. If you want to audit all users, enter Everyone. Click OK. Select
the accesses you want to audit. For example, if you want to audit all
successful and failed attempts to delete files, click Successful and
Failed for Delete. Click OK four times to return to Windows Explorer.
|
3.2. User Rights Assignment
The User Rights Assignment
node includes several Group Policy settings that you can use to control
rights and privileges of different users. This node is within the Local
Policies node.
Because rights are assigned
to users or groups, these settings are configured a little differently.
When a setting is enabled, you must add the groups that will be assigned
the right.
Figure 7
shows the Group Policy Management Editor with the Allow Log On Locally
right setting opened. This right has been defined and granted to the
Administrators group and the G_ITAdmins group.
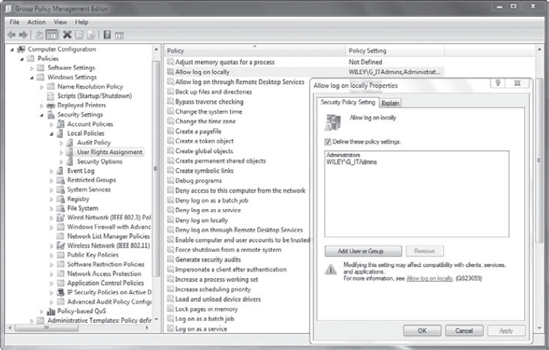
By default, a regular user
in the domain is allowed to log on to any computer in the domain except
for domain controllers. When this setting is configured as shown, only
users in the defined groups will be able to log on to systems within the
scope of the GPO.
Here are some other rights that can be assigned via this node:
Access This Computer From The Network
Normally, any user
(accept the Guest account) can access a computer over the network. This
right allows you to restrict network access to specific users or groups.
NOTE
Several elements must be
in place to allow users to access resources over the network. For
example, in order for a user to access a share, the share must have been
created and the user must have permissions. Any existing firewalls must
be configured to allow the access. Last, the user right must be
granted.
Add Workstations To Domain
Regular users are allowed to
add up to 10 computer accounts to a domain. This right can be granted
to allow a user to add an unlimited number of accounts. For example, if a
technician regularly sets up computers for end users, you can grant
this right. Since accounts are created in Active Directory, which is
located on a domain controller, this setting must be configured on a GPO
that applies to domain controllers, such as the Default Domain
Controllers policy.
Allow Log On Through Remote
Desktop Services
This right is normally granted to the Administrators group and the
Remote Desktop Users group. You would normally add users to the Remote
Desktop Users group to grant this right, but you can also modify this
setting.
Change The System Time
This right is granted only
to users in the Administrators group. As a reminder, Kerberos requires
all computers to be within five minutes of each other, and a computer
will synchronize with a domain controller when it authenticates. If this
right is granted, users have the potential to change the time,
preventing them from accessing any domain resources.
Change The Time Zone
This right is granted to
any regular user. If a user changes the time zone, it will affect the
time displayed to the user but it doesn't affect the system time. In
other words, if a user accidentally changes the time zone, it won't
affect his access to domain resources.
Deny Access To This Computer From The Network
This right is assigned
to the Guest account by default. It overrides the Access This Computer
From The Network policy. In other words, you can use this policy to
restrict users or groups from accessing a computer without modifying the
Access This Computer From The Network policy.
Manage Auditing And Security Log
This right is assigned
to administrators by default. It allows the granted user the ability to
enable auditing on any objects (such as files and folders) and also to
view, clear, and manipulate the Security log.
Take Ownership Of Files Or Other Objects
This right is
assigned to administrators by default. It allows an administrator to
take ownership of an object. The owner can modify the permissions and
grant access to any other users.
Shut Down The System
Regular users are
granted this right for workstations. Only the Administrators and Backup
Operators groups are granted the right for servers. On domain
controllers, this right is granted to the Administrators, Backup
Operators, Server Operators, and Print Operators groups.
3.3. Security Options
The Security Options node
includes several settings directly related to security.
Some of the miscellaneous settings are as follows:
Accounts: Administrator Account Status
This setting can be used to
disable the local Administrator account. This can prevent an attacker
from accessing this account. Other domain groups can be added to the
local Administrators group for administrative access.
Accounts: Rename Administrator Account
This can used to change
the name of the Administrator account for all computers in the scope of
the GPO. This can make it more difficult for attackers to guess the
password. However, it does not change the SID of the Administrator
account, which is widely known by attackers.
Devices: Allowed To Format And Eject Removable Media
You can enable
this so that only administrators, administrators and power users, or
administrators and interactive users are allowed to format and eject
removable media. An interactive user is any user who is currently logged
on.
- Shutdown: Clear Virtual Memory Pagefile
In some situations,
sensitive data can be saved in the pagefile. If the system is booted
using another operating system, data in the pagefile may be viewed. This
setting can be used to ensure the pagefile is cleared and that
sensitive data isn't saved and available.
Several additional settings in
the Security Options node are associated with changes in NTLM and
changes in Kerberos. These settings are covered in the following
subsections.
3.3.1. Changes in NTLM Authentication Security Settings in Windows 7
New Technology LAN Manager
(NTLM) and NTLMv2 are authentication protocols used within Microsoft
networks. NTLMv2 can be used with the Security Support Provider (SSP) to
increase the security in Windows 7 and Windows Server 2008 R2. It can
also be used with 128-bit encryption.
Although NTLMv2 has been
supported since NT 4.0 SP4, 128-bit support is newer. It has been more
common to use 40-bit or 56-bit encryption. New installations of Windows 7
use 128-bit encryption by default. If Windows 7 is upgraded from an
earlier Windows version, it will use the existing setting.
Because 128-bit security is
the default for new installations of Windows 7, some client or server
applications may not work for new installations if they're using 40-bit
or 56-bit encryption for NTLM. Two new settings within the Security
Options node can be used to assist in this scenario:
Figure 8 shows the choices for both of these settings. When configured as shown in Figure 11.10,
connections can be refused if the other connection can't negotiate both
NTLMv2 session security and 128-bit encryption. The same settings are
available for both client and server applications.
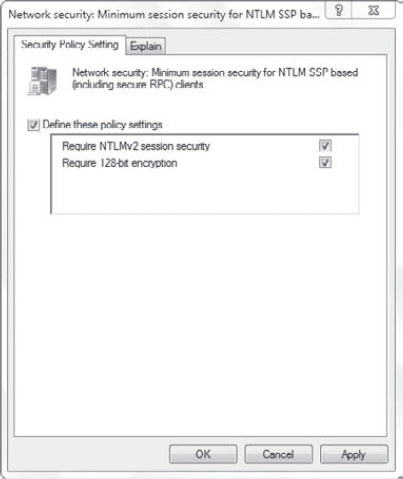
If you need to support older
applications using weaker encryption with 40 or 56 bits, you can
deselect Require 128-bit Encryption. Windows 7 will then negotiate the
weaker encryption used by the application.
3.3.2. Changes in Kerberos Authentication in Windows 7
Data Encryption
Standard (DES) cryptography has been largely replaced with the newer
Advanced Encryption Standard (AES) in most applications that use
cryptography. It isn't just that Microsoft has replaced DES with AES,
but it's the case anywhere cryptography is used. DES has been cracked,
and AES is a strong, efficient standard.
In Windows 7, the older DES
cipher suites are disabled by default. These two suites are DES-CBC-MD5
and DES-CBC-CRC. The following stronger cipher suites are enabled by
default:
AES256-CTS-HMAC-SHA1-96
AES128-CTS-HMAC-SHA1-96
RC4-HMAC
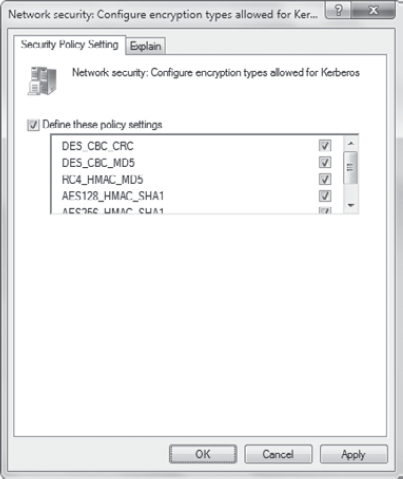
However, if you need to
enable DES support for Windows 7 clients, you can do so. The setting
that needs to be modified is Network Security: Configure Encryption
Types Allowed For Kerberos.
|
The most common reason to enable DES is for interoperability with UNIX or Linux systems using DES.
|
|
Figure 9 shows this setting. When you define the policy settings, you can enable all of the encryption types that you want to allow.
Windows 7 also
supports elliptic curve cryptography (ECC) for smart cards that use
X.509 certificates. Nothing needs to be changed in Windows 7 to use ECC
with smart cards. As long as the smart cards and the smart card readers
support ECC, they will work with Windows 7.
