3. Mandatory Profiles
A mandatory profile
is a roaming profile that is configured as read-only. Users will use
this profile as a roaming profile, but any changes made by the user will
not be saved. The primary reason to create mandatory profiles is so
that users have a consistent profile.
It is possible for
enthusiastic users to modify the standard profile in such a way that it
adversely affects the system. This results in a call to the help desk
and troubleshooting by a technician. Some companies have had one too
many of these calls and have decided to use mandatory profiles to
prevent these problems.
As a reminder, here's
how the roaming profile works. The user logs on, the profile is
retrieved from the server where it's stored, and then the profile is
copied down to the local computer. When the user logs off, any changes
to the profile are copied back up to the server where the roaming
profile is stored.
The only difference between a
roaming profile and a mandatory profile is that the changes are never
copied back up to the server when the user logs off. The user can still
make changes to the local profile. However, because these changes aren't
saved to the server, the next time the user logs on, the mandatory
profile will be copied from the server down to the client, overwriting
any changes the user may have made.
There are three primary steps involved in creating a mandatory user profile:
Create a profile with the desired settings on a Windows 7 system. Copy it to a network share.
Rename ntuser.dat to ntuser.man.
This is a hidden system file, so you'll need to modify the Windows
Explorer view to show hidden files and show system files.
Configure accounts to use the mandatory roaming user profile.
NOTE
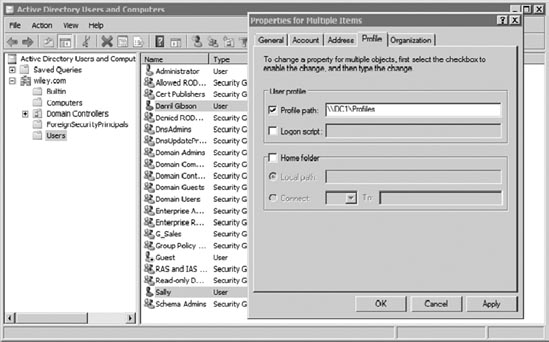
You can set the profile
path for multiple users at the same time in Active Directory Users and
Computers. Use either the Shift key or the Ctrl key to select multiple
user accounts. After you've selected all of the accounts, right-click
one of them, select Properties, and then select the Profile tab, as
shown in Figure 4.

It's also possible to set a mandatory profile for many users using Group Policy.
4. Super-Mandatory User Profiles
Windows 7 also supports super-mandatory profiles.
A super-mandatory user profile is similar to a mandatory roaming user
profile with one important addition. If network or server problems
prevent the user from downloading the mandatory profile, the user is
unable to log on.
With a regular mandatory
user profile, the user is still able to log on even if the mandatory
user profile is unavailable. As a reminder, when a roaming profile is
used, it copies the profile to the local system. If a user has
previously logged on to a system and has a copy of the profile on the
system, Windows 7 will use this if the share for the roaming profile is
unavailable.
If you want to ensure that
users are not allowed to log on unless the mandatory profile is
downloaded, you can configure the profile to be a super-mandatory user
profile. A profile is created as a super-mandatory profile by renaming
the profile folder with a .man extension.
NOTE
You should use
super-mandatory user profiles only when the network is reliable. If
network problems prevent users from accessing the share where the
profile is stored, users will be prevented from logging on at all.
As a reminder, to create a mandatory roaming profile, the ntuser.dat file (located at the root of the profile) is renamed to ntuser.man. This may be stored in a network share identified as \\DC1\Profiles.
If you want the profile to be a super-mandatory profile, you could name the share Profiles.man so that it's accessed using a UNC path of \\DC1\Profiles.man. In addition to appending the share with .man, you also need to ensure that the client is configured to access the share using the full UNC path, including .man (\\DC1\Profiles.man).
5. Modifying the Default User Profile
If you want new users to
have consistent settings that are different from the default, you can
modify the Default User profile. However, this process isn't as simple
as it sounds or as simple as it was in Windows XP.
In Windows XP, you typically followed these steps to modify the default user profile:
Create
an account and log on. (This creates a profile for this account from
the Default User profile.) You would typically create another
administrator account so that you would have permission to make the
changes.
Modify the desired settings to modify the profile of the account. When all of the settings have been modified, log off.
Log
on with the regular administrator account. Access the Profiles page
(from the Advanced tab of System Properties), and copy the new profile
over the top of the Default User profile.
However, this causes
problems in Windows 7 (and actually caused some problems in Windows XP).
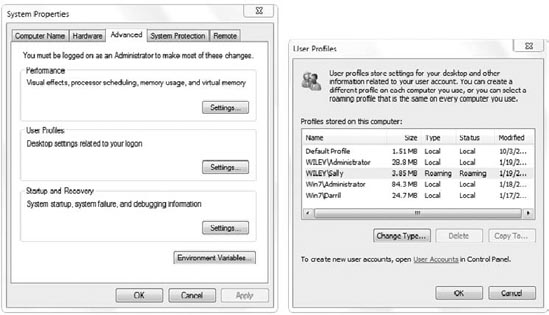
It is no longer the recommended method and isn't even possible. Figure 5 shows the User Profiles page for a Windows 7 system.
If you select any profile
except the Default Profile, the Copy To button is disabled. You're not
able to copy an existing profile over the top of the Default Profile in
Windows 7 using this screen.

Instead, the recommended method
is to use the Windows System Image Manager tool (available in the
Windows Automated Installation Kit).
Log
on with any account that you want to use as the default. The account
will need administrative permissions, and you can use the Administrator
account if desired.
Modify the desired settings to modify the profile of the account.
Create an unattend.xml file using Windows System Image Manager.
Add or modify the CopyProfile parameter so that it reads as follows: <CopyProfile>true</CopyProfile>.
This will cause the currently logged-on user settings to be copied to the Default User profile when Sysprep is run.
Run Sysprep on the system with the following command:
sysprep.exe /generalize /unattend: unattend.xml
If the unattend.xml file is located in a different directory, you'll need to include the full path.
NOTE
It's important to realize
that even though you are copying the profile settings of the
Administrator account, you are not copying the rights and permissions.
Rights and permissions are not stored in the profile, so copying the
administrator's profile to the Default User profile does not give all
new users full administrative permissions.
If you need to customize
the Default User profile, check out Microsoft's Knowledge Base article
973289, which provides more in-depth details on these steps. You can
find it here: http://support.microsoft.com/kb/973289.
6. Configuring Settings with Scripts
It's also possible to configure many of the settings using scripts. You can configure the
scripts to run for an individual user within a domain by modifying the
properties of the user account.
As an example, imagine
that someone within your company created a PowerShell script that can
configure system settings for a Windows 7 computer. You are now asked to
ensure it always runs when a user logs on. You could create a share on a
server, place the script within the share, and then configure the user
account.
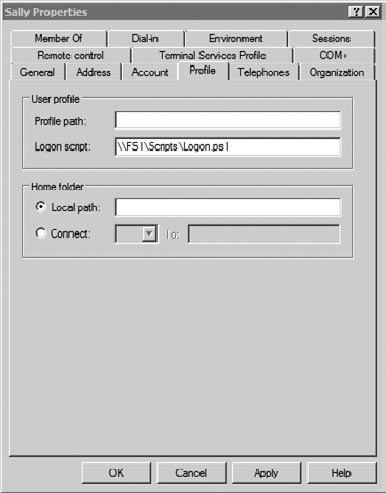
Figure 6
shows the Profile tab of a user Properties screen. The Logon Script
text box will accept the UNC path of a script. In the figure, the script
is stored in the Scripts share on the FS1 server (\\FS1\Scripts) and is
named Logon.ps1.

If you want the script to run
for many users, you can use Group Policy. Group Policy allows you to run
scripts when a computer starts up or shuts down and when a user logs on
or logs off.