Permissions are used to control who can access
objects such as files, folders, shares, and printers. They also control
the level of access that is granted. For example, a user may be granted
permission to read a file or be granted permission to print to a
printer.
Authentication and
authorization go hand in hand, but they aren't the same thing. When a
user logs on with credentials, the user is authenticated. However, just
because a user can log on doesn't mean the user is authorized to access
everything on a system or in a network. Permissions are used to provide
the appropriate level of authorization or access for specific users or
groups to specific resources and functions.
We cover three categories
of resources in this article that can have permissions assigned. The
types of permissions that can be assigned are as follows:
- NTFS
New Technology File System (NTFS) permissions are used to control access to files and folders on local systems.
- Share
Share permissions are used to control access to shared folders when they are accessed over the network.
- Printer
Printer permissions are used to control who can print and manage printers.
NOTE
Active Directory objects
such as Organizational Units (OUs) are also resources that can have
permissions assigned. Active Directory object permissions aren't covered
in this book, but many of the same principles of other permissions
apply to Active Directory object permissions.
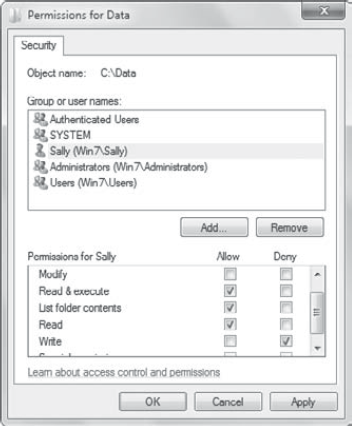
Permissions can be assigned as either Allow or Deny. As an example, Figure 1
shows NTFS permissions assigned for a user named Sally. Sally is
assigned Allow for Read, Read & Execute, and List Folder Contents.
She is also assigned Deny for Write. Sally will be able to read the
files in the folder, but she won't be able to alter the files or create
new ones.
This brings up three important points related to permissions for any of the objects:
- Permissions are cumulative
Users can be
granted multiple permissions based on group membership. For example, if a
user is granted read access as a member of the Users group and granted
Write access as a member of the G_Sales group, the user is granted both
read and write access.
- Permissions use an implicit deny philosophy
If permissions
are not explicitly granted, permissions are denied. In other words, if
Bob is not granted any permission on a file or folder, his access is
denied.
- Deny takes precedence
If there is ever a
conflict where a user is granted Allow and Deny to the same permission,
Deny wins and takes precedence. In other words, if Sally is a member of
the Administrators group and is granted Full Control access to the
folder, but her account is assigned Deny Write access to the folder, she
will not be able to make any changes that require the Write
permissions. Deny takes precedence.
Each of these three types of
permissions (NTFS, Share, and Printer) depends on the use of security
identifiers to identify users and also uses Discretionary Access Control
Lists to assign permissions.
1. SIDs and DACLs
In Windows operating systems, every user and group are identified with a security identifier (SID). This SID is assigned when the user or group is created, and the SIDs are unique within the domain and forest.
When a user logs on, the
system creates a token that includes the user's SID. In addition, the
SID for each group of which the user is a member is added to the token.
NOTE
Although the operating
system uses the SIDs, you'll hardly ever see them. Instead, the
operating system does internal lookups to identify the user or group
name identified by the SID and displays the name instead of the SID.
Occasionally, when the system is low on hardware resources or has a
problem looking up the SID, you'll see the SID instead of the user or
group. A domain SID starts with S-1-5-21- followed by other numbers that
are unique in the domain.
Every object has a security descriptor called a Discretionary Access Control List (DACL). The DACL is a list of Access Control Entries, and each Access Control Entry (ACE)
includes the SID of a user or group and the permissions assigned to the
user or group. When a user tries to access an object, the object's DACL
is compared to the user's token to determine whether the user should be
granted access.
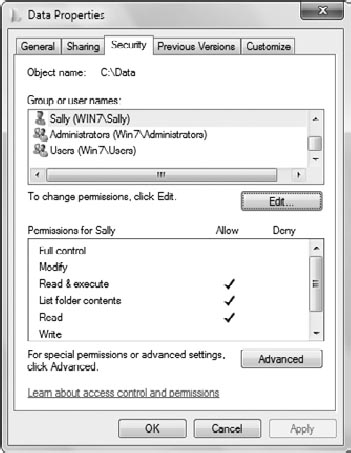
As an example, Figure 2
shows the Security tab for a folder on an NTFS drive. This is actually a
list of several ACEs that make up the DACL. In the figure, Sally's
account is selected, and you can see the specific permissions that she's
been assigned. Sally's entry is a single ACE within the DACL.
You can access the Security tab
for any file or folder from Windows Explorer. Right-click the file or
folder, select Properties, and then select the Security tab. You can
select any of the users or groups to determine the specific permissions
assigned.
NOTE
Users listed in the DACL
follow the format of computer\user or domain\user. If the computer name
is Win7, a local user named Sally is identified as Win7\Sally. A domain
user named Bob from a domain named Wiley.com would be listed as Wiley\Bob. Groups listed in the DACL follow the same format of computer\group or domain\group.
2. NTFS
The New Technology File System (NTFS)
is the standard file system used by Microsoft since the NT operating
systems, although it has been steadily improving over the years. The
primary benefit of NTFS is more flexibility in assigning permissions to
control access. It also allows for assigning different permissions to a
folder and to the files within the folder. Many functions of the Windows
operating system are allowed only NTFS partitions or volumes.
NTFS permissions are
assigned to files and folders on an NTFS drive to control what users can
do with files and folders. They are typically presented as basic
permissions, which are easier to understand by most end users, but there
are 13 granular or advanced permissions. The basic permissions map to
the granular permissions. For example, the basic Read permission maps to
four granular permissions.
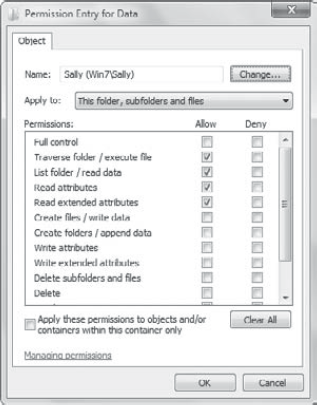
2.1. NTFS Granular Permissions
It's important to understand
what the 13 granular permissions are and how they work before you see
how they work together in the basic NTFS permissions.
Figure 8.12 shows some of these granular permissions for a folder named Data.
You can access this page from Windows Explorer by first right-clicking
the folder and selecting Properties. Then click Advanced => Change Permissions => Edit.
Although most of the
permissions mean the same thing if they are assigned to a file or a
folder, some of the permissions have dual purposes; that is, they mean
one thing when assigned to a file and something else when assigned to a
folder. In Figure 3, several of the permissions are separated by a slash (/), indicating the permission has a dual purpose.
The 13 granular permissions are as follows:
- List Folder / Read Data
When assigned to a folder, it allows a user to view the contents of the folder.
When assigned to a file, it allows a user to read the file.
- Read Permissions
This allows a user to view the permissions assigned to the file or folder.
- Read Attributes
Attributes (such as read-only or hidden) can be viewed by the user when this permission is assigned.
- Read Extended Attributes
Extended attributes (such as the compression or encryption attributes) can be viewed with this permission.
Traverse Folder / Execute File
Traverse Folder applies
only to folders and allows a user to navigate to a child folder even if
they don't have access to a parent folder. For example, if a user has
Full Control access to C:\Parent\Child but does not have any access to C:\Parent, the Traverse Folder permission allows the user to go across (or traverse) the file structure to reach the destination folder.
Execute File applies only to files and allows a user to execute or run a program.
- Create Files / Write
Data Create Files applies only to folders, and it allows a user to add new files to a folder.
Write Data applies only to files, and it allows a user to modify the data within the file.
- Create Folders / Append Data
Create Folders applies only to folders, and it allows a user to add folders within a folder.
Append Data applies only to files, and it allows a user to add data to the end of the file.
- Write Attributes
This permission allows a user to modify the attributes (such as read-only or hidden) of a file or folder.
- Write Extended Attributes
This permission allows a user to modify the extended attributes (such as compression or encryption) of a file or folder.
- Delete
Delete allows a user to delete a file or folder.
- Delete Subfolders and Files
Users with this
permission can delete subfolders and files even if they don't have the
Delete permission on the subfolder or file.
- Change Permissions
This
permission allows a user to modify the existing permissions of a file or
folder. An owner of a file or folder can always modify the permissions
of the file or folder in Windows operating systems.
- Take Ownership
This allows a user to
take ownership of a file or folder. Once ownership is taken, the
permissions can be changed. Administrators can always take ownership of
files and folders.
- Full Control
This grants all of the preceding permissions to a file or folder.
The Change Permissions and Take Ownership
permissions deserve a special mention. Imagine a user named Darril was
working on a project with multiple files stored in a folder named Project.
Darril is the only user who has any permission to this folder, and then
a wonderful thing happens—Darril wins the lottery! Woo-Hoo!
You're not sure where Darril is, but he's not at work anymore, and no one can access the Project
folder. However, an administrator can take ownership of the file and
then change the permissions so that other users can access the files and
folders.
It's also possible to
assign ownership to files and folders within Windows 7, which wasn't
possible in Windows XP and previous versions of Windows.
2.2. NTFS Basic Permissions
The NTFS basic permissions
are designed to be simpler for regular users to use. When a user wants
to allow someone else access to a file, they simply grant Read, and
other required permissions are automatically assigned.
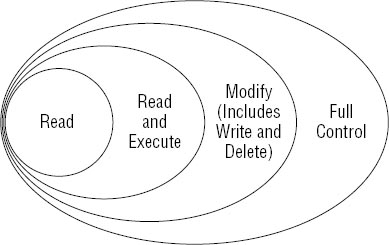
Several of these
permissions encompass other permissions. For example, Read & Execute
includes the Read permission and Modify includes Read & Execute and
Read permissions. Figure 4 shows the relationships among these permissions.
These are the basic permissions:
- Read
Users granted Read permission
can view the contents of a file or folder. Read includes the following
granular permissions: Read Attributes, Read Extended Attributes, and
Read Data permissions.
- Read & Execute
Users granted the Read & Execute permission have all of the Read permissions, and they can also run or execute programs.
Read & Execute includes the granular permissions assigned to Read and also the Execute File granular permission.
- List Folder Contents
List Folder Contents allows a user to view the files and folders within a folder.
This permission includes
the following granular permissions: Read Attributes, Read Extended
Attributes, List Folder, and Traverse Folder.
- Write
Users can create new files and folders, and they can also make changes to existing files and folders.
Write includes the
following granular permissions: Create Files/Write Data, Create
Folders/Append Data, Write Attributes, and Write Extended Attributes.
Notice that Write does not include any of the Read permissions (such as
Read Data, Read, and so on).
- Modify
When granted the
Modify permission to a file or a folder, a user can read, execute,
write, and delete files and folders. The primary addition is the ability
to delete files and folders.
Modify includes all of the
granular permissions included with Read, Read & Execute, and Write,
and it adds the Delete permission. It does not include the Delete
Subfolders And Files permission.
- Full Control
Full Control grants all of
the 13 granular permissions. Full Control is the only basic permission
that includes the Delete Subfolders And Files, Change Permissions, and
Take Ownership permissions.
Launch Windows Explorer by clicking Start => Computer. Double-click the C: drive to select it. Click New Folder. Rename the folder Chapter8. Right-click Chapter8
and select Properties. Select the Security tab. The existence of a
Security tab verifies that the drive is NTFS. You can view the
permissions assigned to users and groups on this screen, but it will not
allow you to modify the permissions. Click Edit. Click Add to access the Select Users or Groups dialog box. Click
Advanced on the Select Users or Groups dialog box, and click Find Now
to list all of the user accounts on the Windows 7 system. Select a user
and click OK. Click OK again. Notice
that by default, the user is granted Read, Read & Execute, and List
Folder Contents permissions. You can modify the defaults if desired.
Click OK. Back on the Security tab of the Chapter8 Properties page, click OK. Click OK again to close the Properties page.
|
If it is not already open, launch Windows Explorer by clicking Start => Computer. Double-click the C: drive to select it. Right-click the Chapter8 folder and select Properties. Select the Security tab and click Advanced. Click Change Permissions. Select
the Users group and click Edit. Notice that some permissions are
checked but dimmed. This indicates the permissions are inherited and
can't be changed unless inheritance is modified.
Click
Allow Full Control and notice how Allow is selected for all the
permissions. Click Cancel on the Object page. Click Cancel on the
Permissions page. Select
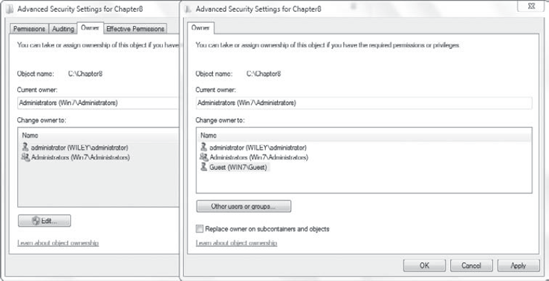
the Owner tab. This shows the current owner and lists users or groups
that can be designated as the new owner. If you logged on with an
account in the Administrators group, it will list the Administrators
group as the current owner. Click
Edit. On the Owner page, click Other Users Or Groups. You can enter the
name of any local user, or if the computer is in a domain, you can
enter the name of a domain user. For this exercise, enter Guest and click OK. Your display will look similar to the following graphic. Click OK.
A
dialog box will appear indicating that if you just took ownership of
the object, you'll need to close and reopen the properties before
changing the permissions. Review the information and click OK. Back
on the Owner tab of the Advanced Security Settings screen, notice that
the current owner is now listed as the user you just selected. Click OK.
Click OK again to close the Chapter 8 Properties page.
|
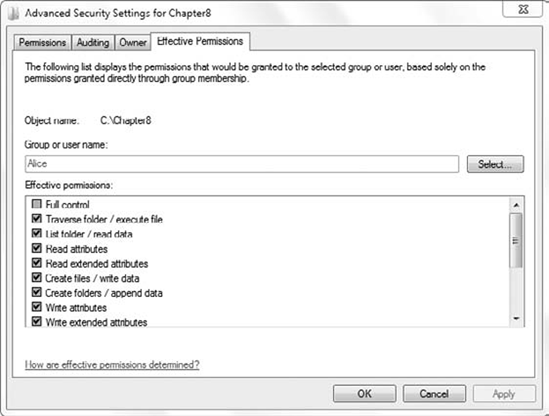
Sometimes you want to know a
user's effective NTFS permissions for a file or folder. You could first
list all of the user's group memberships and then check to see what
permissions are assigned to each group and the user to identify the
cumulative permissions. Alternatively, you can use the Effective
Permissions tab of the Advanced Security Settings screen, as shown in Figure 5.
After selecting the Effective Permissions tab, click Select to enter
the user or group you want to check. In the figure, the user account for
Alice is entered and the effective permissions for Alice are checked.
You can't change the
permission from the Effective Permissions tab, but you can easily
determine the NTFS permissions. Effective permissions include only NTFS
permissions; they do not include Share permissions.
2.3. NTFS Permission Inheritance
Permissions are normally
inherited from parent folders to child folders. In other words, if a
folder is created within another folder, the child folder inherits all
of the permissions assigned to the parent folder. Inherited permissions
are dimmed and can't be changed.
As long as permission inheritance
is enabled, new permissions applied to the parent folder will apply to
objects within the folder. For example, if you grant Full Control to a
folder named Sales to a group named G_Sales, all files in the Sales folder will inherit the same permissions.
However, you can disable permission inheritance. Figure 6
shows the permission screen after the Include Inheritable Permissions
From This Object's Parent check box is deselected. This setting is
normally checked. When you uncheck the box, the Windows Security dialog
box appears, giving you three choices.
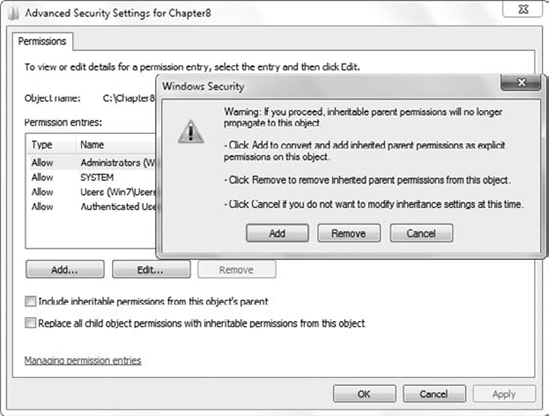
The three choices are as follows:
- Add
Clicking Add will cause
all inherited permissions to become explicitly assigned permissions. The
benefit of selecting Add is that the permissions aren't changed, but
they can now be modified because they are explicitly assigned instead of
inherited.
- Remove
Clicking Remove removes all the inherited permissions. It does not remove any explicitly assigned permissions.
- Cancel
Clicking Cancel allows you to exit without making any changes.
Figure 6
also shows another selection at the bottom of the screen: Replace All
Child Object Permissions With Inheritable Permissions From This Object.
You can think of this as a reset switch. Imagine that some files within a
folder have explicitly assigned permissions that are different from
those of other files in the folder. If you select this check box and
apply it, all the explicitly defined permissions will disappear, and
only the inherited permissions will remain.
Launch Windows Explorer by clicking Start => Computer.
Double-click the C: drive to select it. Click New Folder. Rename the folder Parent.
Double-click Parent. Click New Folder and name the new folder Child.
Double-click Child. Right-click within the Child folder, and select New Text Document.
Select the new text document, and press Ctrl+C to copy it. Press Ctrl+V to make a copy of the text document.
Right-click
a text document and select Properties. Select the Security tab. Click
Edit. Notice that the permissions are all dimmed, indicating they are
inherited and can't be modified. Click Cancel twice.
Click Back to access the contents of the Parent folder. Right-click the Child folder and select Properties.
Select the Security tab. Click Edit. Click Add.
In the Select Users Or Groups box, type Guest and click OK.
Select Full Control to grant the Guest account full control to the Child folder. Click OK. Click OK again.
Double-click
Child. Right-click the text document named New Text Document and select
Properties. Select the Security tab. You'll see that the file has
inherited Full Control permissions for the Guest account.
Click Advanced. Click Change Permissions. Deselect the Include Inheritable Permissions From This Object's Parent check box.
On
the dialog box that appears, click Add. Click OK on the Permissions
dialog box. Click OK on the Advanced Security Settings page. You'll see
that all of the permissions are explicitly assigned and can now be
changed. Click OK.
Return to the root of the C: drive. Right-click Parent and select Properties. Select the Security tab.
Click
Advanced and click Change Permissions. Select the Replace All Child
Object Permissions With Inheritable Permissions From This Object check
box. This will reset the original permissions and reverse your changes.
Click OK.
Review the dialog box that appears, and click Yes to continue. Click OK twice to return to Windows Explorer.
Return to the Child
folder. Right-click the New Text Document and select Properties. Select
the Security tab. Notice that all of the changes you previously made
have been reset to only the permissions applied to the Parent folder.
