3. Working with Printers on Windows 7
The primary tool you'll use to
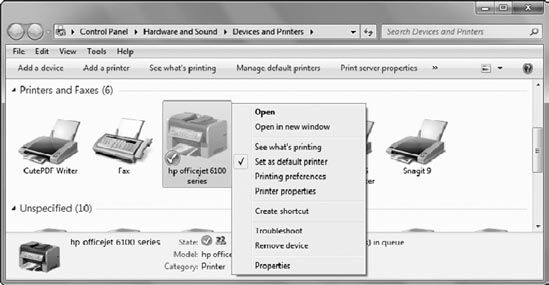
manage printers on Windows 7 is the Devices and Printers applet. This
is available from the Start menu (below the link to Control Panel), and
it can also be accessed from Control Panel within the Hardware And Sound
category.
Figure 5
shows the Devices and Printers applet with Printers And Faxes showing.
If a printer is selected, additional menu items appear on the toolbar.
In addition, the context menu (accessed by right-clicking the printer)
shows several other choices.
|
If the link to Devices and
Printers is not on the Start menu, you can add it. Right-click Start and
select Properties. Click Customize and select the Devices And Printers
check box in the Customize Start Menu dialog box. Click OK twice, and
Devices and Printers will be on the Start menu.
|
|

Some context menu choices are worth mentioning:
Set As Default Printer
When this is
checked, the printer is the default printer for all print jobs. Although
this will be the default selection, most applications allow you to
change the printer when you actually send the print job.
Printing Preferences
You can set
different preferences for the printer such as print quality (draft or
best quality), page orientation (landscape or portrait), color options,
and more, depending on the characteristics of the printer. These choices
will be different for different printer brands and models.
Properties
This provides a limited amount of read-only information on the printer.
Printer Properties
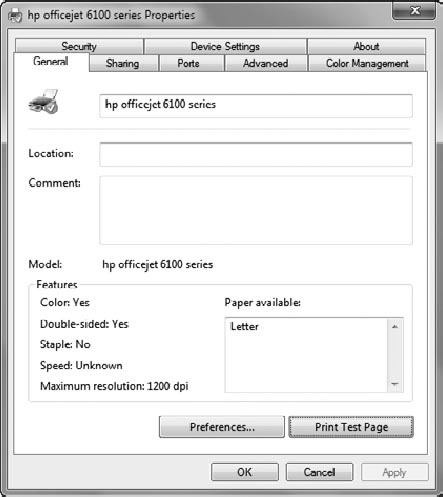
This is the primary page you'll access to manipulate a printer's properties. Figure 6
shows the Properties page for a printer. The General tab can be used to
print a test page, the Security tab is used to manipulate permissions,
the Sharing tab is used to share the printer, and the Ports tab is used
to add and manipulate ports. The Advanced tab is used for advanced
configuration settings such as updating the driver or setting print
priorities or print schedules.

.3.1. See What's Printing
The See What's Printing
link on the Devices and Printers menu allows you to view the print queue
for the printer that is selected. If you have sent print jobs to a
printer but the jobs aren't printing, you can view the queue from here.
Jobs in the queue can be
paused, restarted, or cancelled by right-clicking the job and accessing
the context menu. This can be useful if a job gets hung up in the queue.
3.2. Manage Default Printers
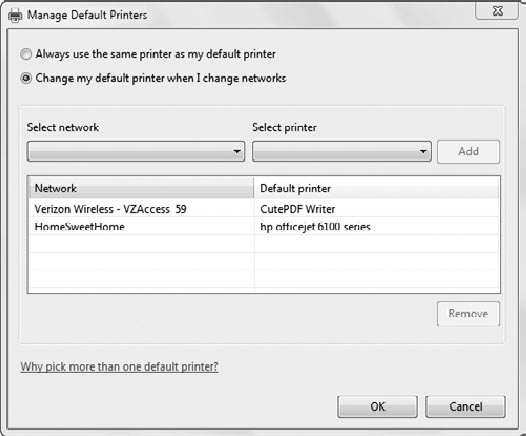
Windows 7 provides a tool that allows you to set different default printers when a computer is attached to a different network. Figure 7 shows the screen that appears when Manage Default Printers is selected from the toolbar in Devices and Printers.
NOTE
The Manage Default
Printers choice appears only on mobile computers when the computer has
more than one network connection. It does not appear on desktop systems.
This can be useful for users
with mobile computers that connect to different networks. As shown in
the figure, when the system connects to the network named HomeSweetHome
(a wireless connection), it will default to the HP Officejet 6100
printer. When connected using the Verizon Wireless air card, it will use
the CutePDF Writer as the default printer.

3.3. Print Server Properties
If you share printers on a
Windows 7 system, it will behave as a print server and you can
manipulate Print Server Properties. Manipulating server properties is
commonly done on an actual print server in an enterprise, but if Windows
7 is being used in a small office or home office, it can be used to
host multiple printers.
NOTE
If a Windows 7 computer is
used as a print server, it is limited to no more than 20 concurrent
connections. This is an increase. Windows XP and previous desktop
systems could support only 10 concurrent connections.
The Print Server Properties screen allows you to change settings for all printers on the same computer. It includes five tabs:
Forms
The Forms tab shows the
different form sizes (such as letter size or legal size) that are
supported by printers on the system. You can also create additional
forms from this tab.
Ports
The Ports tab allows
you to manipulate the ports such as serial, parallel, or TCP/IP address
ports. These are added when a printer is added, but you can also delete
ports from this tab.
Drivers
The Drivers tab can be used to add and remove drivers; however, drivers are commonly manipulated using Printer Properties.
Security
Server permissions
can be assigned here. By default, administrators are assigned all
permissions, and the Everyone group is assigned the Print permission.
Advanced
The most important element here is the location of the Spool folder. By default the Spool folder is located in the C:\Windows\System32\Spool\Printers
folder. If the drive is filling up with a high volume of print jobs
and/or is causing excessive fragmentation on the drive, you can move the
Spool folder to another location by just typing in the new location on this tab.
|
You should ensure the print queue doesn't include any print jobs before moving the Spool folder. Any print jobs held in the queue will be lost when a new path for the Spool folder is entered.
|
|