3. Problem Steps Recorder
A neat new feature available with Windows 7 is the Problem Steps Recorder.
Users can use this to record the actual steps they take to run or use
an application. This can be very useful for users who have trouble
articulating the actions they took. Users often take many steps but
aren't aware of the importance of each step they take. They may omit
these steps when explaining the problem.
When the Problem Steps Recorder
runs, it records all of the steps the user takes and takes screen shots
of their actions. The result is an archive format HTML document with an .mhtml extension. This single document includes all of the text and images recorded by the user. It is compressed as a zip file.
The user can then email the
zip file to a help desk administrator for review. The administrator can
open the zip file and view the document.
Figure 4 shows the Problem Steps Recorder.

Click Start => Control Panel. Type Problem in the Control Panel Search box located in the upper-right corner. Click Record Steps To Reproduce A Problem. Click
Start Record. If you're currently running any applications as an
administrator, a warning dialog box will appear. Review it and click OK. Enter IPConfig /all at the command line and press Enter. Click Add Comment on the Problem Steps Recorder. Type IPConfig results and click OK. Click Stop Record on the Problem Steps Recorder. Browse to a location where you want to save the file. Enter a filename such as AppProblem and click Save. Use
Windows Explorer to browse to where you saved the file. Notice that an
end user can right-click this document and select Send To => Mail Recipient to send the file as an attachment for an email. Right-click
the file and select Extract All. Ensure Show Extracted Files When
Complete is checked. Click Extract. (You can alternatively click the zip
file if you simply want to view it.) Double-click the .mhtml document to open it. This will open the file in Internet Explorer. Review the document.
|
4. Checking Whether an Application Runs in Safe Mode
Safe Mode can sometimes be
useful when troubleshooting applications. You can use Safe Mode to
uninstall an application that caused problems with the normal operation
of the system or to see if the application will run in Safe Mode.
Safe Mode starts Windows with a limited set of files and
drivers. You can start Windows 7 in Safe Mode by pressing the F8 key
when you turn on your system. Pressing F8 will bring you to the Advanced
Options screen, which includes several Safe Mode choices.
|
There's a short time between the
startup of the system and when the splash screen appears. If you miss
it, you'll need to reboot the system and start again. After the system
starts, it's okay to press the F8 key repeatedly until the Advanced
Options screen appears.
|
|
If you installed an
application and now find that Windows 7 is no longer working properly,
there could be an incompatibility with the application and Windows 7.
You can boot into Safe Mode and uninstall the application using Programs
and Features via the Control Panel, as shown earlier. You can also
perform a System Restore from within Safe Mode if necessary.
It's also possible that you're
able to boot into Windows 7, but problems appear when you launch the
application. If you can launch the application in Safe Mode, you can
eliminate the default settings and basic device drivers as possible
causes.
5. Managing Application Compatibility
Some applications will run
fine but not in Windows 7. The most common reason why an application
won't run in Windows 7 is the extra security that comes with Windows 7.
Other compatibility issues arise because of how the application
interacts with the hardware.
You have two primary choices when you're faced with a compatibility issue:
5.1. Application Compatibility
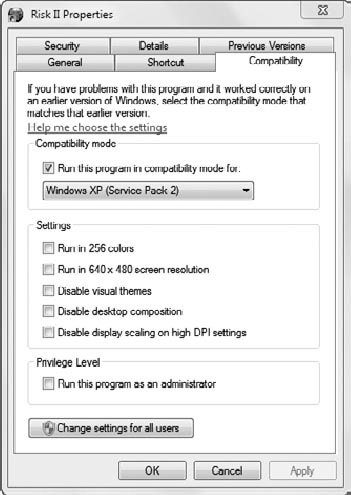
Windows 7 allows you to run applications in Application Compatibility mode. As an example, I have an old game that I occasionally like to run—Risk II. Unfortunately, it is supported only in Windows XP.
After installing the application, I can right-click it on the Start menu and select Properties. Figure 5 shows the different application compatibility selections that can be selected.
|
The Privilege Level setting
Run This Program As An Administrator can be used for older applications
that require elevated privileges. Although older applications didn't
require administrative permissions, it was common for developers to
program them to need such elevated permissions. This causes conflicts
with UAC. Checking this box can resolve the problem for the application.
|
|
In the figure, the application
is using the Windows XP (Service Pack 2) selection. Windows 7 emulates
the settings of the older operating system when the application is run.
Other operating system selections are as follows:
Windows 95
Windows 98/ME
Windows NT 4.0 (Service Pack 5)
Windows 2000
Windows XP (Service Pack 3)
Windows Server 2003 (Service Pack 1)
Windows Server 2008 (Service Pack 1)
Windows Vista
Windows Vista (Service Pack 1)
Windows Vista (Service Pack 2)
You can also use the Program
Compatibility Wizard to configure an application to run with the
settings of a previous version of Windows.
Click Start => Control Panel. Type Compatibility in the Control Panel Search box located in the upper-right corner. Click Run Programs Made For Previous Versions Of Windows to launch the Program Compatibility Wizard. Click Next. The wizard will attempt to detect any issues with the system. After a moment, it will complete scanning your system and will provide a list of programs. If the program is in the list, you can select it and click Next. If
it's not in the list, you can select Not Listed. Click Next. Either
enter the application's full path or click Browse to browse to the
application. Click Next.
The Program Compatibility Wizard will recommend settings for the application. Click Try Recommended Settings. On
the Test Compatibility Settings For The Program screen, click Start The
Program. Determine whether the program is working correctly. Click Next. If the application works, select Yes, Save These Settings For This Program. If
the application doesn't work, you can click No, Try Again Using
Different Settings. This will display a window similar to the following
graphic.
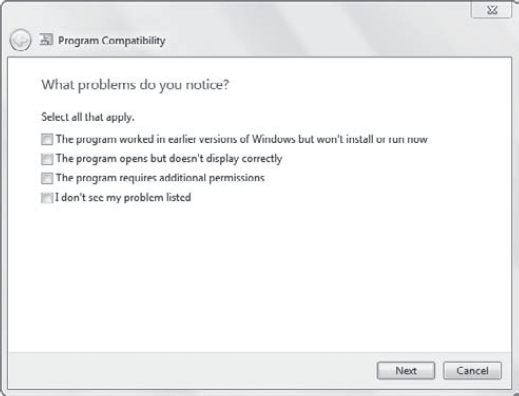
You can experiment with these settings by checking one or more of the boxes and trying the program again. Once
you've identified settings that work, click Yes, Save These Settings
For This Program. These settings will automatically be used each time
the application starts in the future.
You
can always view the application compatibility settings by
right-clicking the shortcut, selecting Properties, and clicking the
Compatibility tab.
|
5.2. Running the Application in a Previous Version of Windows
Instead of using the
application compatibility settings, you can run the application in an
actual previous version of Windows. There are several ways to do this.
The most extreme solution
is to give the user two computers. The user can run one computer with
Windows 7 and another computer for the problematic application. However,
this is not desirable for most companies.
You can virtualize the application as mentioned previously. As a reminder, you have the following choices:
As a comparison, Windows
XP Mode is the cheapest, most seamless solution. For just a few
computers, this is likely the first choice. As a reminder, it works best
with hardware virtualization, but KB 977206 provides a workaround.
Windows VPC can be the
second choice if you need the incompatible application to run on only a
few computers. You can use VPC to install a compatible operating system
and then install the application in this Virtual PC image.
If you need to support more
than a few computers, you can go to one of the server solutions. Remote
Desktop Services and Application Virtualization are the two server
solutions currently available.
