If Windows 7 won't start, it's not very useful.
Thankfully, you have several tools you can use to help troubleshoot
different boot issues. You've already read about the most valuable tool,
Startup Repair in the WinRE. However, you do have some other tools
available.
1. Understanding the Boot Phases
When troubleshooting boot
issues, it's important to understand the different phases of the boot
process for Windows 7. With an understanding of the different phases,
you'll have a better idea of what method to use to resolve the problem.
The different phases are
1.1. Power On Self Test (POST)
During the POST phase, the
computer starts the BIOS program and checks the functionality of basic
devices such as the processor, memory, and video. If the system fails
here, it is hardware related and not affected by Windows 7 at all.
1.2. Initial Startup Phase
After POST, the BIOS directs
the system to boot from a device such as a CD, NIC, USB, or hard drive.
The system locates the Windows Boot Manager program from the data in
the BCD store and begins the boot process.
If this phase fails, you'll receive the following error:
Non-system disk or disk error
Replace and press any key when ready
This indicates the BCD store could not be located. Verify that you're booting from a device that holds the BCD store.
NOTE
Some computers use an
Extensible Firmware Interface (EFI), which is a replacement for the
BIOS. EFI uses a boot menu that allows users to choose from different
operating systems installed on a system. When Windows 7 is installed on
an EFI system, it will modify the EFI menu to load the Windows 7 Boot
Manager program automatically after a two-second delay.
1.3. Windows Boot Manager Phase
Windows Boot Manager is used to
read the BCD store and launch the Windows Boot Loader program. It has a
built-in delay that allows you to press a key to access different
menus.
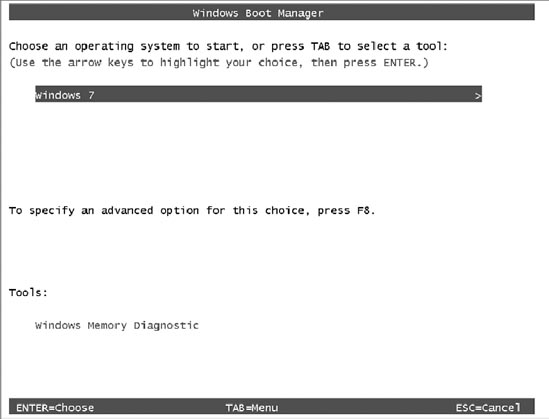
If you press any key during this phase, the Boot Manager menu will appear, as shown in Figure 1.
From this menu, you can boot to Windows 7, press F8 to access the
Advanced Boot Options page, or select the Windows Memory Diagnostic.
It's possible to install
more than one operating system on a single computer. If other operating
systems have been installed, this menu will allow the user to choose
different operating systems.
You can also press the F8 key
instead of any key, and the Advanced Boot Options screen will appear,
bypassing the Windows Boot Manager menu. The Advanced Boot Options
screen includes the Repair Your Computer choice, the Safe Modes, and some other options discussed in the
next section.
|
If different operating
systems are installed on the same system, they should be installed on
separate partitions. In addition, newer operating systems should be
installed after older operating systems to avoid corrupting the first
installation. As an example, if you install Windows 7 on a system and
then later install Windows XP on the system, the Windows XP installation
will corrupt the boot process for Windows 7, and you won't be able to
boot into Windows 7 until the problem has been resolved. A Startup
Repair from the WinRE will resolve this problem.
|
|
1.4. Windows Boot Loader Phase
After the Boot Manager
phase, the Windows Boot Loader phase begins. This phase will load
several components that are used to boot the operating system in the
kernel-loading phase. It does not start the components but instead only
loads them. The following components are loaded in this phase:
Operating system kernel program: ntoskrnl.exe
Hardware Abstraction Layer (HAL): hal.dll
System Registry hive: (system32\Config\System)
Services and device drivers configured to start automatically
Paging is enabled in this phase to give the system access to virtual memory if needed.
1.5. Kernel-Loading Phase
The Windows Boot Loader
phase passes control to the kernel-loading phase once it is complete.
All the components that were loaded during the Boot Loader phase are
started at this time.
This includes all the
services and device drivers configured to start automatically. At this
stage, both services and device drivers are handled the same and are
generically referred to as services. The start types of these services
are prioritized, with critical services starting first and less-critical
services configured with a delayed start to give time for the critical
services to start.
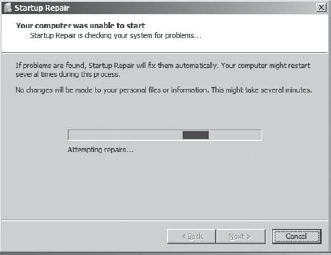
If things go wrong in the boot
phase, they often go wrong here. But if the system crashes during this
phase, Windows 7 will usually recognize the crash and automatically
launch a Startup Repair on the reboot. Figure 2
shows this in action. Windows 7 recognized the system couldn't restart
and launched Startup Repair. If the Startup Repair doesn't start
automatically, you can launch the WinRE and initiate a Startup Repair.
For some problems, you'll see a
stop error instead—the so-called Blue Screen of Death. Don't overlook
the obvious; that is, read the text on the screen. There seems to be
something about these blue screens that paralyzes a lot of people, and
they don't recognize that there is valuable information on these
screens. Often the text will give you insight into exactly what the
problem is, and at other times you can search the Internet for
additional information on the stop code.
If the stop error
indicates the problem is related to a device or driver you just
installed, you can select Last Known Good Configuration (Advanced) from
the Advanced Boot Options menu discussed in the next section.
1.6. Logon Phase
Once the kernel-loading phase has completed, the Winlogon.exe
program starts. The logon screen appears, or if the computer is in a
domain, the Ctrl+Alt+Delete message appears, prompting users to press
these keys to log on.
After a user logs on, the
system is considered to have booted successfully. If a user is not able
to log on, it could be due to an application or process configured to
start when the user logs on. You can boot into Safe Mode and reconfigure
the application or process.
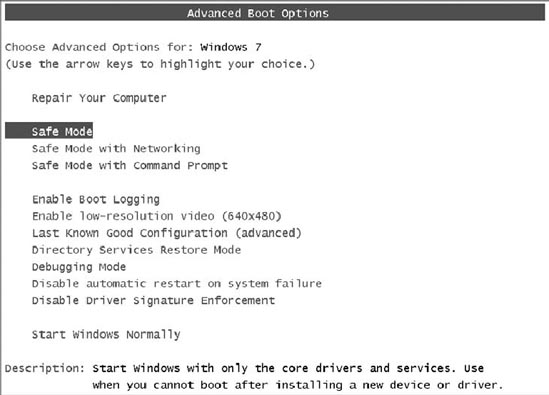
2. Using Advanced Boot Options
The Advanced Boot Options page
includes several choices that you can use to troubleshoot, and if the
system won't boot, this is often a good place to start. You access the
Advanced Boot Options page by pressing F8 as the system boots or by
pressing any key during the Boot Manager phase and then pressing F8.
Figure 3 shows the Advanced Boot Options menu with one of the Safe Modes selected.
We discussed the Repair
Your Computer choice earlier, and it is first in this menu for a
reason—it is often your first choice to resolve a problem with a system
that won't boot. Select this option to launch the WinRE, and select
Startup Repair.
For some other problems, you may want to use the other options available in this menu.
2.1. Safe Modes
The Advanced Boot Options
menu includes three Safe Modes. Safe Mode is used to boot a system with
only the core drivers and services running. The idea is that one of the
drivers or services is causing the system to misbehave, so by accessing
Safe Mode, you can start the system without the errant driver or
service.
Safe Mode
is often valuable when troubleshooting malicious software (malware)
issues. Often malware will protect itself when the operating system is
fully loaded, and it prevents critical malware files from being deleted.
You can usually delete these files in Safe Mode manually or run other
malware scans.
Three Safe Modes are available:
Safe Mode
Only the basic files,
drivers, and services are loaded. This includes drivers for the mouse,
keyboard, disk drives, and basic video.
Safe Mode With Networking
This is the same as Safe Mode, except that it includes the extra drivers and services necessary to access network resources.
Safe Mode With Command Prompt
This is Safe Mode without the GUI. You have access only to the command prompt. It does not include networking resources.
2.2. Other Boot Options
Several other boot options are available from the Advanced Boot options screen:
Enable Boot Logging
This will create a running log of the boot process. The log name is ntbtlog.txt, and it is stored in the Windows
folder. You can use this if you suspect a specific driver or service is
causing the system to blue screen. Enable this, reboot the system, and
then after the system crashes, you can boot into Safe Mode to view the
log. One of the last services or drivers listed in the log is likely the
problem.
Enable Low-Resolution Video (640×480)
This loads the
current video driver but set to a low-resolution mode. Regular Safe Mode
uses only the base video driver. It's possible for some video drivers
to be set to a resolution that causes them to blink out after they've
been configured and confirmed. The obvious solution is to reset the
resolution, but if you can't access the display, you can't reconfigure
the resolution. You can select this mode to access the current video
driver set to a low resolution and then reconfigure the resolution.
Last Known Good Configuration (Advanced)
The Last Known Good Configuration
is recorded in the Registry when the system successfully boots. A
successful boot is defined as someone being able to log on successfully.
If you made changes to a system and then find it crashes or blue
screens on reboot before anyone has logged on, you can select this and
restore the Registry settings for HKEY_Local_Machine\System\CurrentControlSet.
A key part of
understanding the Last Known Good choice is that you can't use it after
someone has successfully logged on. If someone has logged on, you now
have a new Last Known Good Configuration that is recorded in the
Registry.
|
Logging in with Safe Mode is not considered a successful boot and will not overwrite the Last Known Good Configuration.
|
|
Directory Services Restore Mode
This applies only
to servers running Active Directory Domain Services (domain
controllers). It would not be used on a Windows 7 computer.
Debugging Mode
Debugging Mode is used for
advanced troubleshooting purposes. It allows Microsoft personnel to
connect to the computer and determine the cause of a problem but would
rarely be used on a desktop PC.
Disable Automatic Restart On System Failure
If your system is
caught in an endless reboot cycle where it never completes the boot but
instead restarts, you can use this to change the configuration until
you're able to resolve the problem.
Disable Driver Signature Enforcement
This setting
allows drivers containing improper signatures to be loaded. If a driver
has an invalid or missing digital signature that is preventing the
successful boot of Windows 7, you can use this to boot normally and
resolve the problem.
