3. Using MSConfig
The System Configuration utility
(MSConfig) is a useful tool that can be used to modify different system
configuration settings, boot options, and startup options. You can
access it by clicking Start, typing msconfig in the Search box, and
pressing Enter. It's also available in the Administrator Tools section
of the Control Panel. MSConfig has several tabs that can be manipulated.
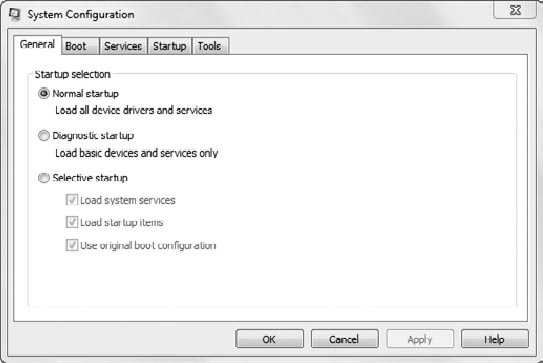
Figure 4
shows the General tab of the System Configuration utility. You can
modify the start of the system. Normal Startup is the default. If you
select Diagnostic Startup, it will start Windows with basic services and
drivers only so that you can rule out basic Windows files as the source
of a problem. Selective Startup allows you pick and choose which
drivers and services will start.
You can modify which
services and applications start from the Services and Startup tabs. Each
service and application that is installed and configured to start
automatically is checked. When you uncheck any of the blocks in Services
or Startup, the Startup Selection will change from Normal Startup to
Selective Startup.
|
Using a Selective
Startup can sometimes be helpful when troubleshooting malware. If the
malware won't allow itself to be deinstalled while it's running or won't
stop, you can deselect the problem application or service in the
Services or Startup tab and reboot the system. The system will run
normally without the malware.
|
|
Figure 5
shows the Boot tab of System Configuration with the Advanced Options.
You can use this to choose one of the Safe Modes without pressing the F8
key to access the Advanced Boot Options. The Make All Boot Settings
Permanent selection will result in the current settings being configured
as a Normal Startup in the BCD store.
If you click the Advanced
Options button, the BOOT Advanced Options page will open. You can limit
the number of processors or the amount of memory used on the next boot.
You can use this to narrow down suspect hardware or simulate the
operation of the system with less hardware.
The last tab is the Tools
tab. This is actually a pretty cool addition to the MSConfig utility. It
provides quick links to several very useful tools.
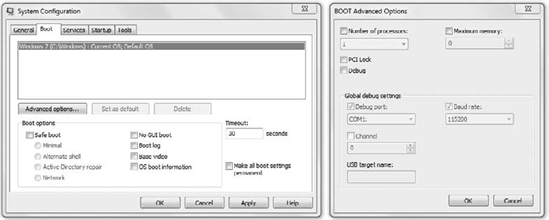
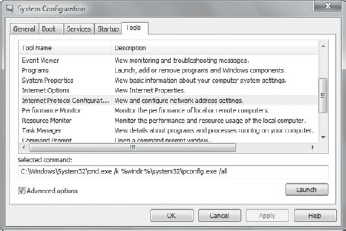
Figure 6
shows the Tools tab. You can select any tool in the list and click the
Launch button to start it. Some tools, like IPConfig shown in the
figure, have advanced options that can be selected.
You can consider this a great
list of tools that you should know both for on-the-job use and for
preparing for Windows 7 certification exams. Start at the top and go
through the entire list until you're familiar with each tool, its
purpose, and how to use it. This tab includes links to the following
tools:
4. Startup and Recovery Options
Another way the BCD store can
be modified is from the Startup And Recovery options page. You can
access this page by selecting the Advanced tab of the System Properties
page. The Startup And Recovery options page is shown in Figure 7.
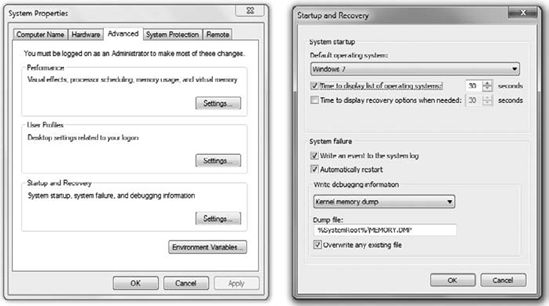
The System Startup section is
most useful if you have a dual-boot or multiboot configuration, where
your system has more than one operating system installed, allowing you
to boot to different operating systems at different times. Here you can
modify which operating system will load by default. You can also modify
how long to wait before loading the default operating system.
The recovery mode setting
will apply only if your system is in recovery mode. Depending on the
recovery procedure occurring, the user may be given a choice, or the
system may launch into a single recovery option.
Setting the time to 0
seconds for any of these options will result in the default choice
launching without giving the user an option.
System Failure settings are at the bottom of this page. The available choices are as follows:
Write An Event To The System Log
This allows you to use the Event Viewer later to view the details of the event.
Automatically Restart
When this option is checked, the system will attempt to reboot if a fatal error causes it to crash before the boot completes.
Write Debugging Information
You can select None, Small Memory Dump (128 KB), or Kernel Memory Dump. The default location and filename are shown (c:\memory.dmp),
but they can be modified. In order to create this dump file, you need
to have two things in place: The paging file must be located on the same
drive as the operating system, and this drive must have enough space to
hold the dump file. The dump file can be as large as 50 percent of the
physical RAM, so if you have 6 GB of RAM, the target drive must have at
least 3 GB of free space. You can modify the default behavior of the
dump file by modifying the registry. This KB article shows how: http://support.microsoft.com/kb/969028.
